
Patagonia’s Torres del Paine, Chile & Bariloche, Argentina
I visited Torres del Paine, Chile from 11/6- 11/16 (2025) and then flew to Bariloche, Argentina where I stayed from 11/17- 11/23.
Table of Contents:
The Basics
Torres del Paine: Activity #1: The Hike to the Base of Torres del Paine
Torres del Paine: Activity #2: Puma Trekking in Torres del Paine
Torres del Paine: Activity #3: Torres del Paine by Car
Torres del Paine: Activity #4: The French Valley
Bariloche: Day 1: Circuito Chico Scenic Loop Drive
Bariloche: Day 2: Bariloche Half Day
Bariloche: Day 3, Maybe 4 for Others: The Arraynanes Forest & Villa La Angostura
Bariloche: Day 4, Maybe 5 for Others: Ruta de los Siete Lagos (The Route of the Seven Lakes) & San Martin de los Andes
The Basics
Border Entry: Make sure to double check to be safe, but you shouldn’t need more than a Passport to enter Argentina and Chile.
Vaccines: No specific vaccines are required to visit these regions of Argentina and Chile.
Best Time of Year to Visit:
Torres del Paine: The best time to visit Torres del Paine, Chile is summer (Dec– Feb) for the warmest weather and longest daylight hours, or autumn (Mar– May) for fewer crowds and beautiful fall colors, though some routes may close in May. Spring (Oct– Nov) is also a great option with wildflowers and wildlife, while winter (Jun–Aug) is best for experienced travelers who want to see snow-covered landscapes and can handle a high number of trail closures. I chose the shoulder month of November in hopes of getting lucky with the weather while also avoiding crowds.
Bariloche: The best time to visit Bariloche depends on your interests: summer (Dec– Feb) is ideal for warm-weather activities like hiking and boating, while winter (Jun– Sept) is best for snow sports like skiing. For beautiful scenery with fewer crowds, consider visiting in the shoulder seasons of spring (Oct– Nov) or autumn (Mar– May). Similar to Torres del Paine, I chose the shoulder month of November in hopes of getting lucky with the weather while also avoiding crowds.
Visit Duration:
Torres del Paine: Assuming you’re on full vacation mode and not working, I recommend staying for 7-8 days in case of inclement weather which can be very unpredictable and will likely occur.
Bariloche: You might only need 2-3 days to see everything that Bariloche offers, but you’ll also want to explore the resort towns of Villa La Angostura and San Martin de Los Andes. That said, I’d recommend 5-6 days if budget and time permits.
Flights: I recommend starting farthest south in Torres del Paine and working your way north to Bariloche to make your flight home shorter. Most visitors fly into Puerto Natales with a layover in Santiago. When flying from Puerto Natales to Bariloche, you should expect at least 1 layover (typically Buenos Aires) and a full day of traveling. I would also be sure to give yourself at least 3 hours minimum between your flight from Puerto Natales and your first layover because weather delays are very common out of Puerto Natales.
Weather:
Torres del Paine: No matter what time of year, the weather can be very unpredictable so you should bring clothes for all seasons. It could be a warm day in Puerto Natales but much colder in the park, especially if you plan to do some of the more advanced hiking trails. Keep in mind, their summer might feel like winter to most Americans. Overall, most days are a mix of clouds and sun with light rain during November. If sun is in the forecast, do not hesitate to take advantage because it may not happen again during your trip. I was very lucky because the first weekend was perfectly sunny weather, but it became very erratic during the latter half of my stay.
Bariloche: On the other hand, you can look forward to sunny skies and warm temperatures for most of your time in Bariloche. However, you’ll still need a jacket in the early mornings.
Accommodations:
Torres del Paine: Puerto Natales is the main hub when visiting the park— it’s then a ~1.5 hour drive to the park entrance. Most visitors rent an Airbnb, but hotels are plentiful as well. I chose to stay at the Etnias Apartments which included 2 beds/3 baths and only a short walk to the city center. There are also accommodation options closer to the park and even inside the park itself. However, 1) there are no grocery stores or restaurants nearby and 2) many of the hotels are outrageously expensive. That said, finding an accommodation in Puerto Natales is the safe bet for first timers + you can enjoy the local shopping, coffee shops and bars in your free time. For those looking to splurge, check out The Singular, a luxury hotel in Puerto Bories— it’s very expensive, but an experience in itself. Even if you don’t stay there, I recommend finding some time to make a quick cocktail visit.
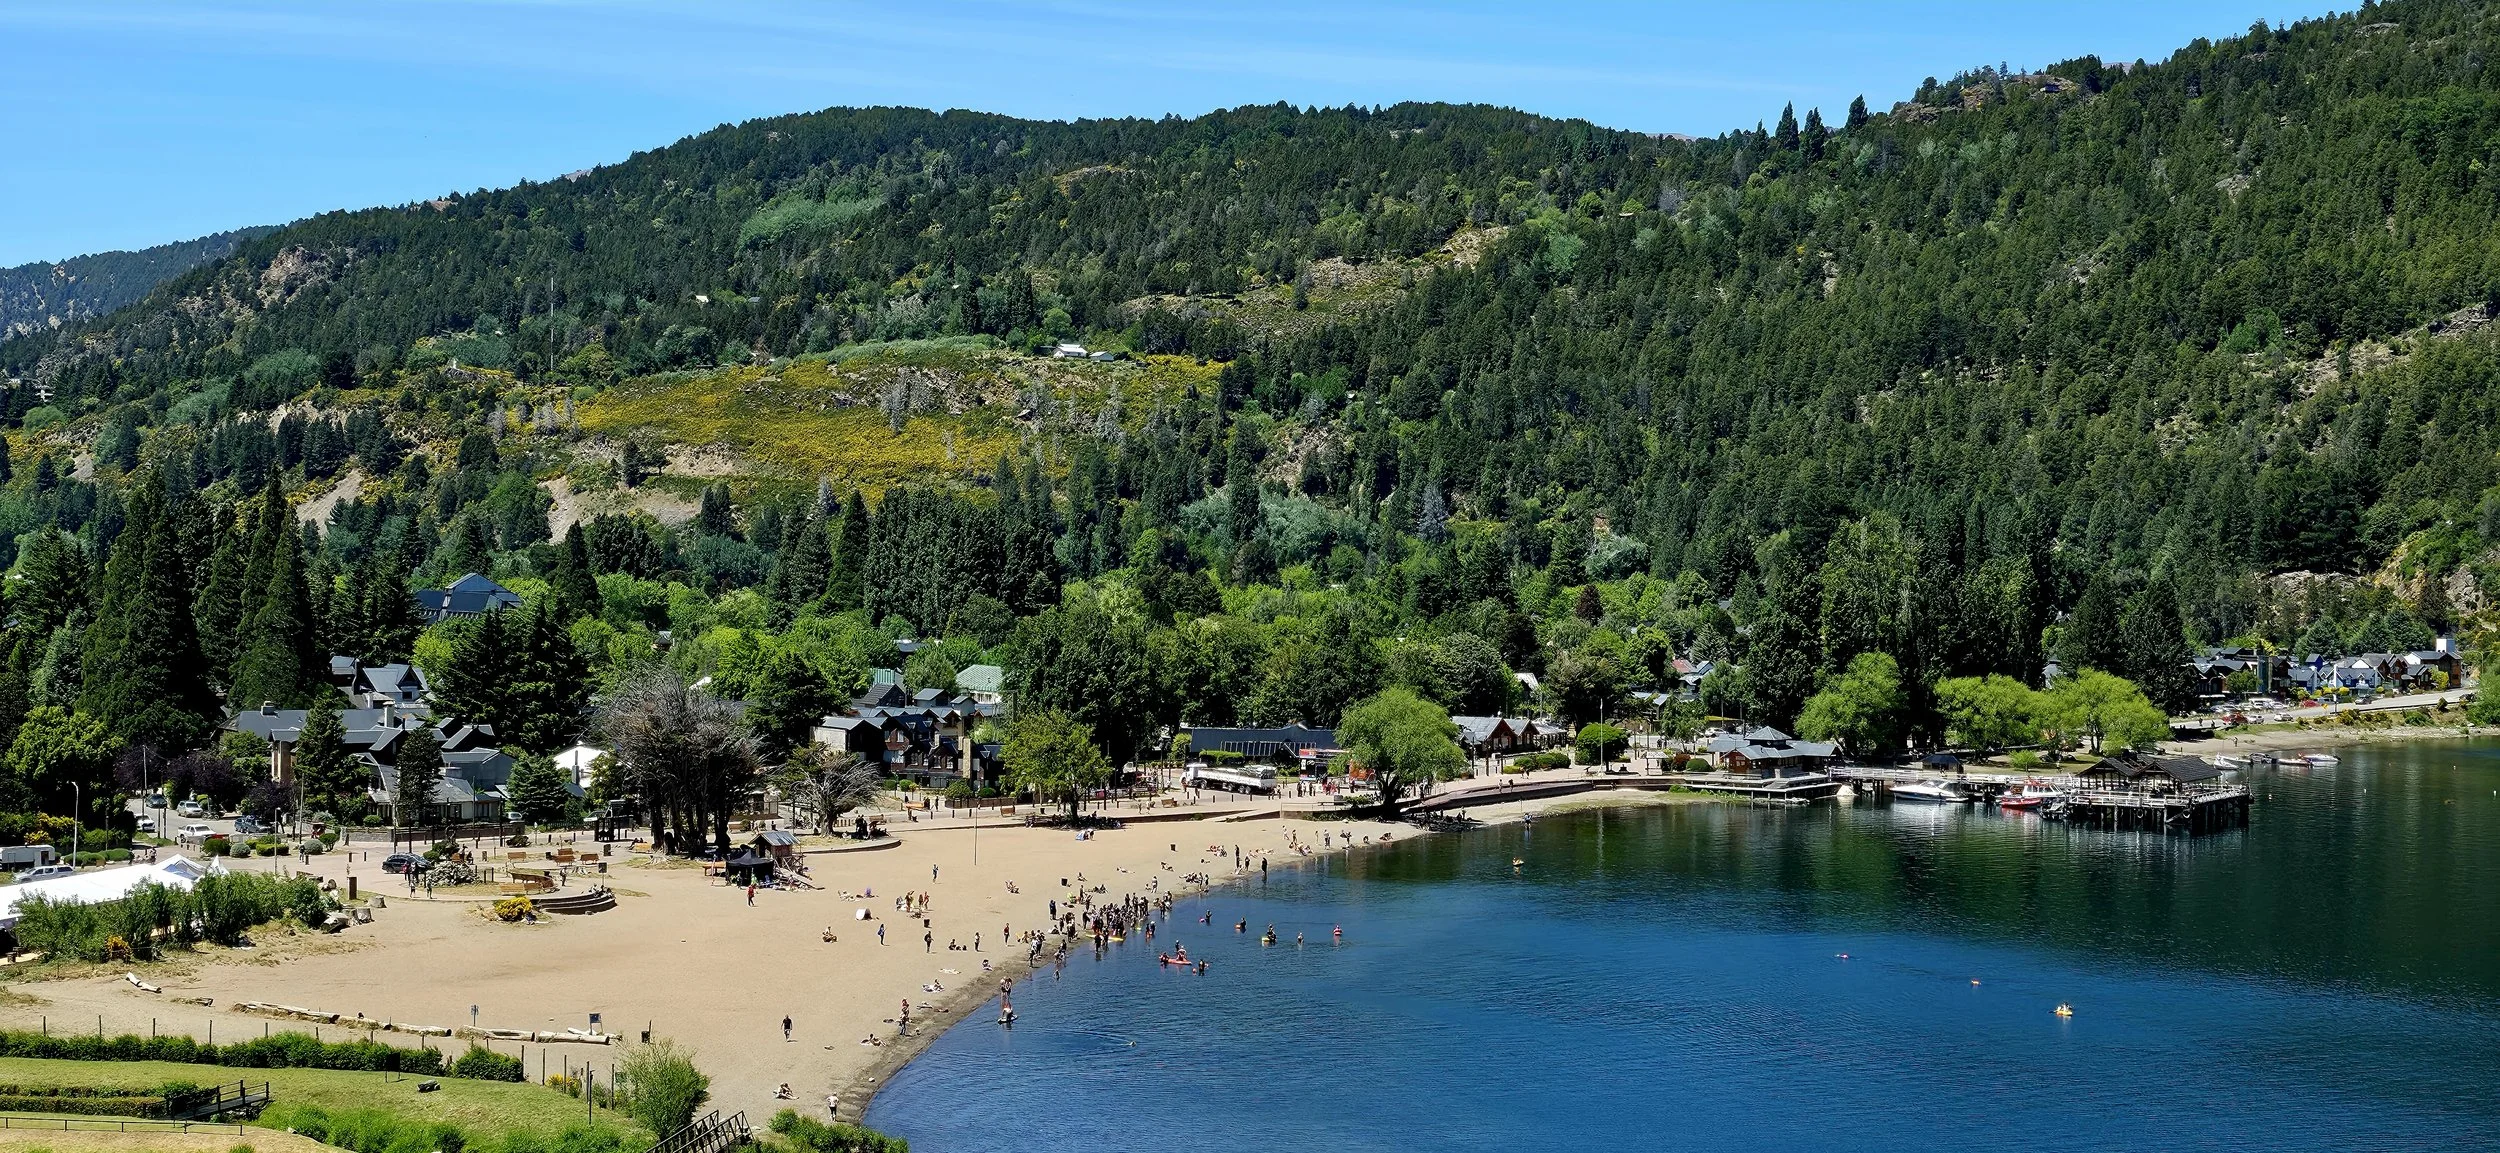
Bariloche: To be honest, Bariloche’s city center (Calle Mitre & Civic Center) is nothing to brag about. It’s loaded with tour agencies, chocolaterias, coffee shops and subpar restaurants and shopping. The trendier part of town begins just west of the city center off Avenue Bustillo. The scenic lakeside road that extends all the way to the legendary Circuito (Circuit Route) is lined with fashionable and upscale boutique hotels, restaurants, chocolaterias, cervecerias and more, many of which come with an amazing lakeside view. During the summer months, the locals flock to the small beaches which can often increase traffic. I stayed at the Alma del Lago Suites & Spa off Bustillo, just west of the city center, yet still only a 10 minute walk to Calle Mitre. The views were great and the hotel included many amenities like a pool, gym, spa, cocktail lounge, complimentary breakfast and more.
Costs: With the exception of potential high flight costs due to the travel distance, I found both Chile and Argentina to be reasonably affordable.
Transportation:
Torres del Paine: Many visitors rely on their tour companies for transportation to and from the park. Additionally, renting a car is not necessary for food and shopping if you’re accommodation is in Puerto Natales. That said, I still highly suggest renting a car to do the excursions at your own pace. For example, it’s beneficial to start many of the famous hikes in the wee morning hours to catch the sunrise and to avoid large crowds, which is not possible without a car— you will thank me later. Furthermore, you will have more free time to explore later in the day and possibly visit other areas of Patagonia that wouldn’t be possible without a vehicle. If you decide to rent, I would strongly recommend booking well in advance because inventory moves quickly.
Bariloche: Renting a car in Bariloche is a necessity in my opinion. Similar to Torres del Paine, you can get by without a car, but I think most younger people will regret it. You’ll want to be on your own time when touring the Circuit Route, Ruta de Los Siete Lagos and many of the other attractions mentioned later in the blog.
A few more pointers to make note of include;
Make sure the vehicle’s oil is at a healthy level before leaving the rental location and that you know how to change a tire, especially in Torres del Paine where it’s common to journey on rock roads.
No toll-passes are necessary in either location.
Make sure to purchase insurance (especially in Torres del Paine) for the same reason mentioned above.
Rideshare Apps:
Torres del Paine: Uber and Didi are available and you can use them to get around the city or go to nearby destinations like Torres del Paine. If you are not familiar with Didi, it’s used in many Latin American countries and could be even more economical. Lastly, taxis are also very common in Puerto Natales and safe for tourists, but you’re not going to find them near the park.
Bariloche: Uber is the most common rideshare app. Although Didi is widely used across Argentina, it doesn’t currently operate in Bariloche.
Groceries: For me, it can be difficult to eat healthy in this part of the world, but hopefully some of the following ideas will help you feel your best!
Torres del Paine: There are two main grocery store chains in Puerto Natales, Unimarc and Superfrut, and neither offers Whole Foods quality products, or even Safeway for that matter. Unimarc is larger and more crowded, mostly because of its’ central location. However, it lacks quality and the checkout lines can often take ~30 minutes. Superfrut is a few blocks from Unimarc and is slightly smaller, but has more organic options and quicker checkouts. While these are the two most recognized in the area, there are many other boutique options including fruterias and carnecerias. Additionally, I was lucky to find a few hidden gem cafes that offered super healthy and delicious options including Hablemos Coco and La Ensaladeria.
Bariloche: Similar to Puerto Natales, it’s tough to find quality grocers, but Bariloche is still closer to the United States. Supermercados Todo is widely recognized as the “go-to” grocer with many locations throughout the city and surrounding neighborhoods. Trying to find healthy restaurants was a big challenge for me, but I’m sure they exist if you put in the research.
Fitness Centers:
Torres del Paine: It’s highly unlikely that your accommodation will include a fitness studio on site. However, ExtraFit is a ~10 minute walk from the city center. It’s the largest and most complete gym with easy parking in Puerto Natales. If you’re crazy like me and planning to be in Puerto Natales for 1-2 weeks, you might want to consider purchasing your own exercise equipment at the Nuevo Mall Chino Luz del Oriente (no website available). That said, they only offer something like 3, 5, 8 and 12lb weight options, but something is always better than nothing!
Bariloche: You’ll find a lot of gym options in Bariloche, especially in the city center. Located on Calle Mitre, SportClub del Turista appeared to be the most bustling and trendy place to be. On the other hand, I spent most of my time using the hotel gym.
Wi-Fi: Connections are solid in Puerto Natales and Bariloche, and typically very dependable in most nearby towns. However, you will lose reception within 15-20 minutes after leaving these areas, especially Puerto Natales.
Wildlife:
Torres del Paine: The wildlife in Puerto Natales is nonexistent with the exception of stray dogs like many Central and South American cities. However, once you begin the drive to Torres del Paine, you will need to focus more attention to the road, especially during the early morning hours. The main road to Torres del Paine is littered with thousands of hares (large rabbits) that consistently dart across the roads— it’s almost like a real-life video game. The hares are most active during the overnight hours since it’s easier to avoid predators. As you approach the park, you’ll need to become even more alert for guanacos hanging out by the roads, wild South American camelids, relatives of the llama, known for their slender bodies and long necks. Furthermore, there is a large puma population in the region (even outside the park), but they are rare to spot unless you’re on a puma tracking tour (more to come below). Even so, the park recommends that you avoid running on the trails since pumas often mimic the behavior of regular cats. General rule of thumb, if you see a large group of guanacos, there could be a puma lurking. Overall, you’ll likely experience many more animals and birds, but the puma and guanaco are the two that create the most excitement among most visitors.
Bariloche: Contrary to Torres del Paine, there isn’t much exotic wildlife in Bariloche to brag about. Pumas still exist in the region, but they are even more difficult to spot than in Torres del Paine.
Random Recommendations:
Through my travels, I’ve learned a few tricks along the way. One of them being, always book the most exciting excursions EARLIER in your trip, or anything that can be impacted by weather for that matter. That way, you can always reschedule the activity to another day if needed. Similarly, have backup options ready for those activities that could potentially get canceled.
If you’re willing to spend a little more money for efficiency purposes, I recommend booking your accommodation in Torres del Paine and Bariloche without any gaps— in other words, do not checkout of your accommodations when traveling to other places for a night or two. You’ll save a ton of time and stress by not having to constantly check in/check out, pack/unpack, reacclimate yourself to a new home, etc.
Torres del Paine, Chile
Now, moving on to the part that is most exciting. I’ve broken up Torres del Paine into a few sections, with each section covering a different activity. Note, the activities are listed in priority from top to bottom, and purely my own opinion.
Activity #1: The Hike to the Base of Torres del Paine
The hike to the Base of Torres del Paine is the most famous “day hike” in the park, followed by the French Valley. I strongly suggest prioritizing this hike and planning it when the weather looks most promising. Windguru is the most accurate website for tracking weather inside the park. Keep in mind, the weather in Puerto Natales can be completely different than Torres del Paine. Purchasing a park pass is required and can be bought at the park entrance or online. Buying online will allow you to enter the park 24-7 rather than having to wait for the visitor’s office to open at ~8:30am. Now that you’ve secured 24-7 access, you definitely want to start the hike no later than 5am in order to capture the sunrise and avoid large crowds later in the day— this means that you should depart Puerto Natales at 3am to be safe. The hike takes most visitors ~8 hours to complete roundtrip. The temperature will likely be very cold during the early morning hours of your hike (~40 degrees) and then gradually become warmer as the day progresses (~60- 70 degrees). However, the temperature will drop like a stone once you reach the summit and you won’t last more than 15 minutes without a hat and gloves (even during summer). That said, make sure to wear multiple layers since you can always remove them along the way.
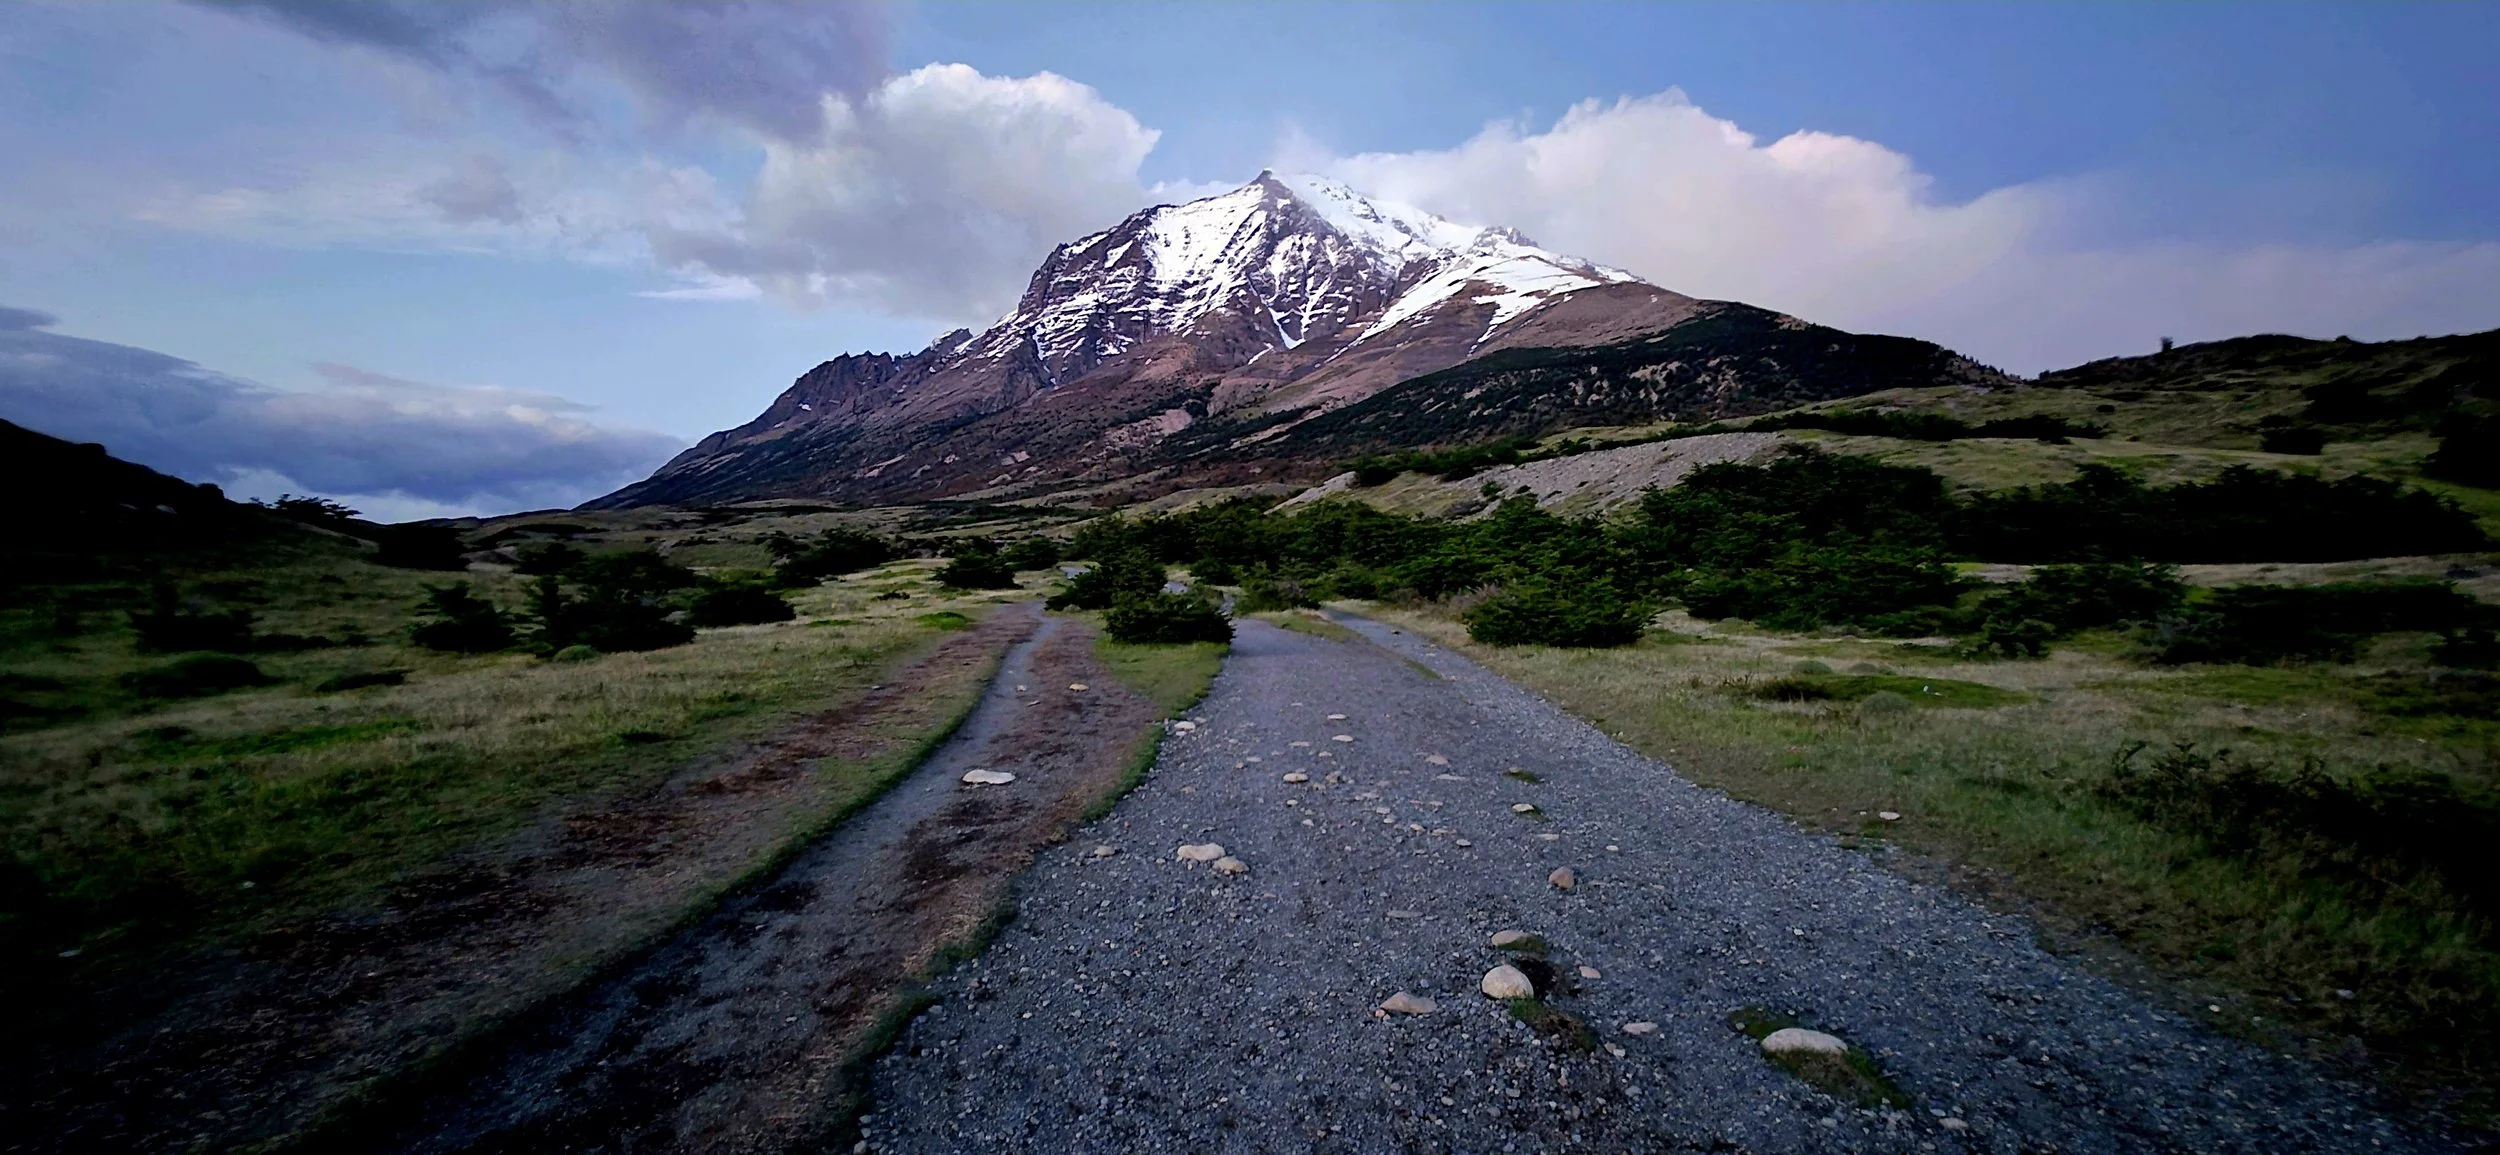
If you have a car, I recommend doing the hike without a tour guide since the path is well marked. If you feel more comfortable with a guide, I suggest booking Javier’s tour on ToursByLocals— but be warned, he’s a machine. To reach the trailhead, I would park in one of the lots near Hotel Las Torres Patagonia and then it’s a ~1 km walk to the trailhead. The photo of the mountain above shows the trailhead directly after walking passed the hotel.
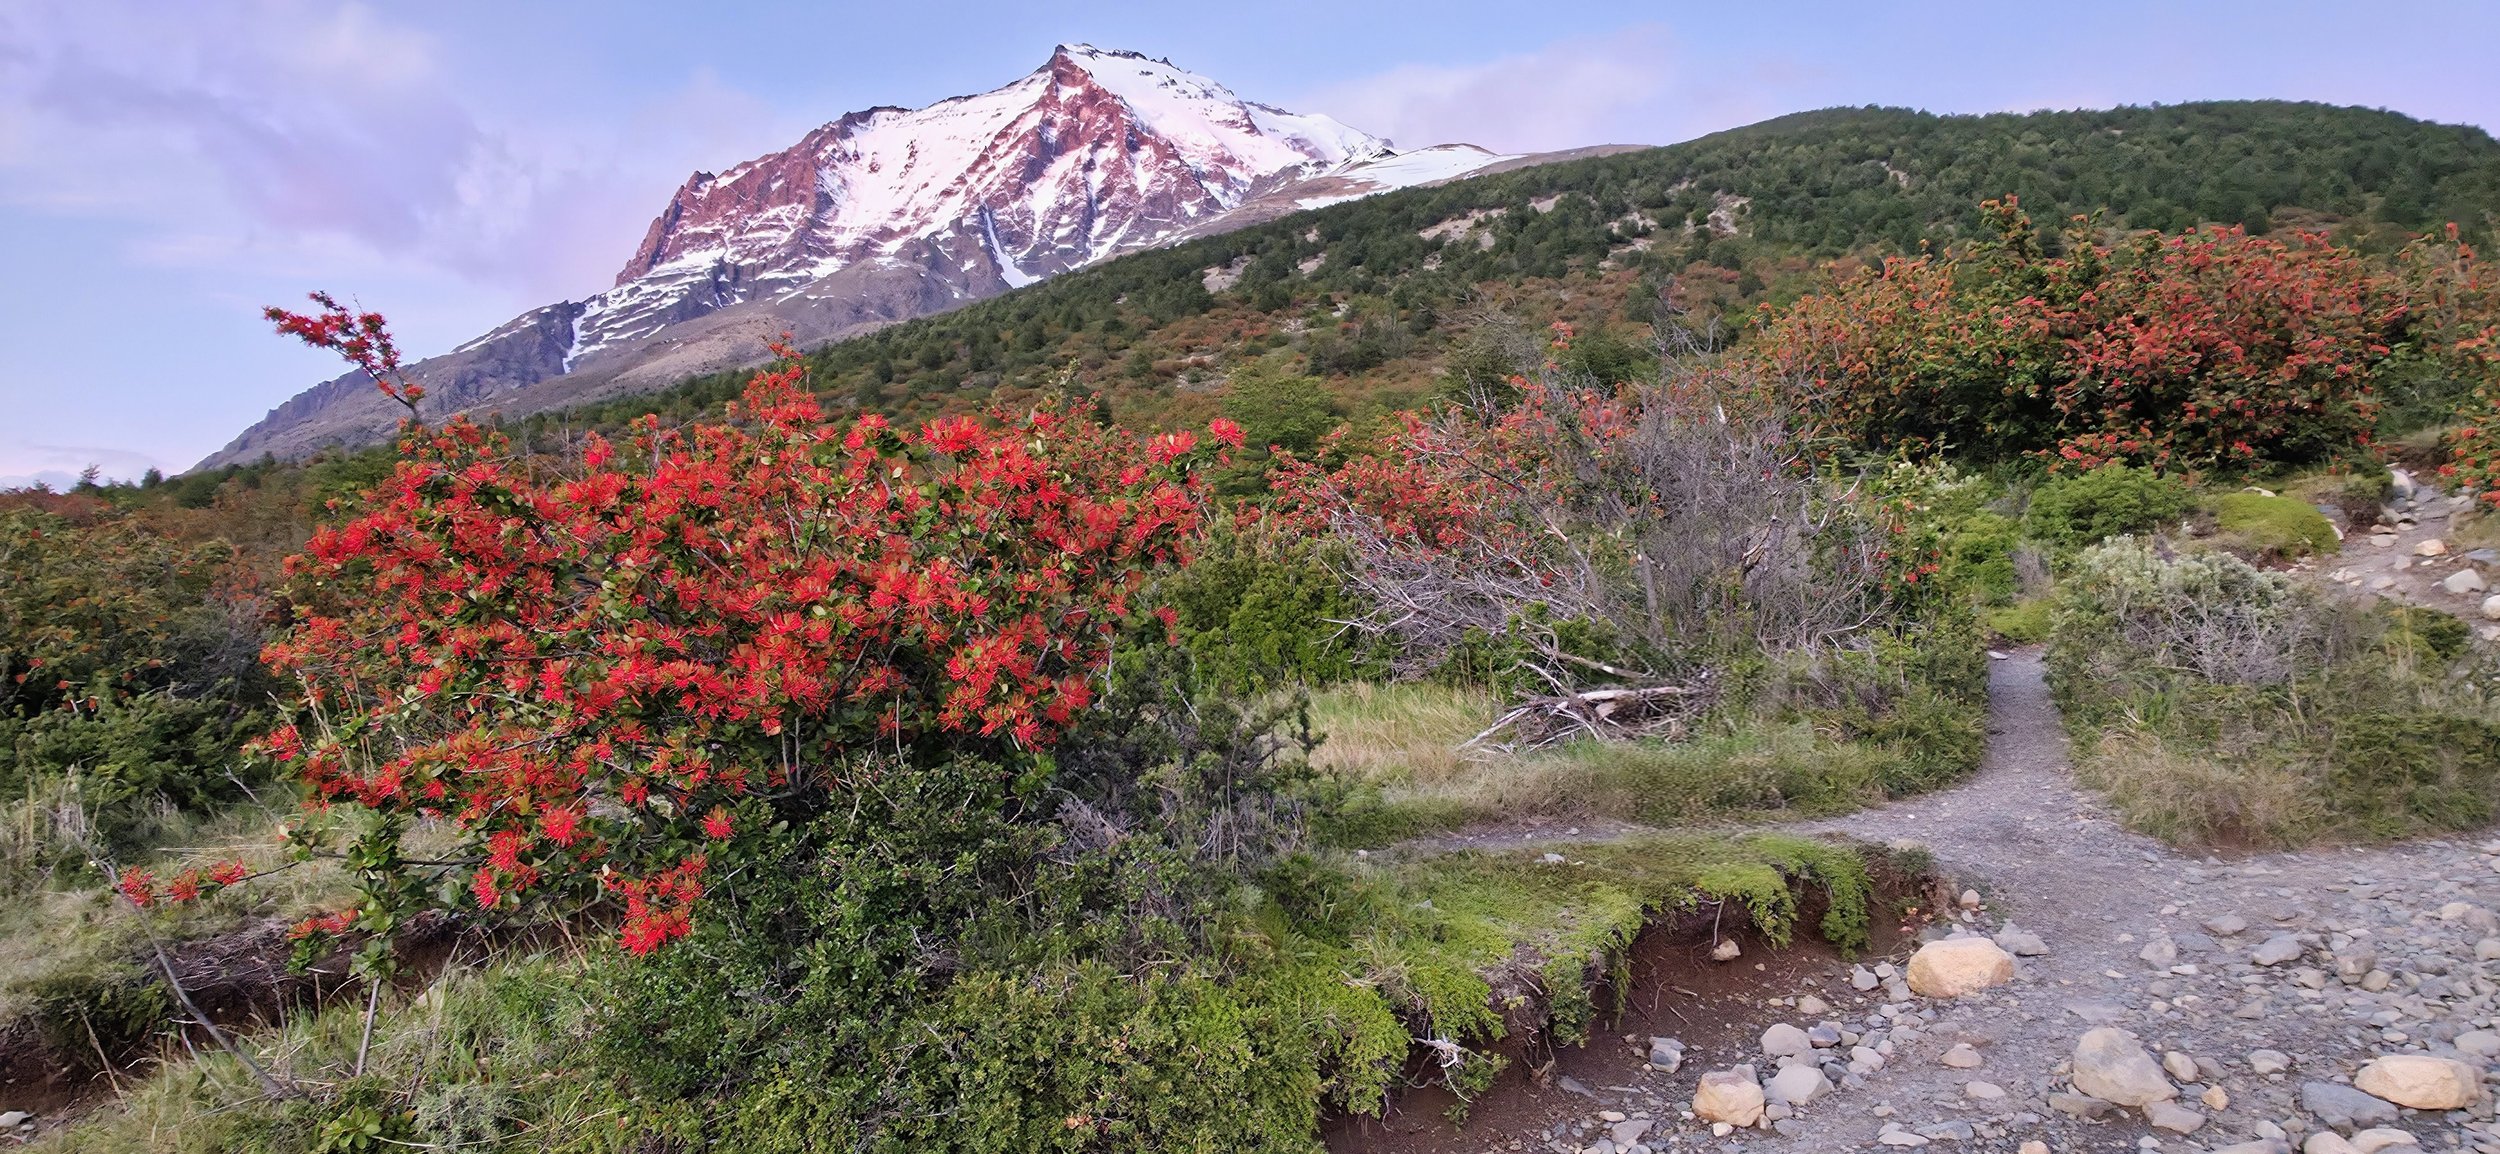
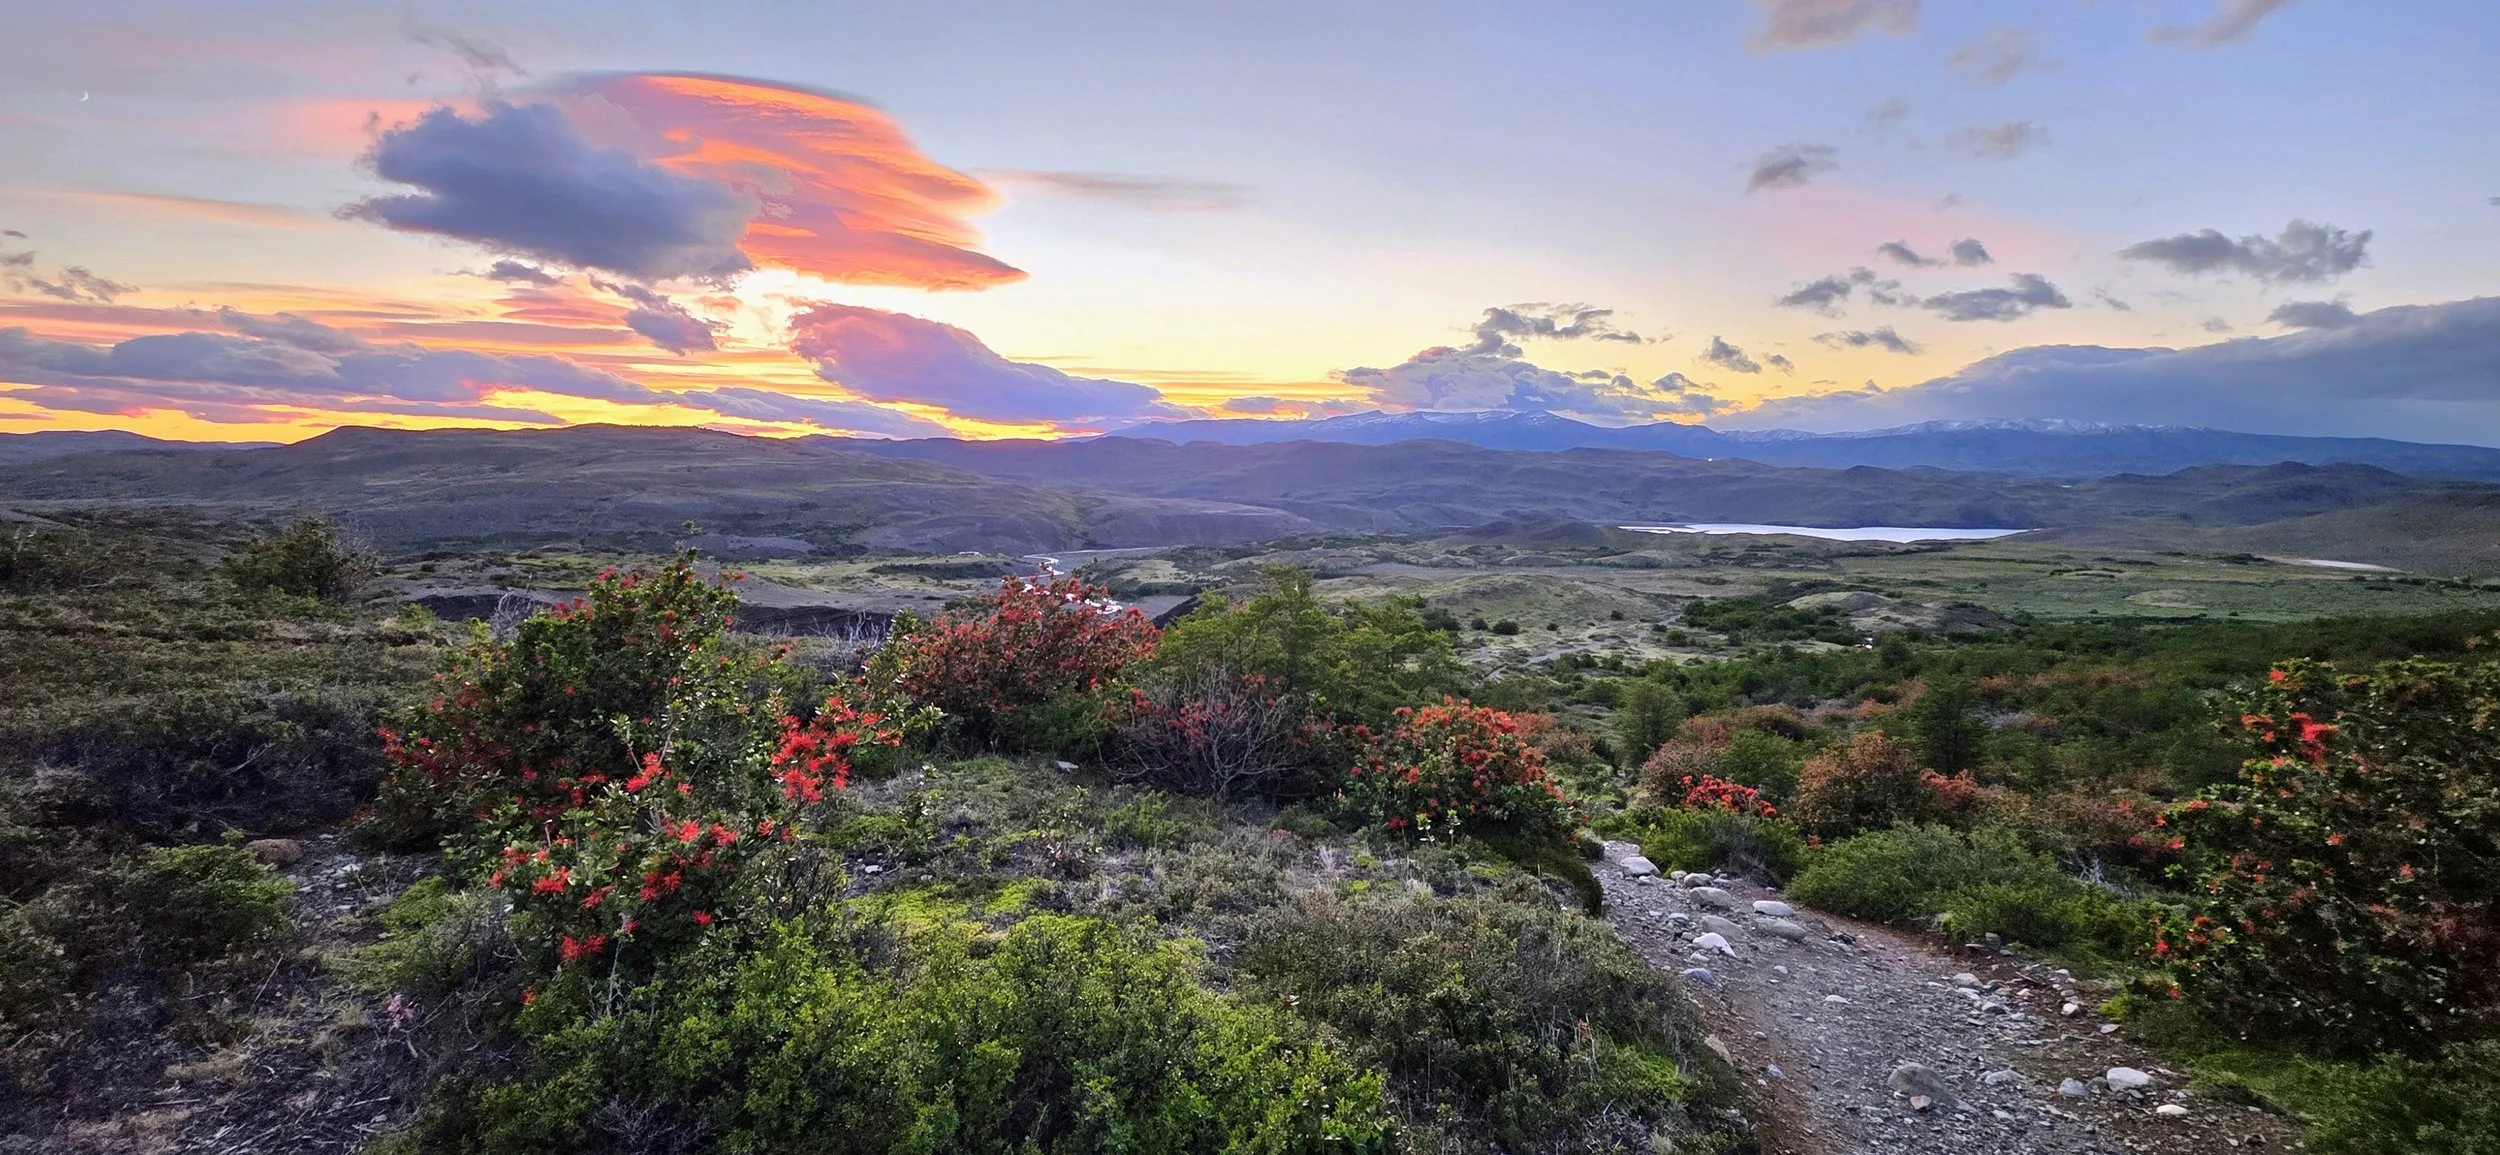
The first hour is mostly uphill and can be a bit challenging if you’re not in great shape. However, you’ll be rewarded with a few epic photo opportunities as the sun reflects off the mountains at sunrise. These two photos were taken ~45 minutes into the climb. Don’t forget to stop and look backwards from time to time because many of the best photos are behind you.
Once you reach the top of the hill and the terrain starts to plateau, you will enter a strong wind tunnel that might last for up to 10 minutes. The view is fantastic (photo above), but the trail is also narrow so be cautious of these obstacles. Shortly after the wind tunnel, you will descend for ~45 minutes through a forest and river before reaching “base camp.” This is a widely popular camping ground where you can take a short rest break. However, don’t wait too long because you’ll want to stay ahead of the crowds.
The photo above was taken from the bridge above the river, just before base camp. Fast forwarding things a little bit, you’ll spend the next hour traversing up and down through forest landscapes before approaching the final ascent. You might now see a lot of people returning from the opposite direction at this point, but don’t be alarmed. These are hikers that either started ~1am or slept at base camp and had a head start— most of them will be gone by the time you reach the summit. Upon breaking into daylight, take a break and buckle up, the most grueling leg of the excursion is about to commence.
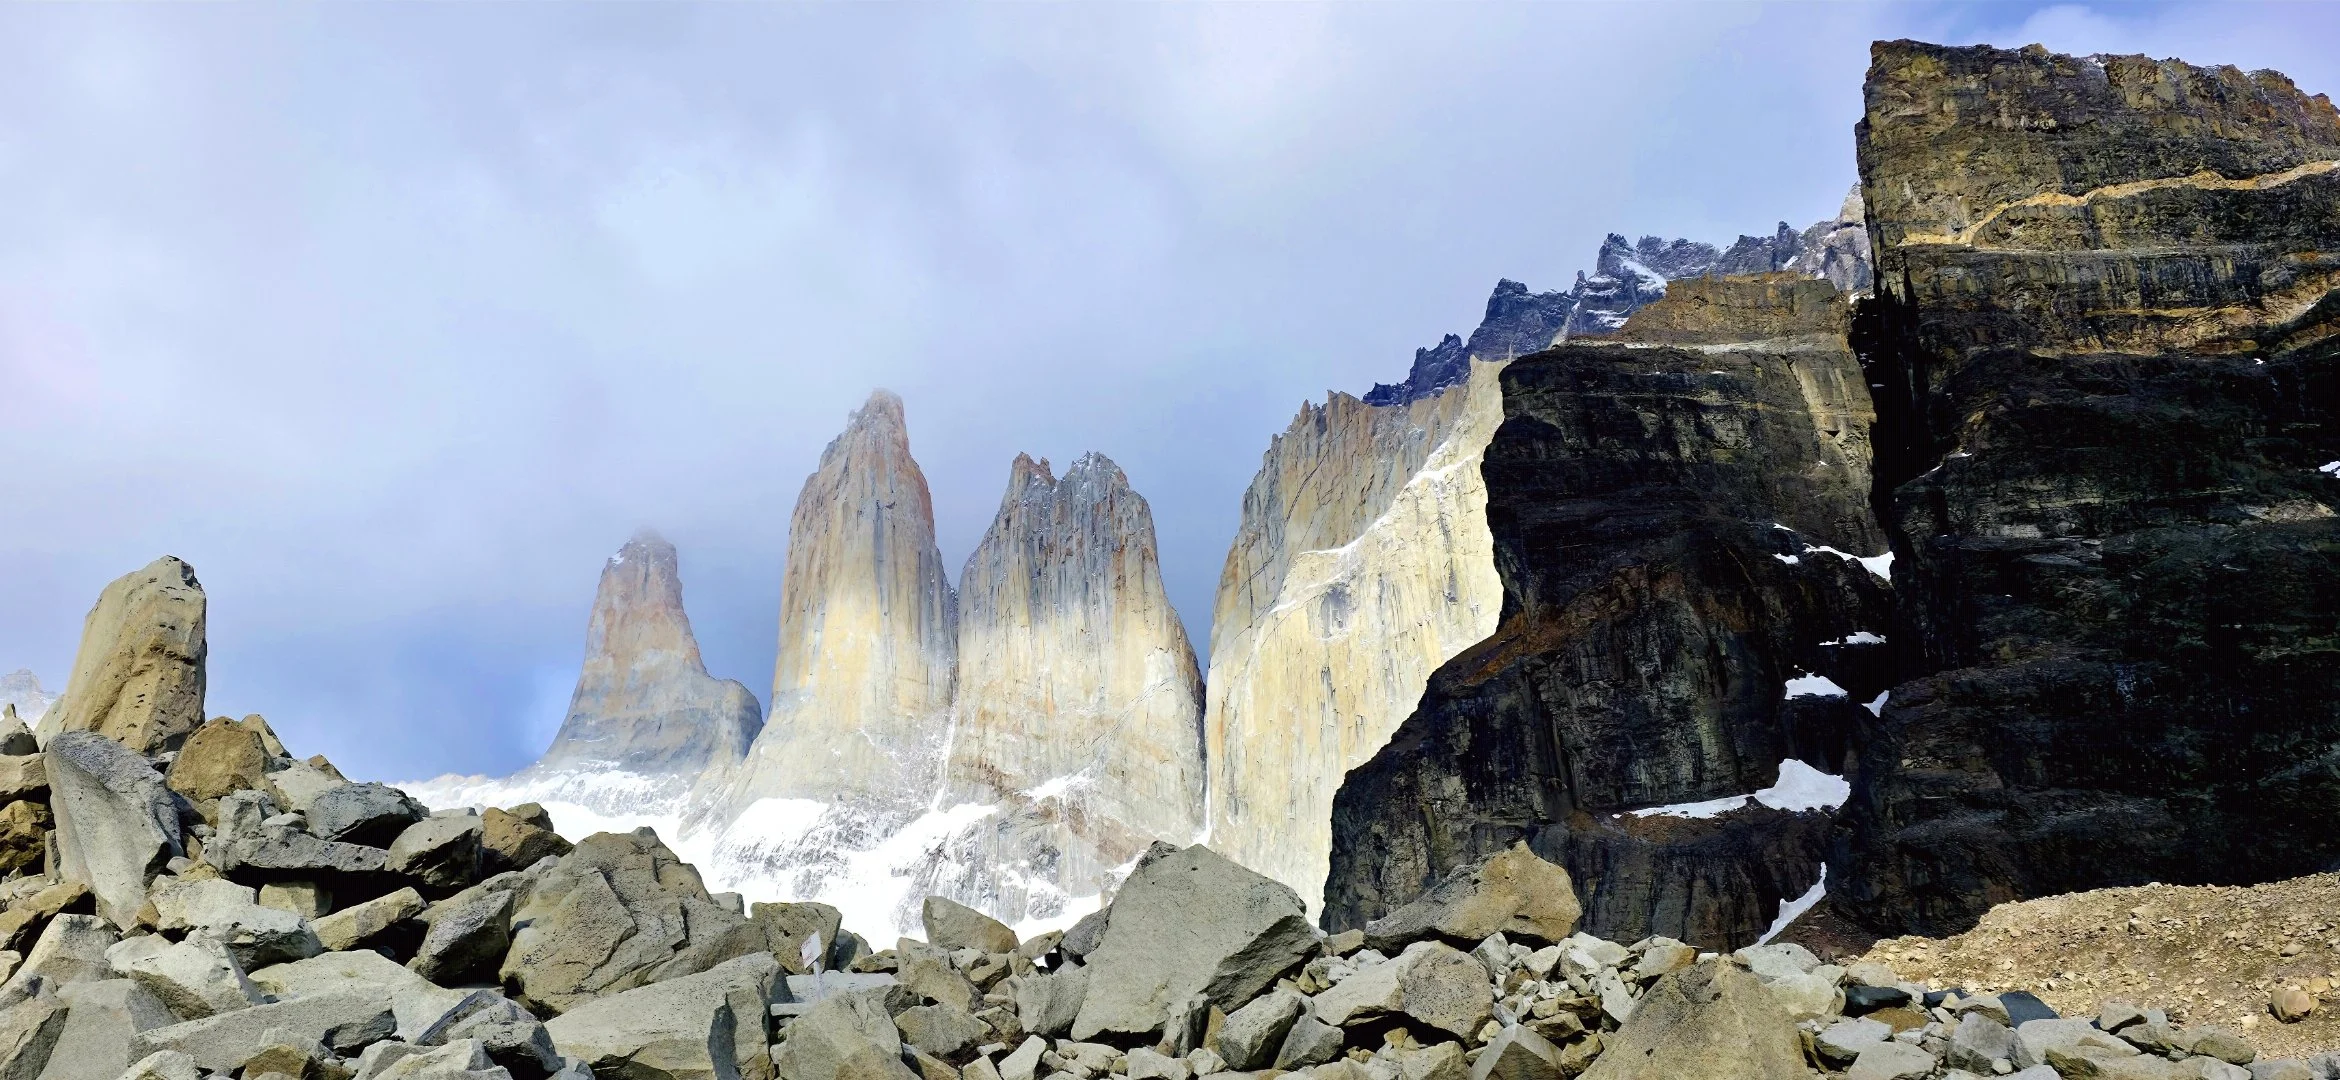
For the last hour, you’ll be climbing very rocky and steep terrain while at the same time, the temperature will begin to plummet, and the air will become thinner. It probably won’t feel overly cold at first because of your constant movement, but it will eventually hit once you break at the summit. About ~5 minutes before reaching the lake, make sure to keep looking up and you’ll spot the view in the photo above. Don’t hesitate to start snapping photos if you’ve got a clear view of the towers because the clouds can roll-in at any given moment— it happened to me.

Before you know it, you will be rewarded with one of the most epic views in the world and a surge of joy will breathe new life into your body. Do not wait to get your photos because your body will begin to go numb after ~20 minutes and more people will be arriving soon. Quickly walk down to the lake and you’ll find a few large boulders to act as seating for your photos. I would suggest walking along the ridge of the lake to capture the different angles as well.
The return hike back to your car should be much quicker since it’s mostly downhill. You might also see many large groups of hikers just beginning their trek to the summit and you’ll realize that waking up at 2am in hopes of having the entire lake to yourself, was worth the struggle!
Activity #2: Puma Trekking in Torres del Paine
If you’re seeking a more unique and adventurous activity, puma trekking should be the second priority on your list. Without a professional guide, your odds of seeing a puma on your own are close to zero. There are multiple tour companies that claim to offer this excursion, but only a few that actually have permission to access the Estancia where many of the pumas call home. I recommend hiring Leona Amarga Expeditions since they were the most responsive and they offered more flexible options including 1-day and 2-day tours. I paid extra money for a private tour so that I could be on my own time. One cool thing about the Estancia is that they only allow up to 10 guests at any given time so that it doesn’t feel like a zoo. Just to be clear, the Estancia does not own the pumas, and they are free to roam all over the park. It just so happens that many pumas prefer the Estancia’s vegetation as a home. Honestly, one day is all you need unless you’re obsessed with pumas. The tour is typically broken up into morning and evening sessions since that’s when pumas are move active. Since I had a few close encounters early in the morning, I decided to go for 6 straight hours in order to have the rest of the day to explore the park.
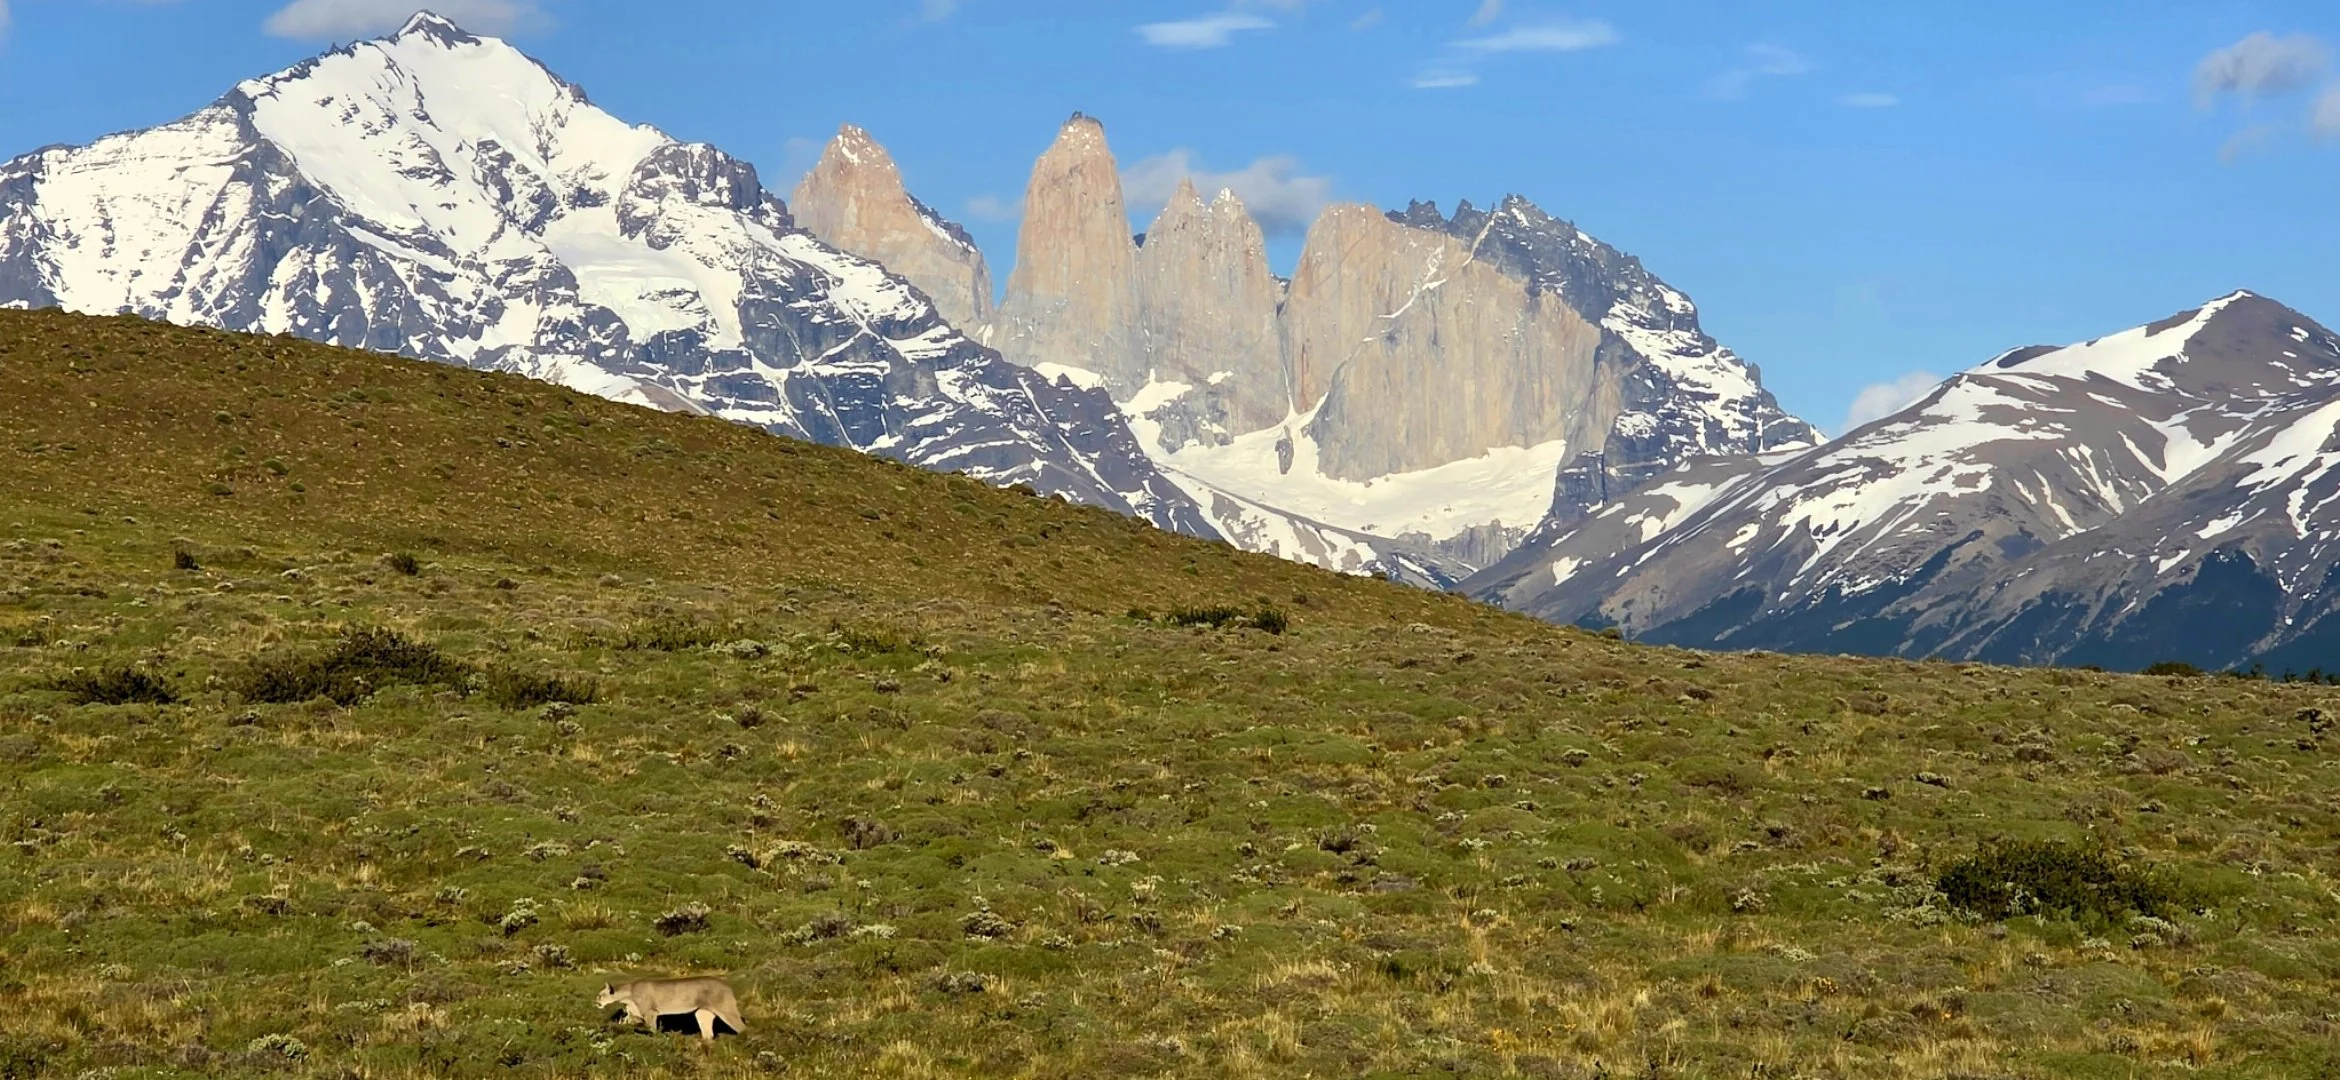
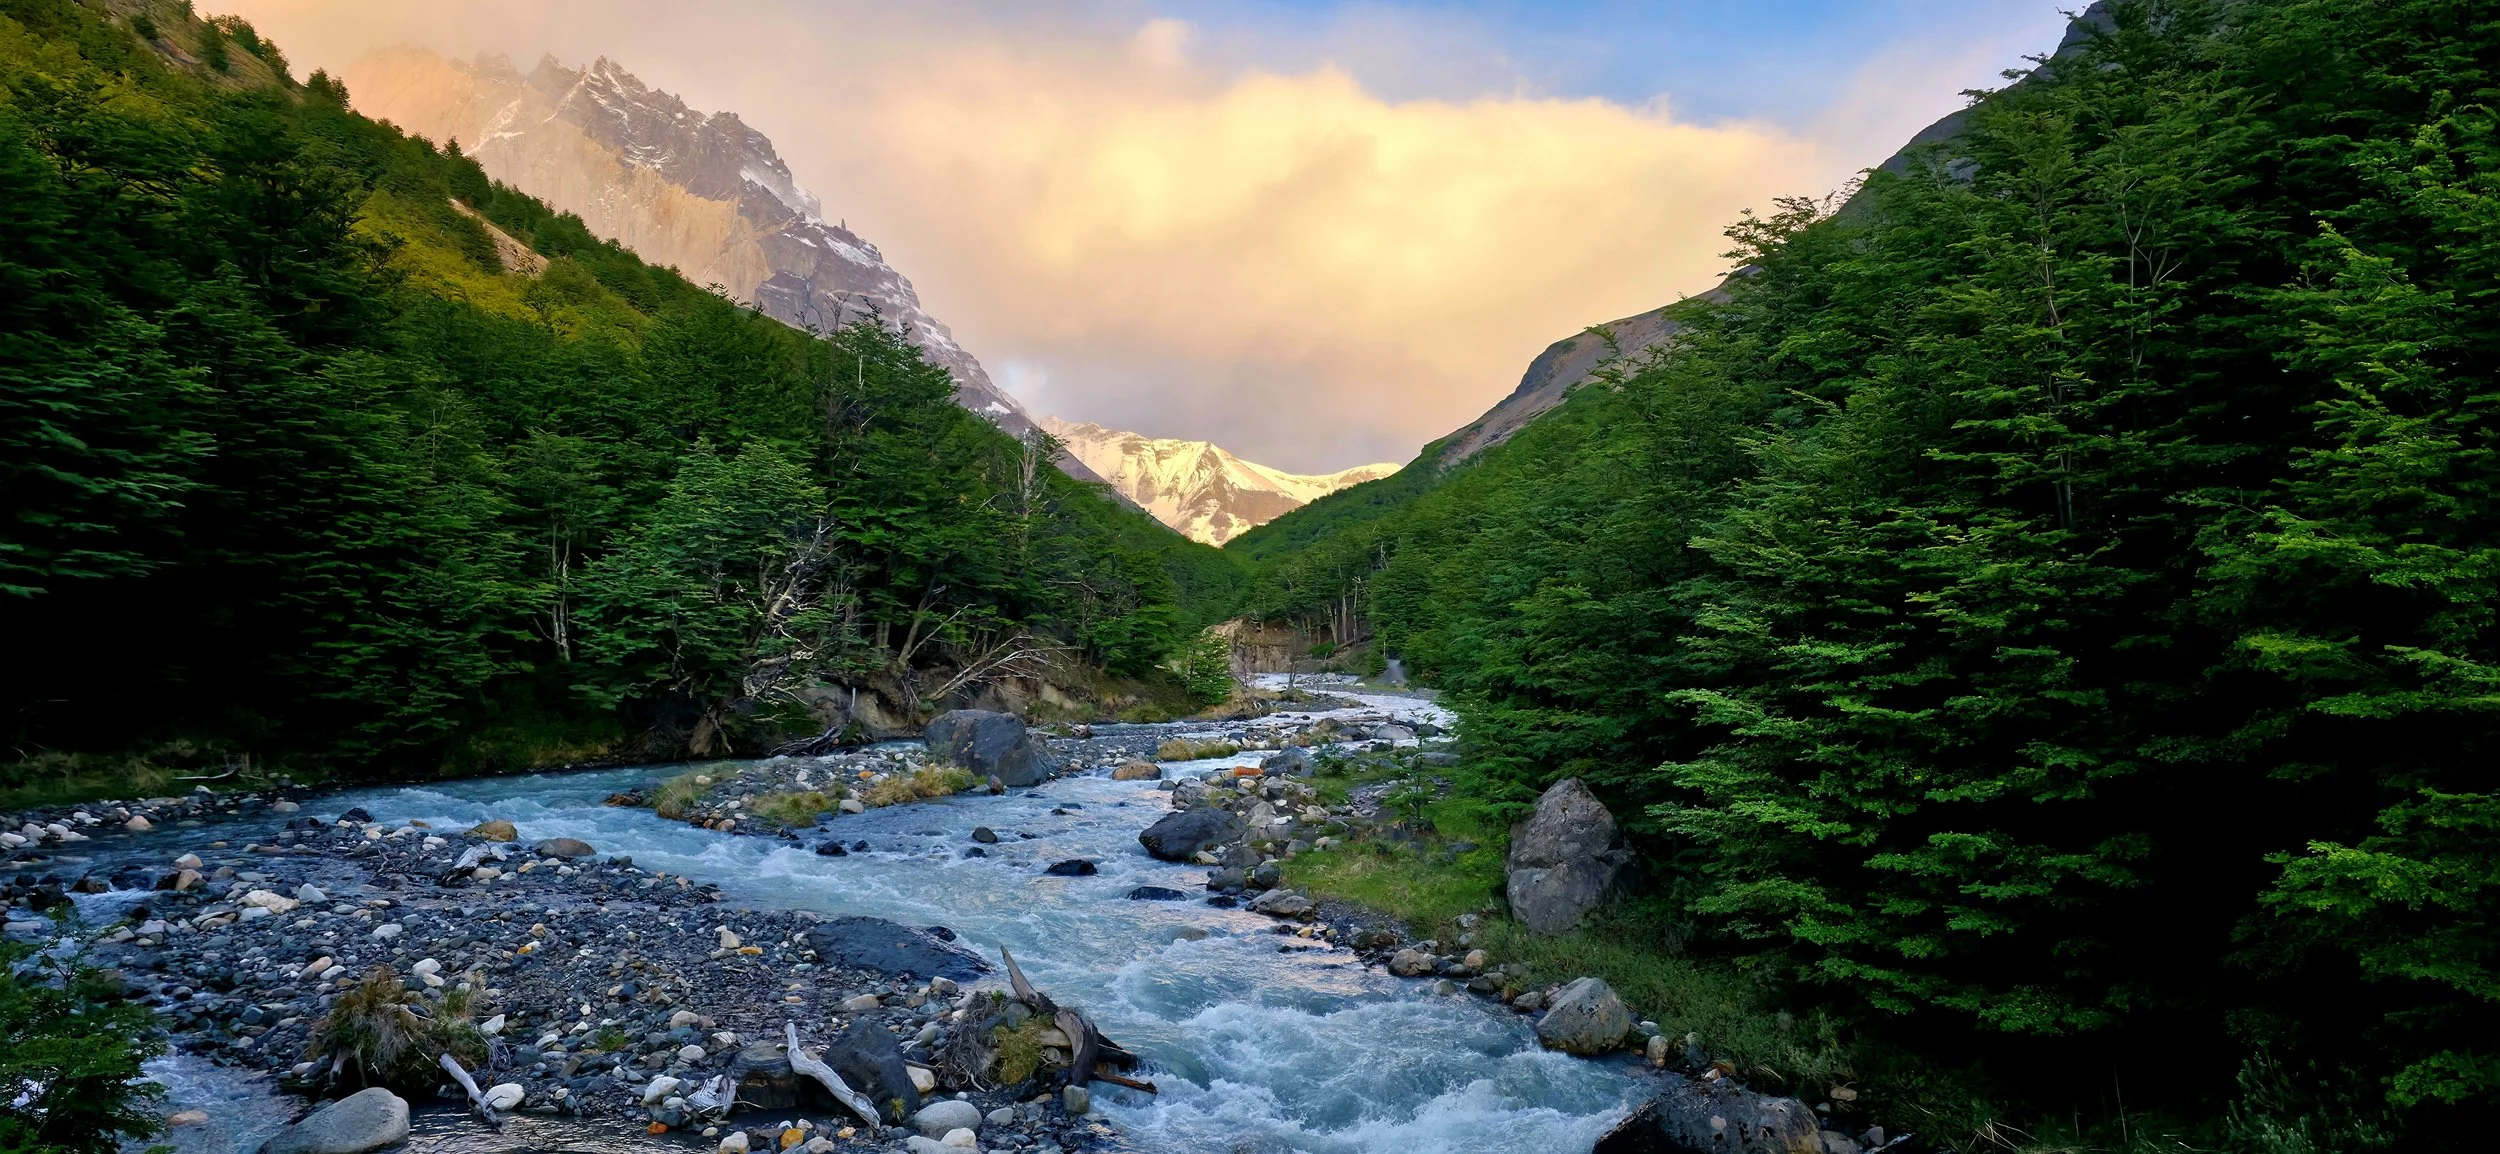
The tour typically starts at 6am so you’ll need to leave Puerto Natales by 4:30am latest. However, I’d recommend leaving 45 minutes earlier for some extra photo time— the first picture with the lake was taken a short walk from the parking lot meeting-spot. It’s common for a few guides to work together with walky-talky’s to track the pumas. They will drive off-road throughout the Estancia, occasionally stopping in hot spots so that everyone can use their binoculars to search for the cats. The rule of thumb is that if you spot a group of guanacos, a puma is typically nearby. We got very fortunate because we spotted a female puma making her way up a hill with the towers perfectly visible in the background.
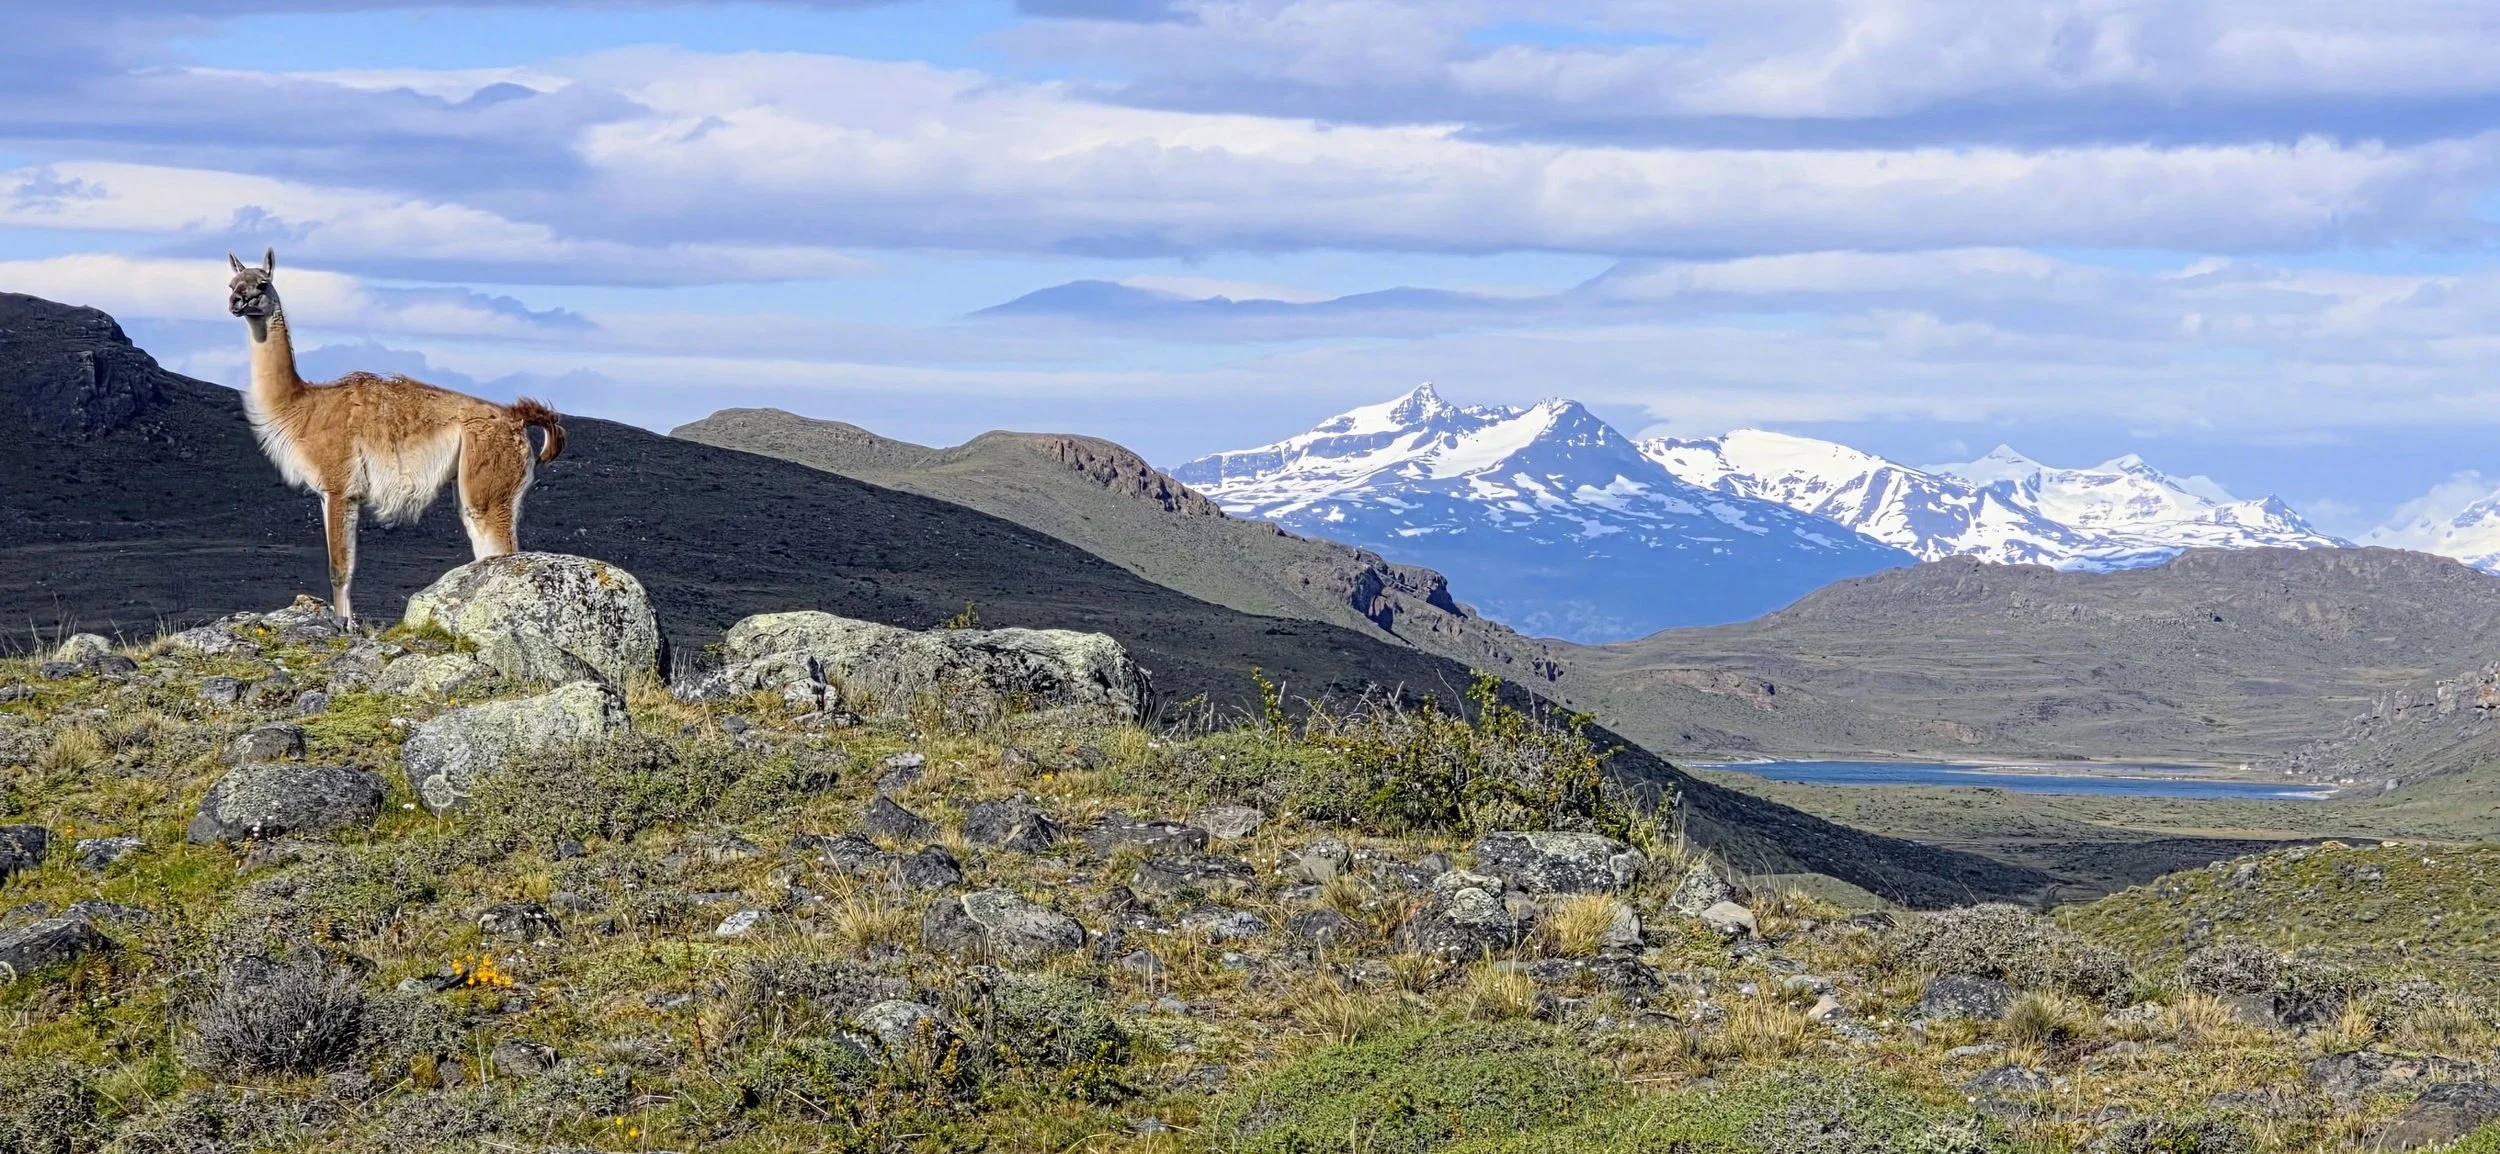
Since it was a rare, perfectly sunny day and I had already gotten the best puma photos possible (in my opinion), I had asked the guide to show me around the rest of the Estancia for other dramatic photo opportunities. It was an exciting off-road adventure as we zoomed throughout the Estancia, often running into groups of guanacos. You will likely encounter the same landscapes if you ask your guide to do the same.
It’s difficult to explain where these two pictures were taken since we drove all over, but the guides will definitely know if you show the pictures.
Activity #3: Torres del Paine by Car
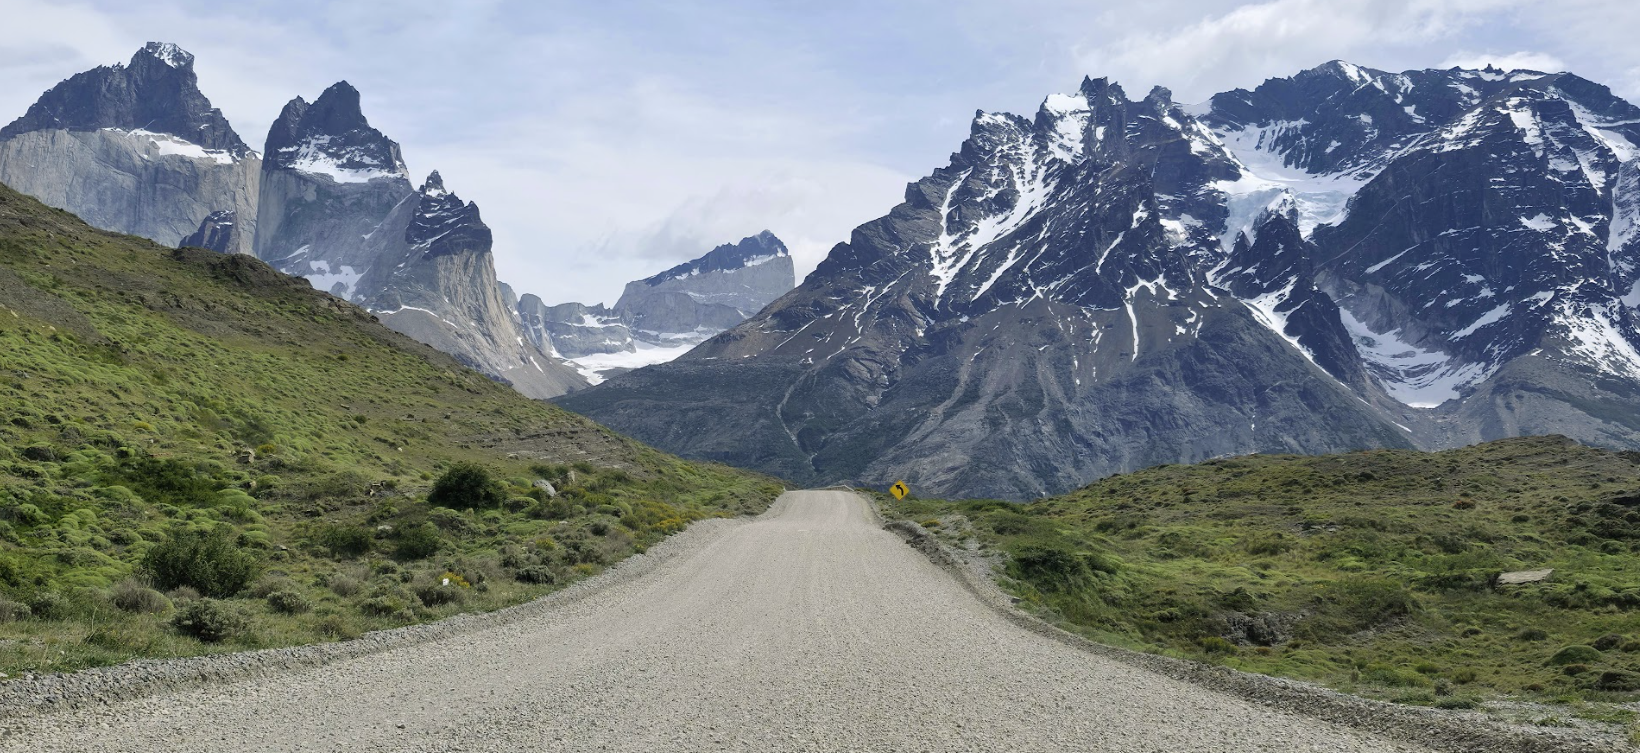
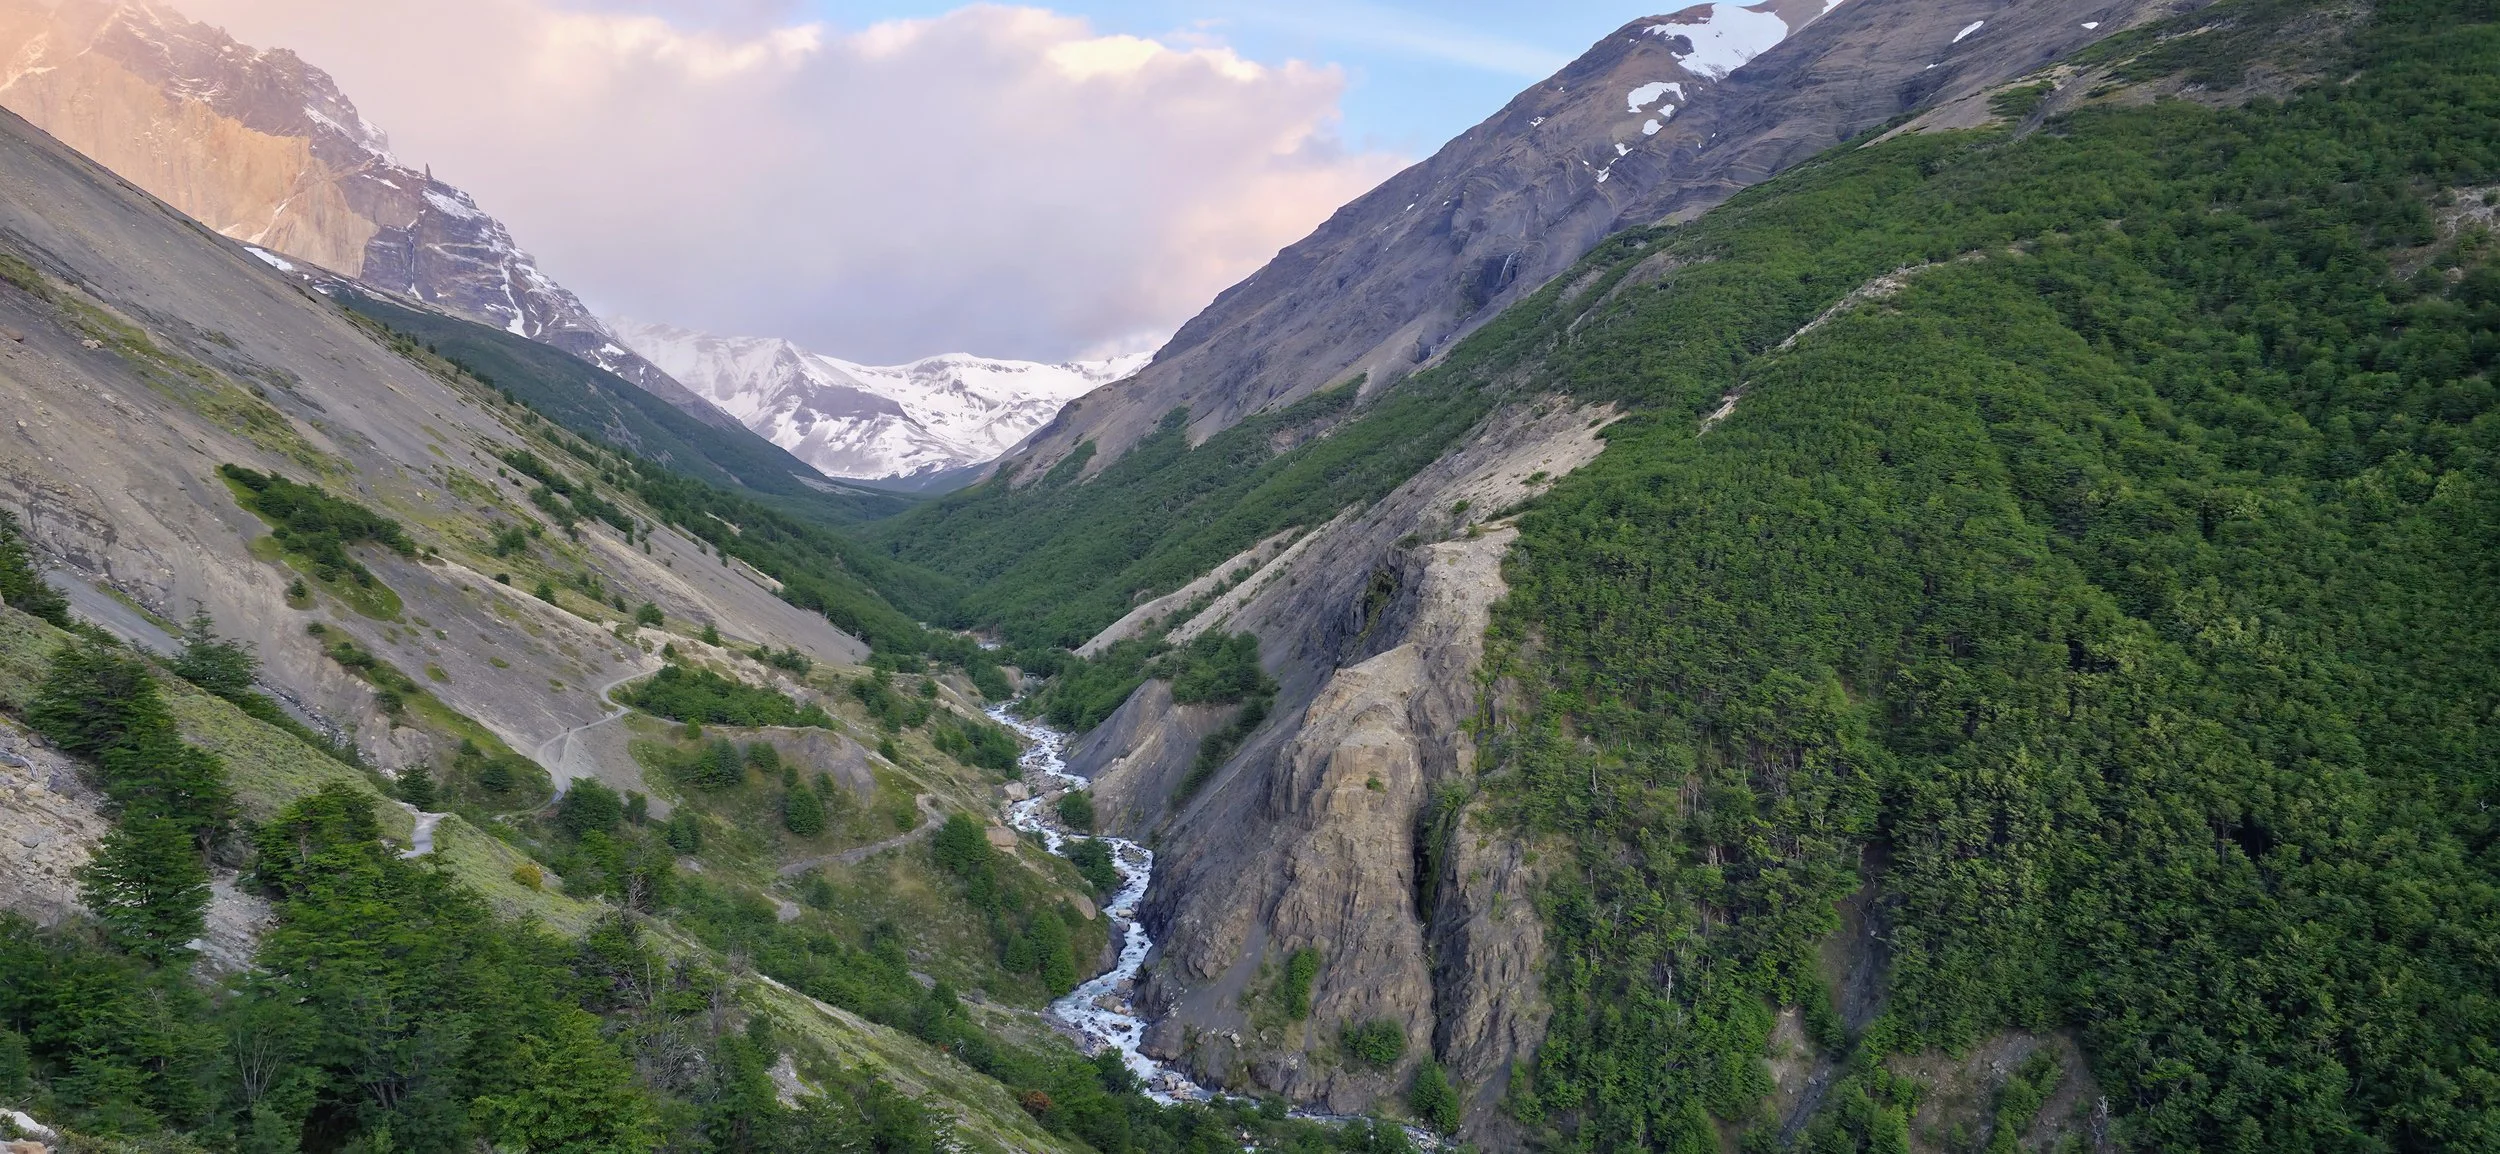
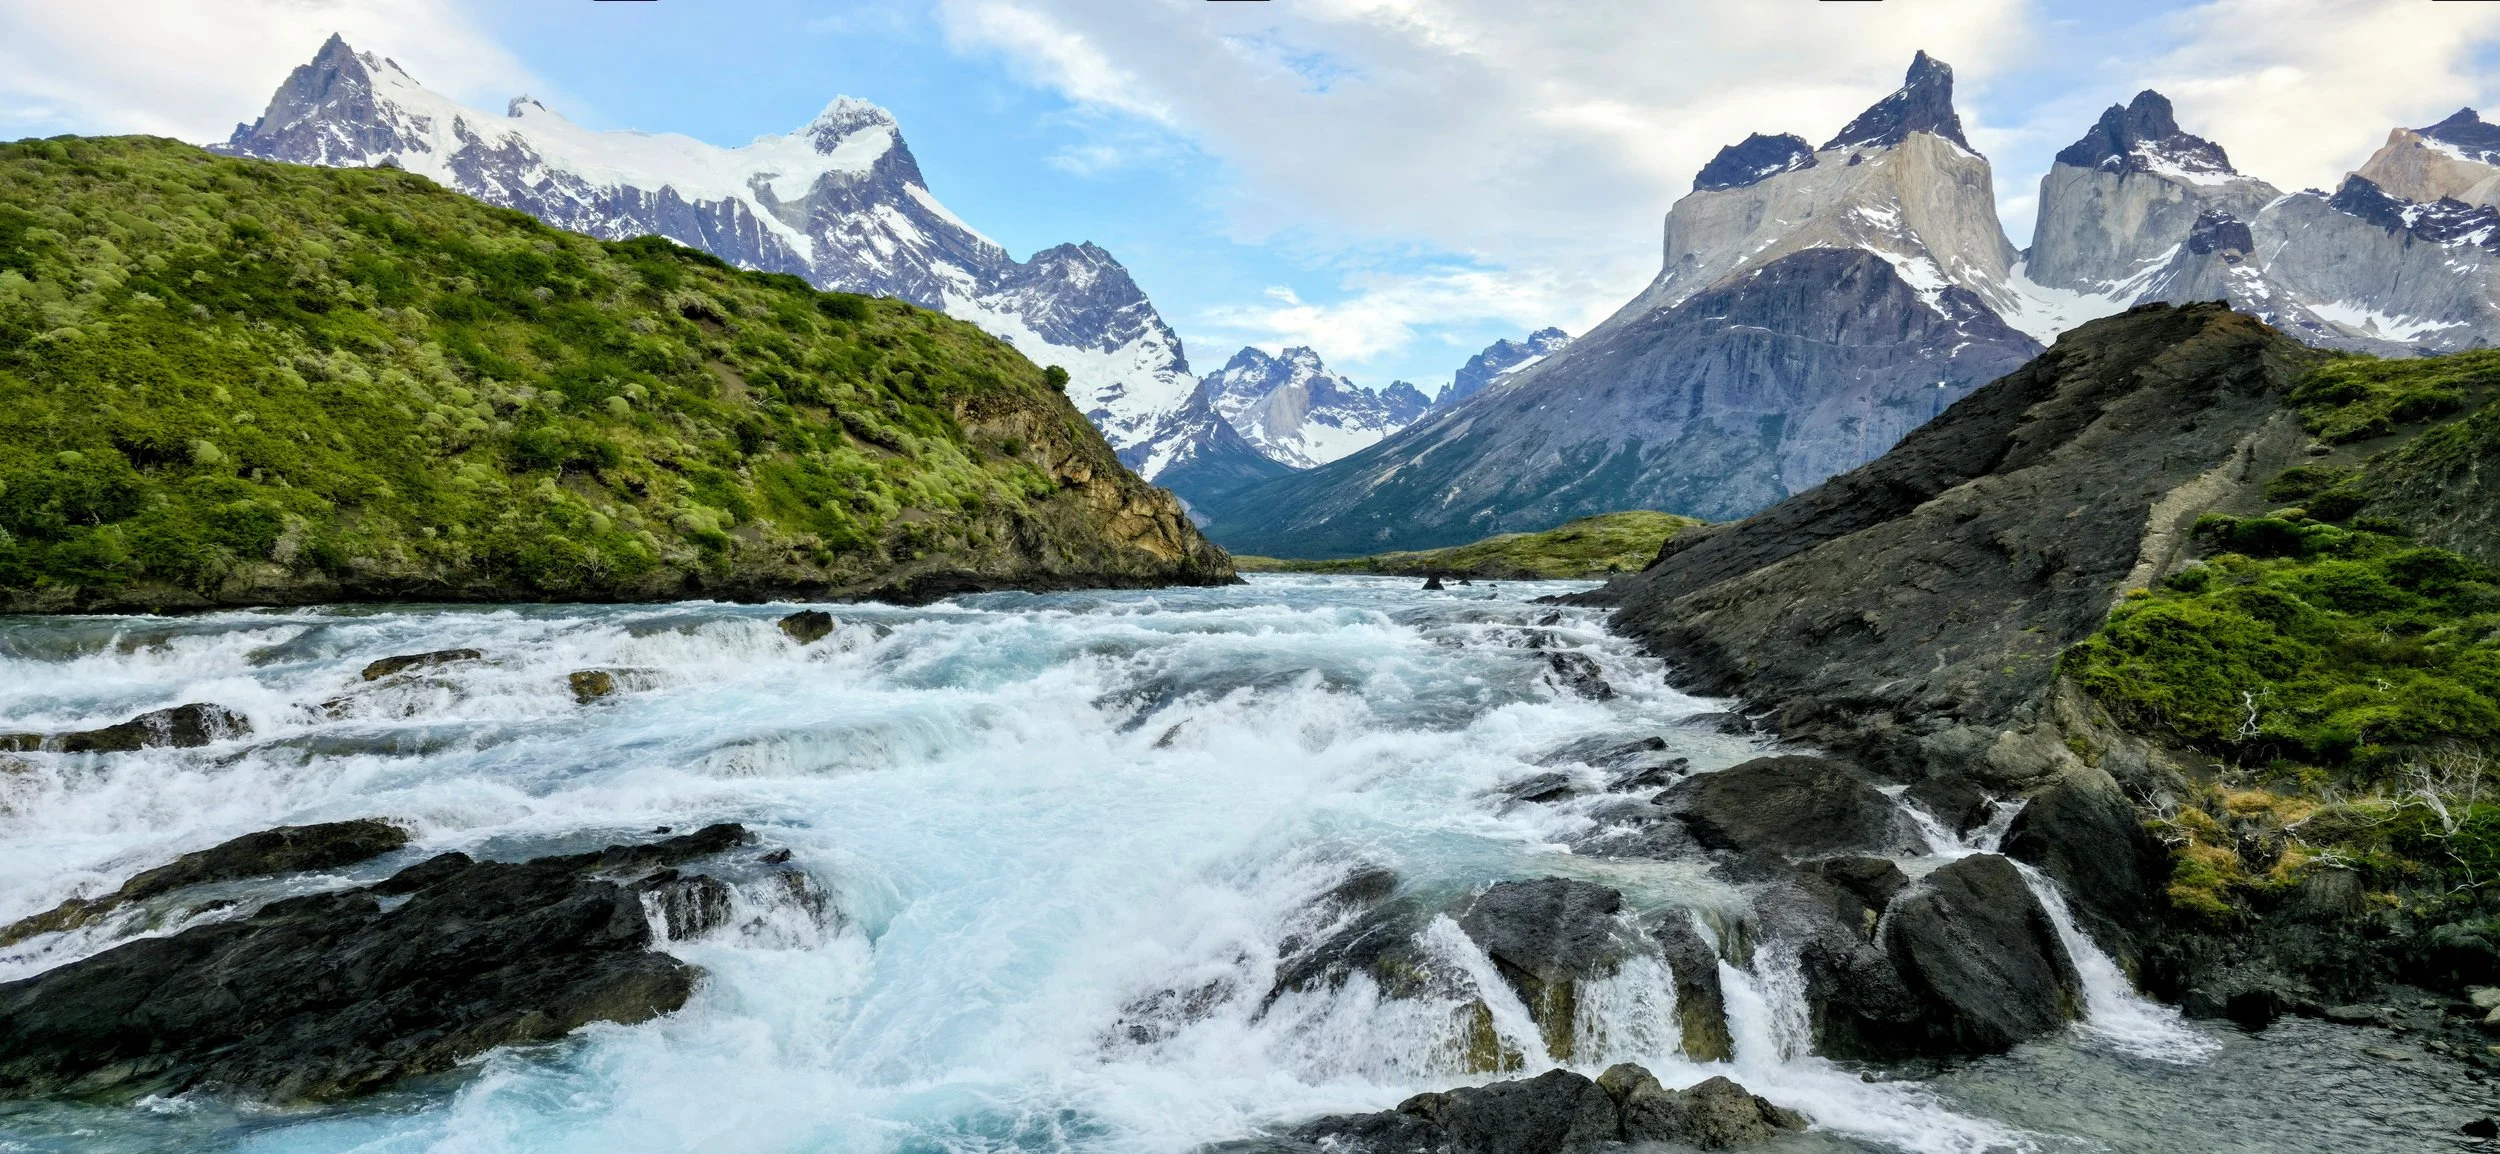
For the third day, my advice would be to trek around Torres del Paine by car. This should be a very packed day so you’ll need to depart super early, or you could combine a few of these stops on the day of the puma trekking to give yourself more flexibility. Additionally, keep in mind that there are many activities that are not covered in my blog so do your homework to ensure that you’re not missing anything. (The photo above was taken ~halfway through the drive and you’ll know it when you get there)
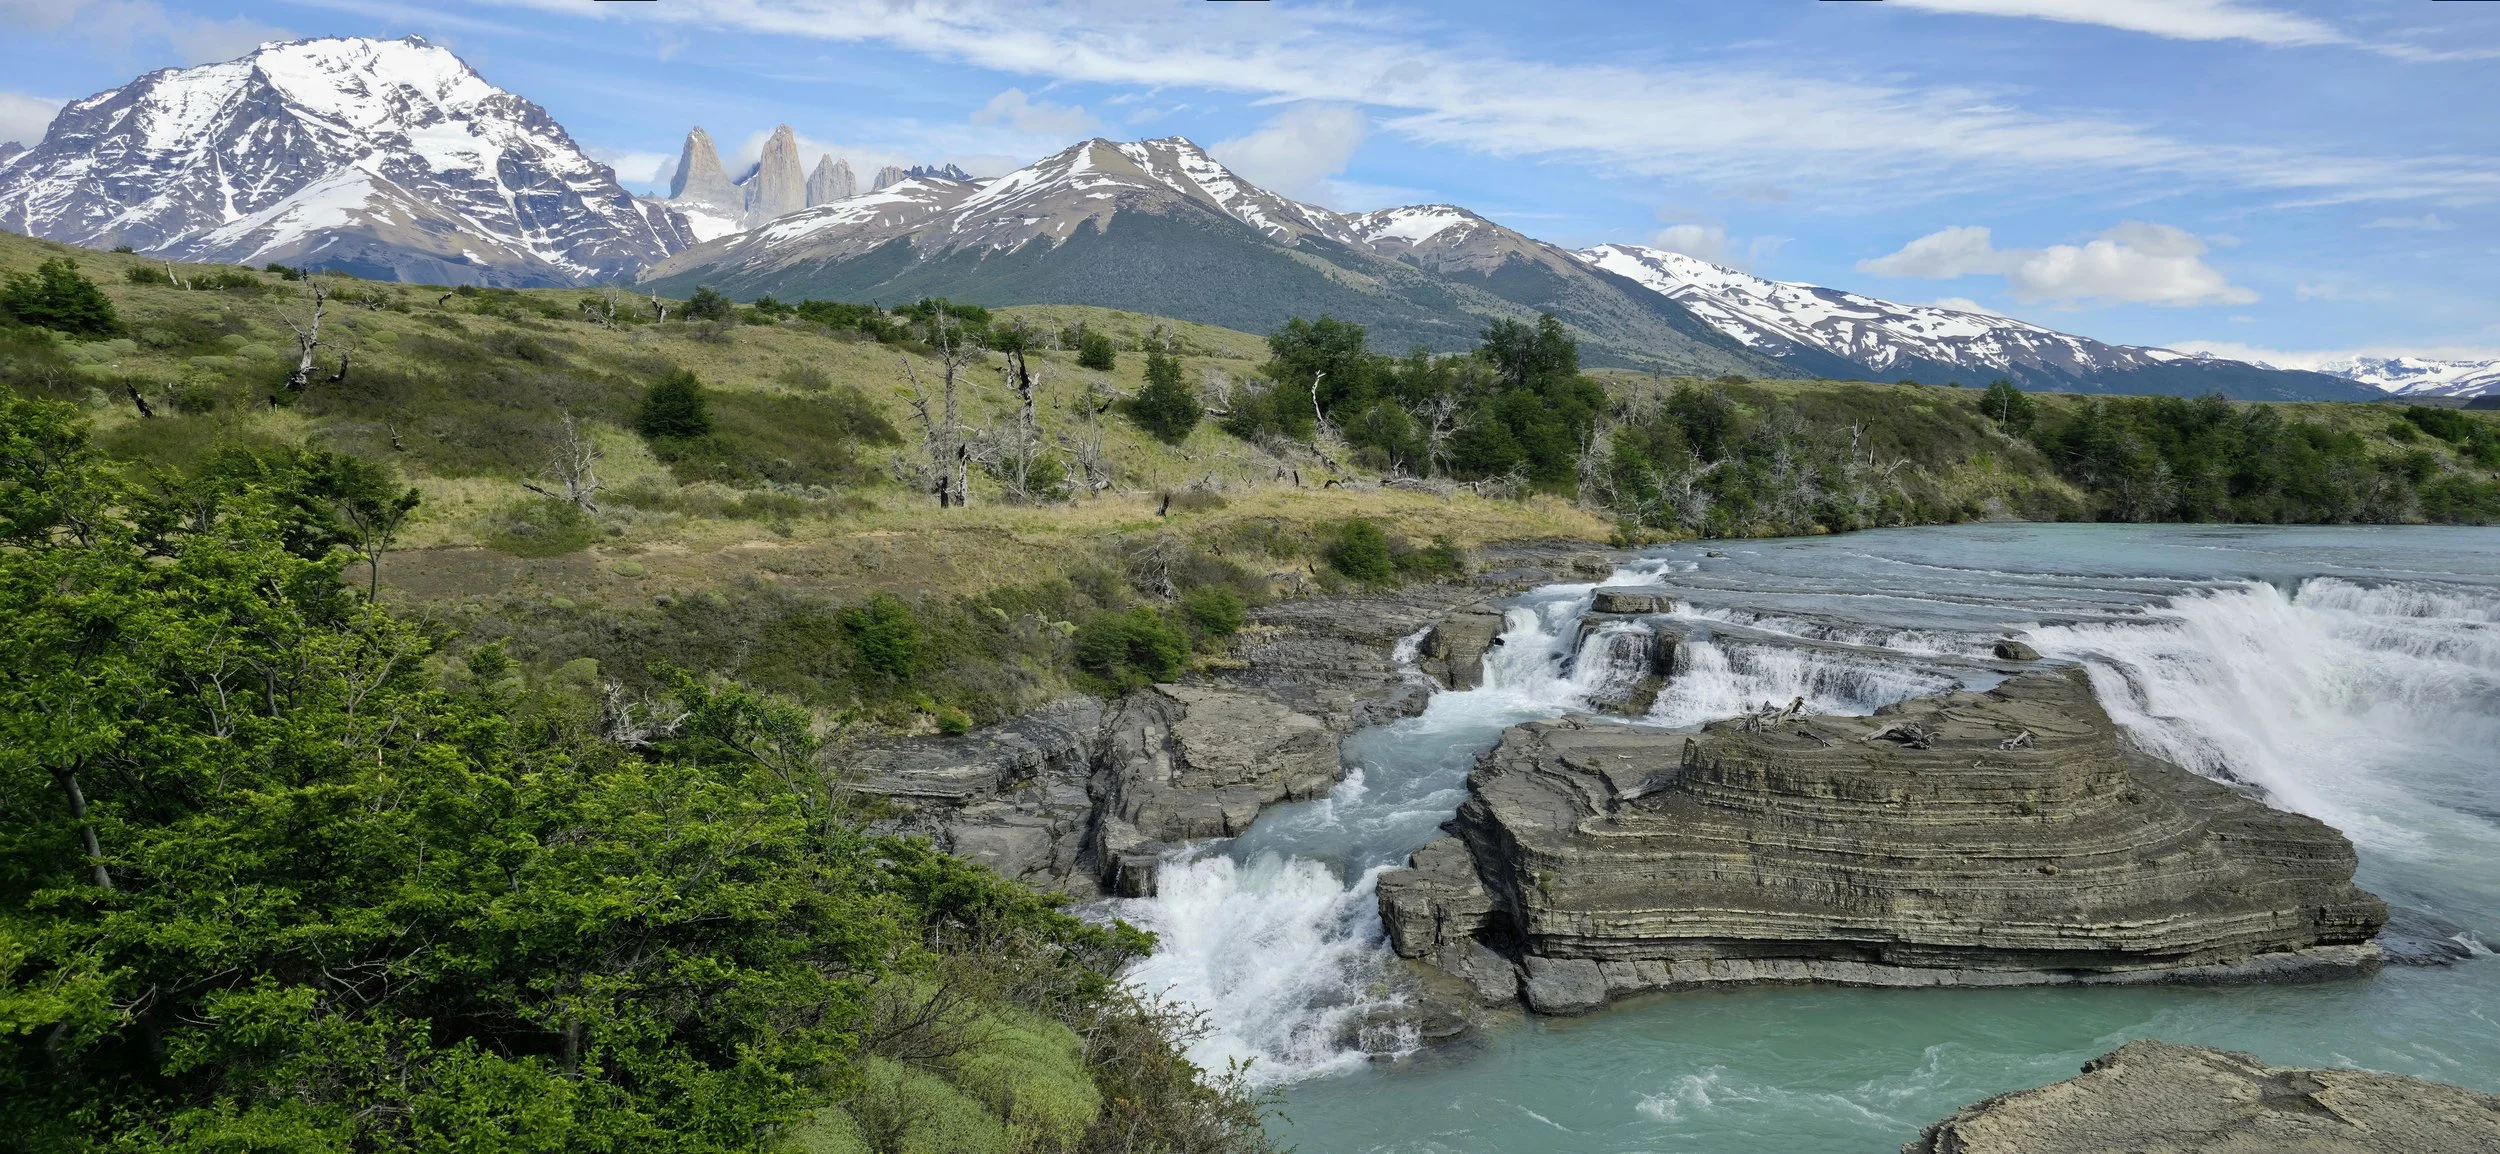
Using the Laguna Amarga entrance is the most popular and safest route to the park. It’s also the same entrance that’s closest to the puma trekking excursion. As a reminder, you will avoid long lines by purchasing your park passes in advance and by arriving at the crack of dawn. You might even be able to drive straight through if you arrive before the park rangers. Roughly ~20 minutes after passing the entrance, you will find the Cascada del Rio Paine, a fantastic photo opportunity with the towers perched the background. Both small platforms offer similar photo opportunities to the picture above.
You’ll likely be making many photo-stops as you meander throughout the park, most of which I’m not going to include because I’d never finish writing this blog. ~20 minutes after the Rio Paine, you will reach a turnoff for another waterfall called Cascada del Salto Grande. However, this is also the trailhead for the hike to Mirador Cuernos. Furthermore, it’s a very busy area because it’s where most hikers take the ferry to the French Valley. Needless to say, arrive very early to avoid large crowds. The Cuernos hike is definitely a must-do!
Cascada del Salto Grande is ~20 minute walk from the parking lot. If you arrive early when less people are nearby, I would suggest climbing lower to get a more dramatic view of the falls. Hiking over the platform is not technically permitted, but I doubt that anyone will speak up against it.
As you continue following the path directly after Cascada del Salto, you will find the trailhead for the hike to Mirador Cuernos. This hike is ~45 minutes each way and is a painless walk through a striking landscapes. By arriving super early, you might even have the entire trail for yourself!
As the trail twists by small mountains and lakes, you will encounter various photo opportunities. However, you’ll need to exit the trail and walk about 10- 15 yards into the vegetation to capture a few of these photos.
You can expect a small incline at the conclusion of the hike and just after that, you’ll discover one of the most beautiful views in the park. I would advise hopping over the small fence (if there is one) and walking down the hill for ~10 yards for an even better photo opportunity— or take a video like mine above.
And finally, don’t ever forget to look in back of you as some of the best photos are often behind you! This photo was captured while returning down that same incline.
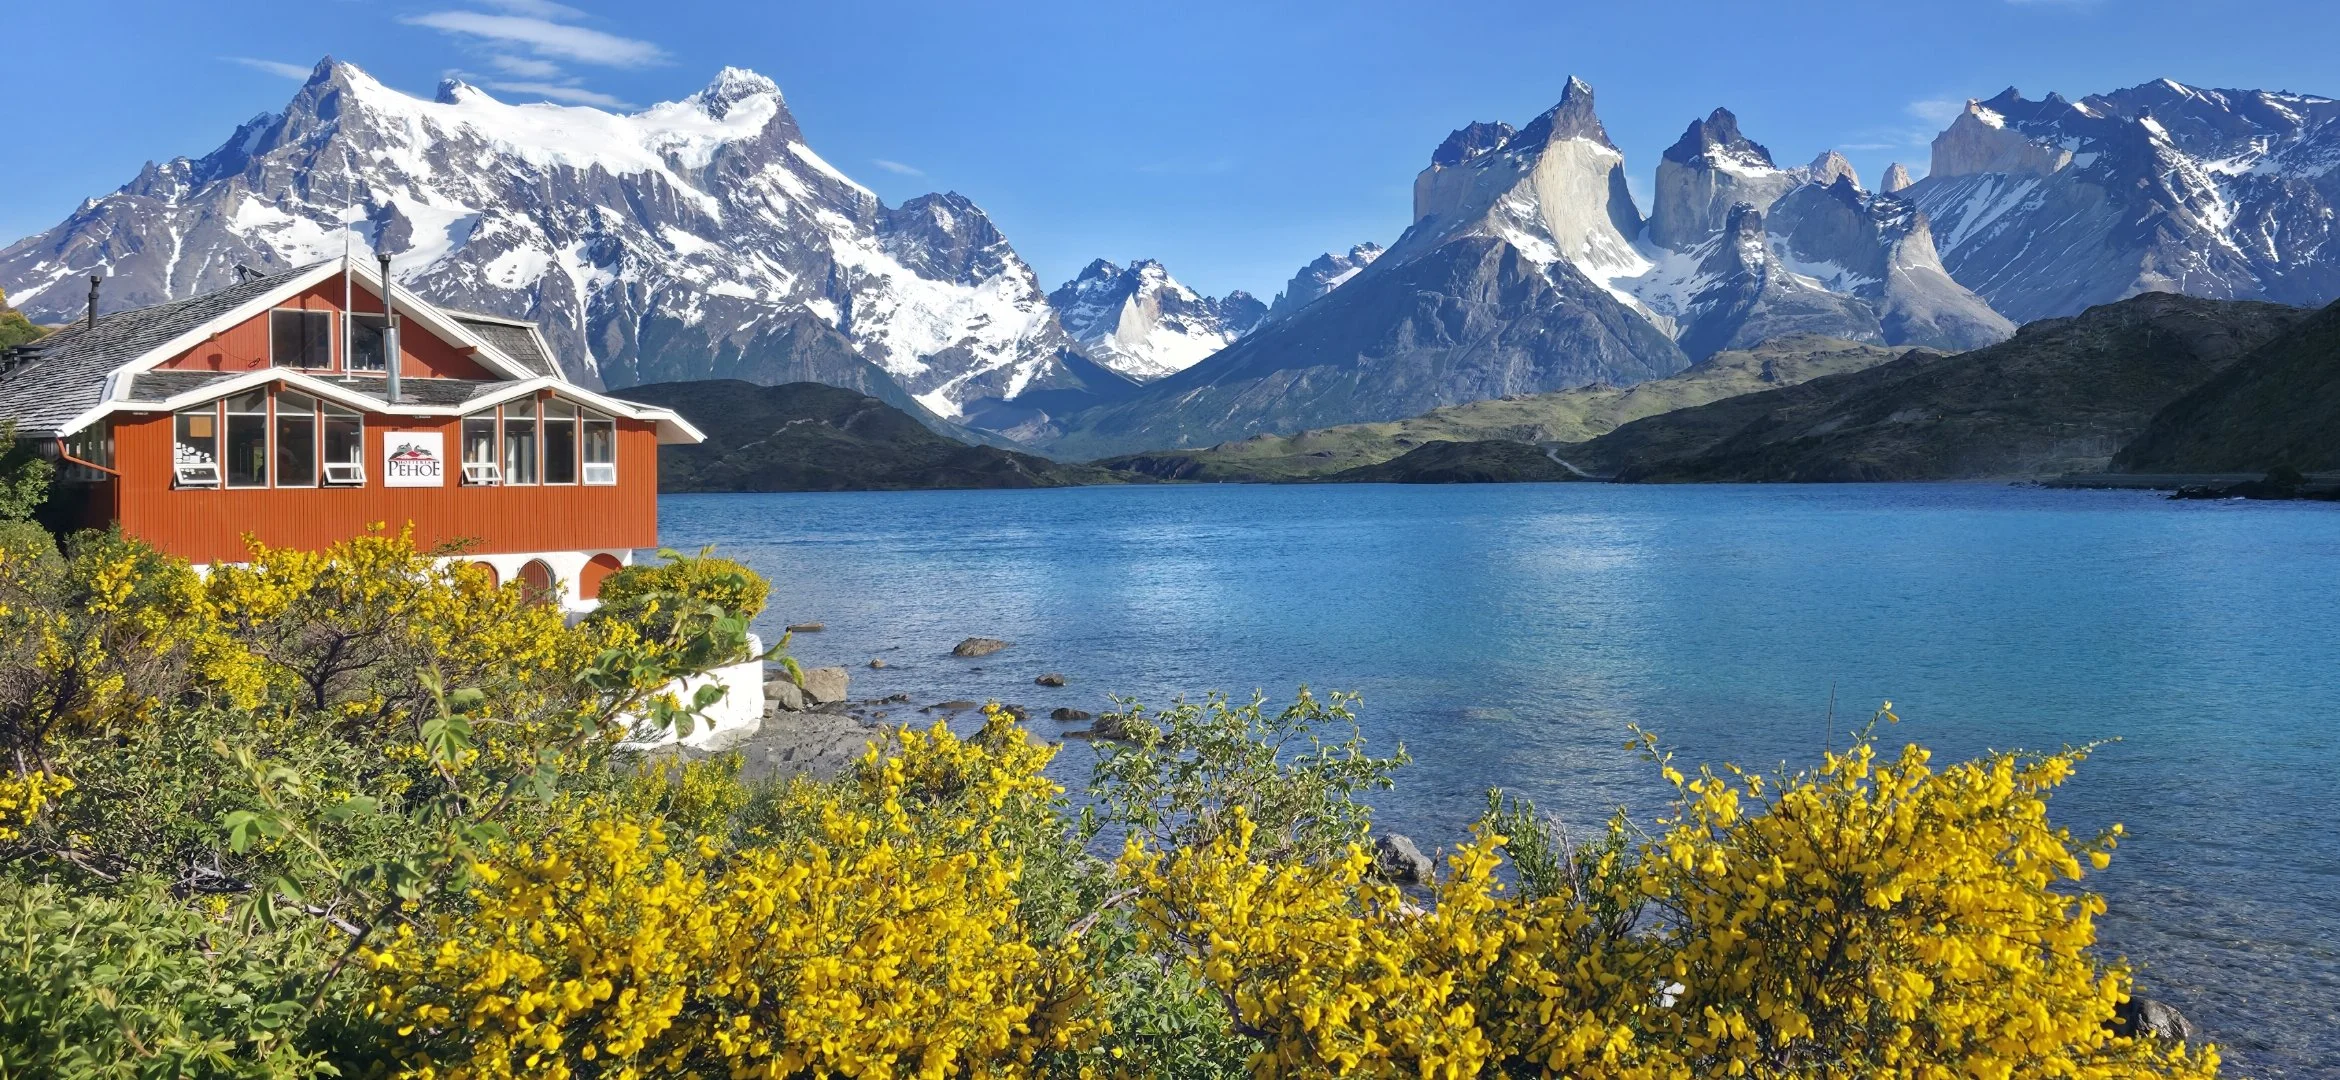
From the Cuernos Hike, it’s a short ~5 minute drive to Hosteria Pehoe where you can turn off the main road and park in the small lot. This is a small, cottage-style hotel located on a tiny island that offers a fantastic view of the dramatic Patagonian peaks. There are several unique photo opportunities from the bridge with this photo taken just before reaching the main office. You can also tour around the island to find alternative photo opportunities. As you continue the drive, you will quickly encounter one of the most expensive hotels in the park, Explora. Although not what it used to be, it’s still worth a quick stop to explore the property.
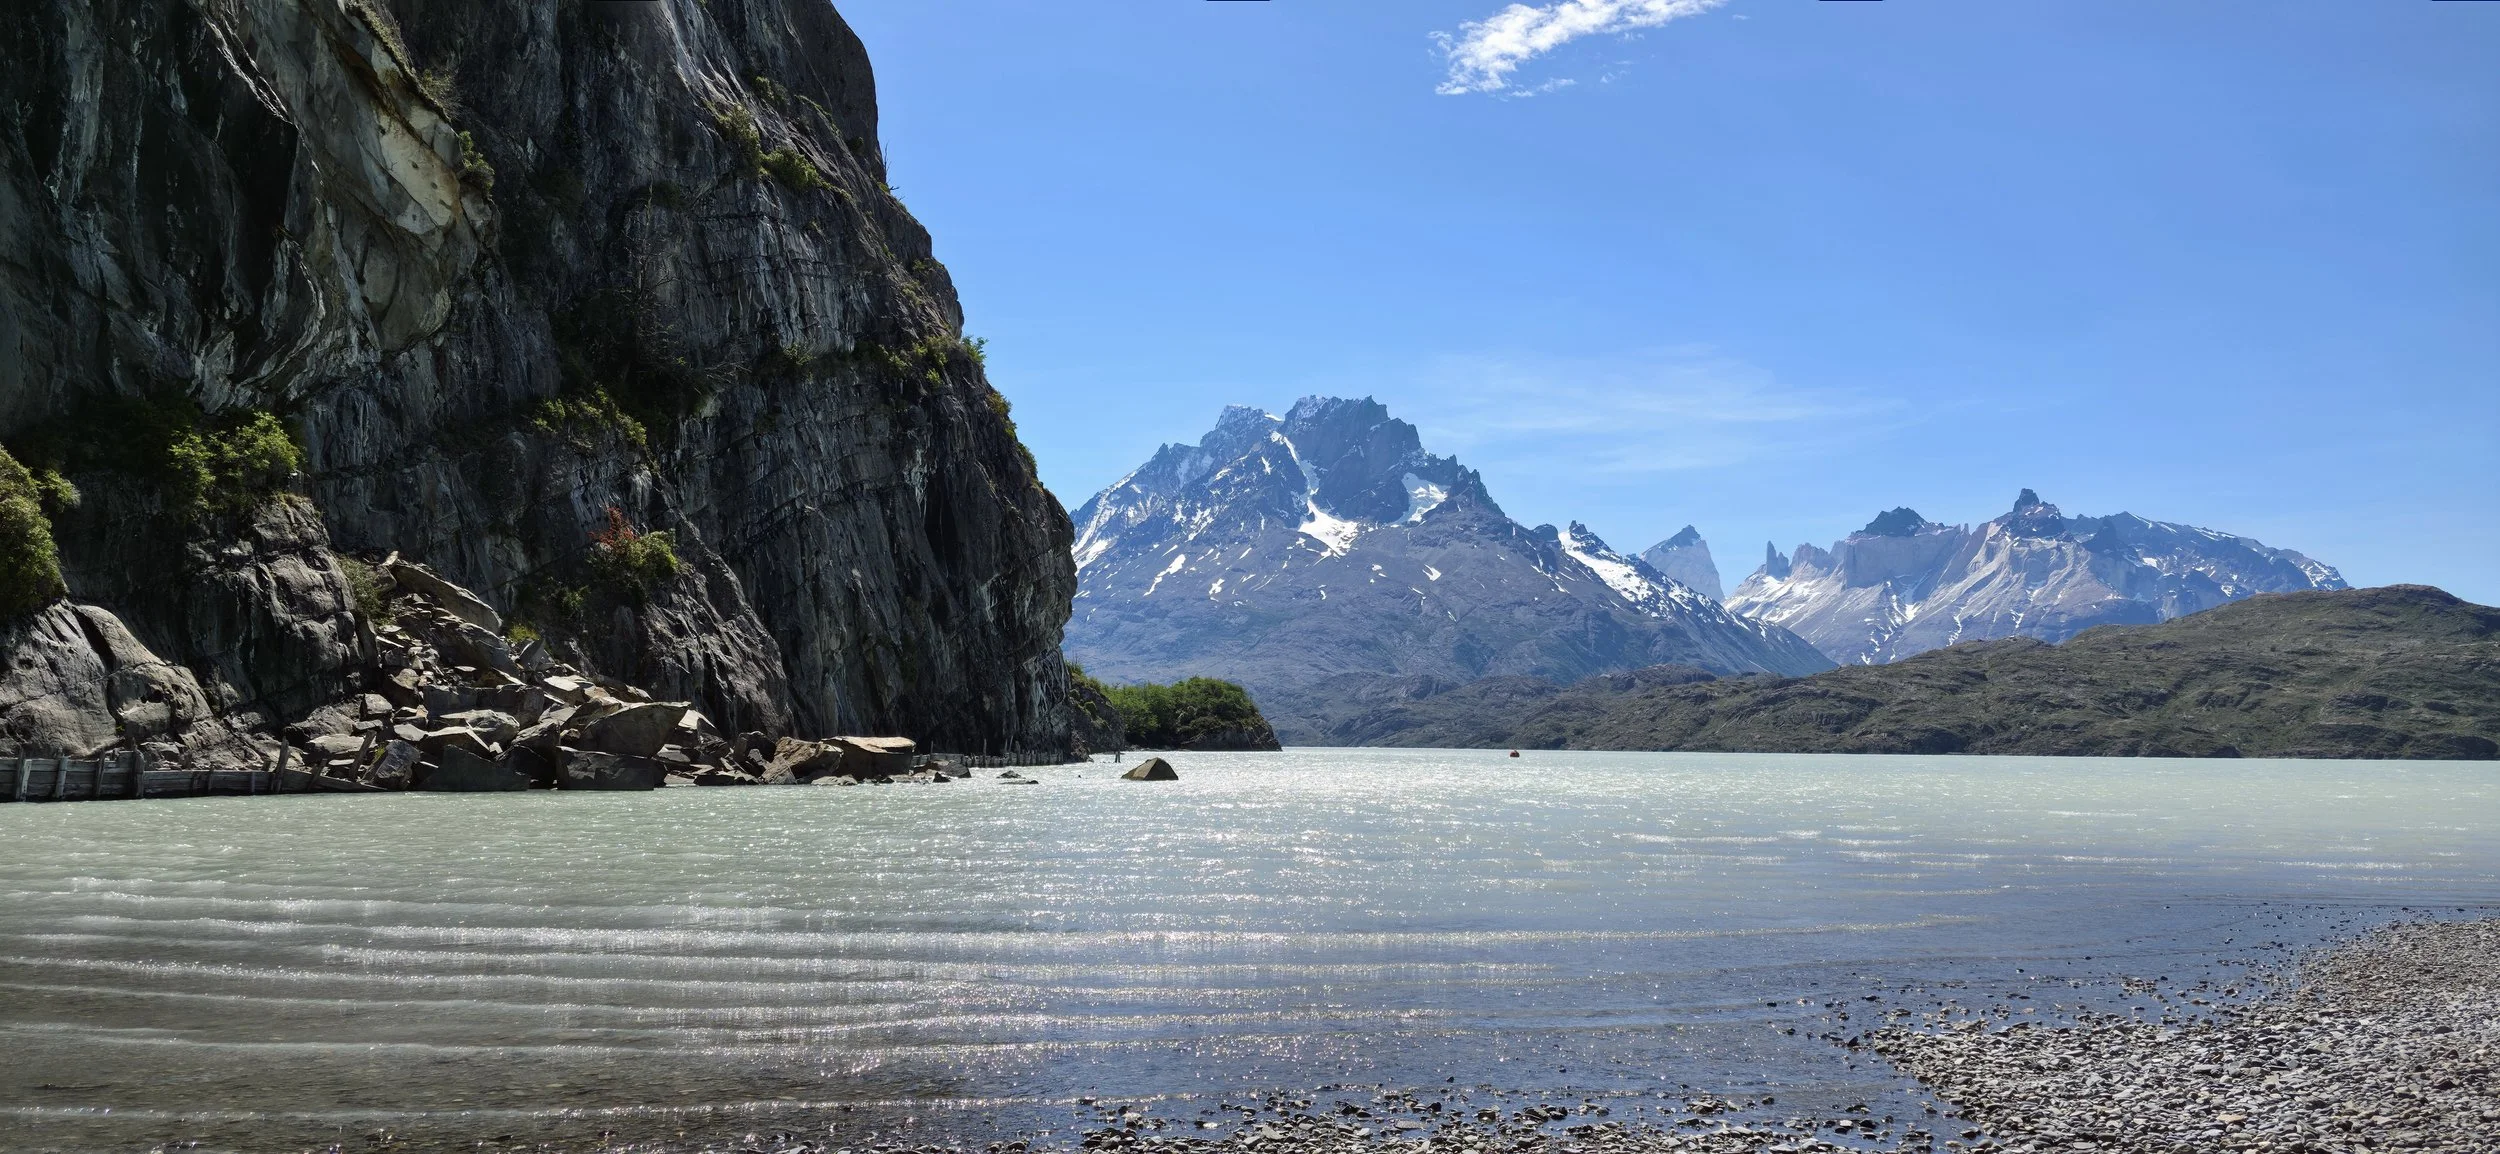
One of the final stops of the day (perhaps the final), is Mirador Lago Grey, ~30 minute drive from Hosteria Pehoe. This area of the park can become quite busy during the day, but most tourists do not make it far onto the beach because they are lazy! My advice is to walk to the water, but stay towards the left to capture the most dramatic landscape photo (see above).
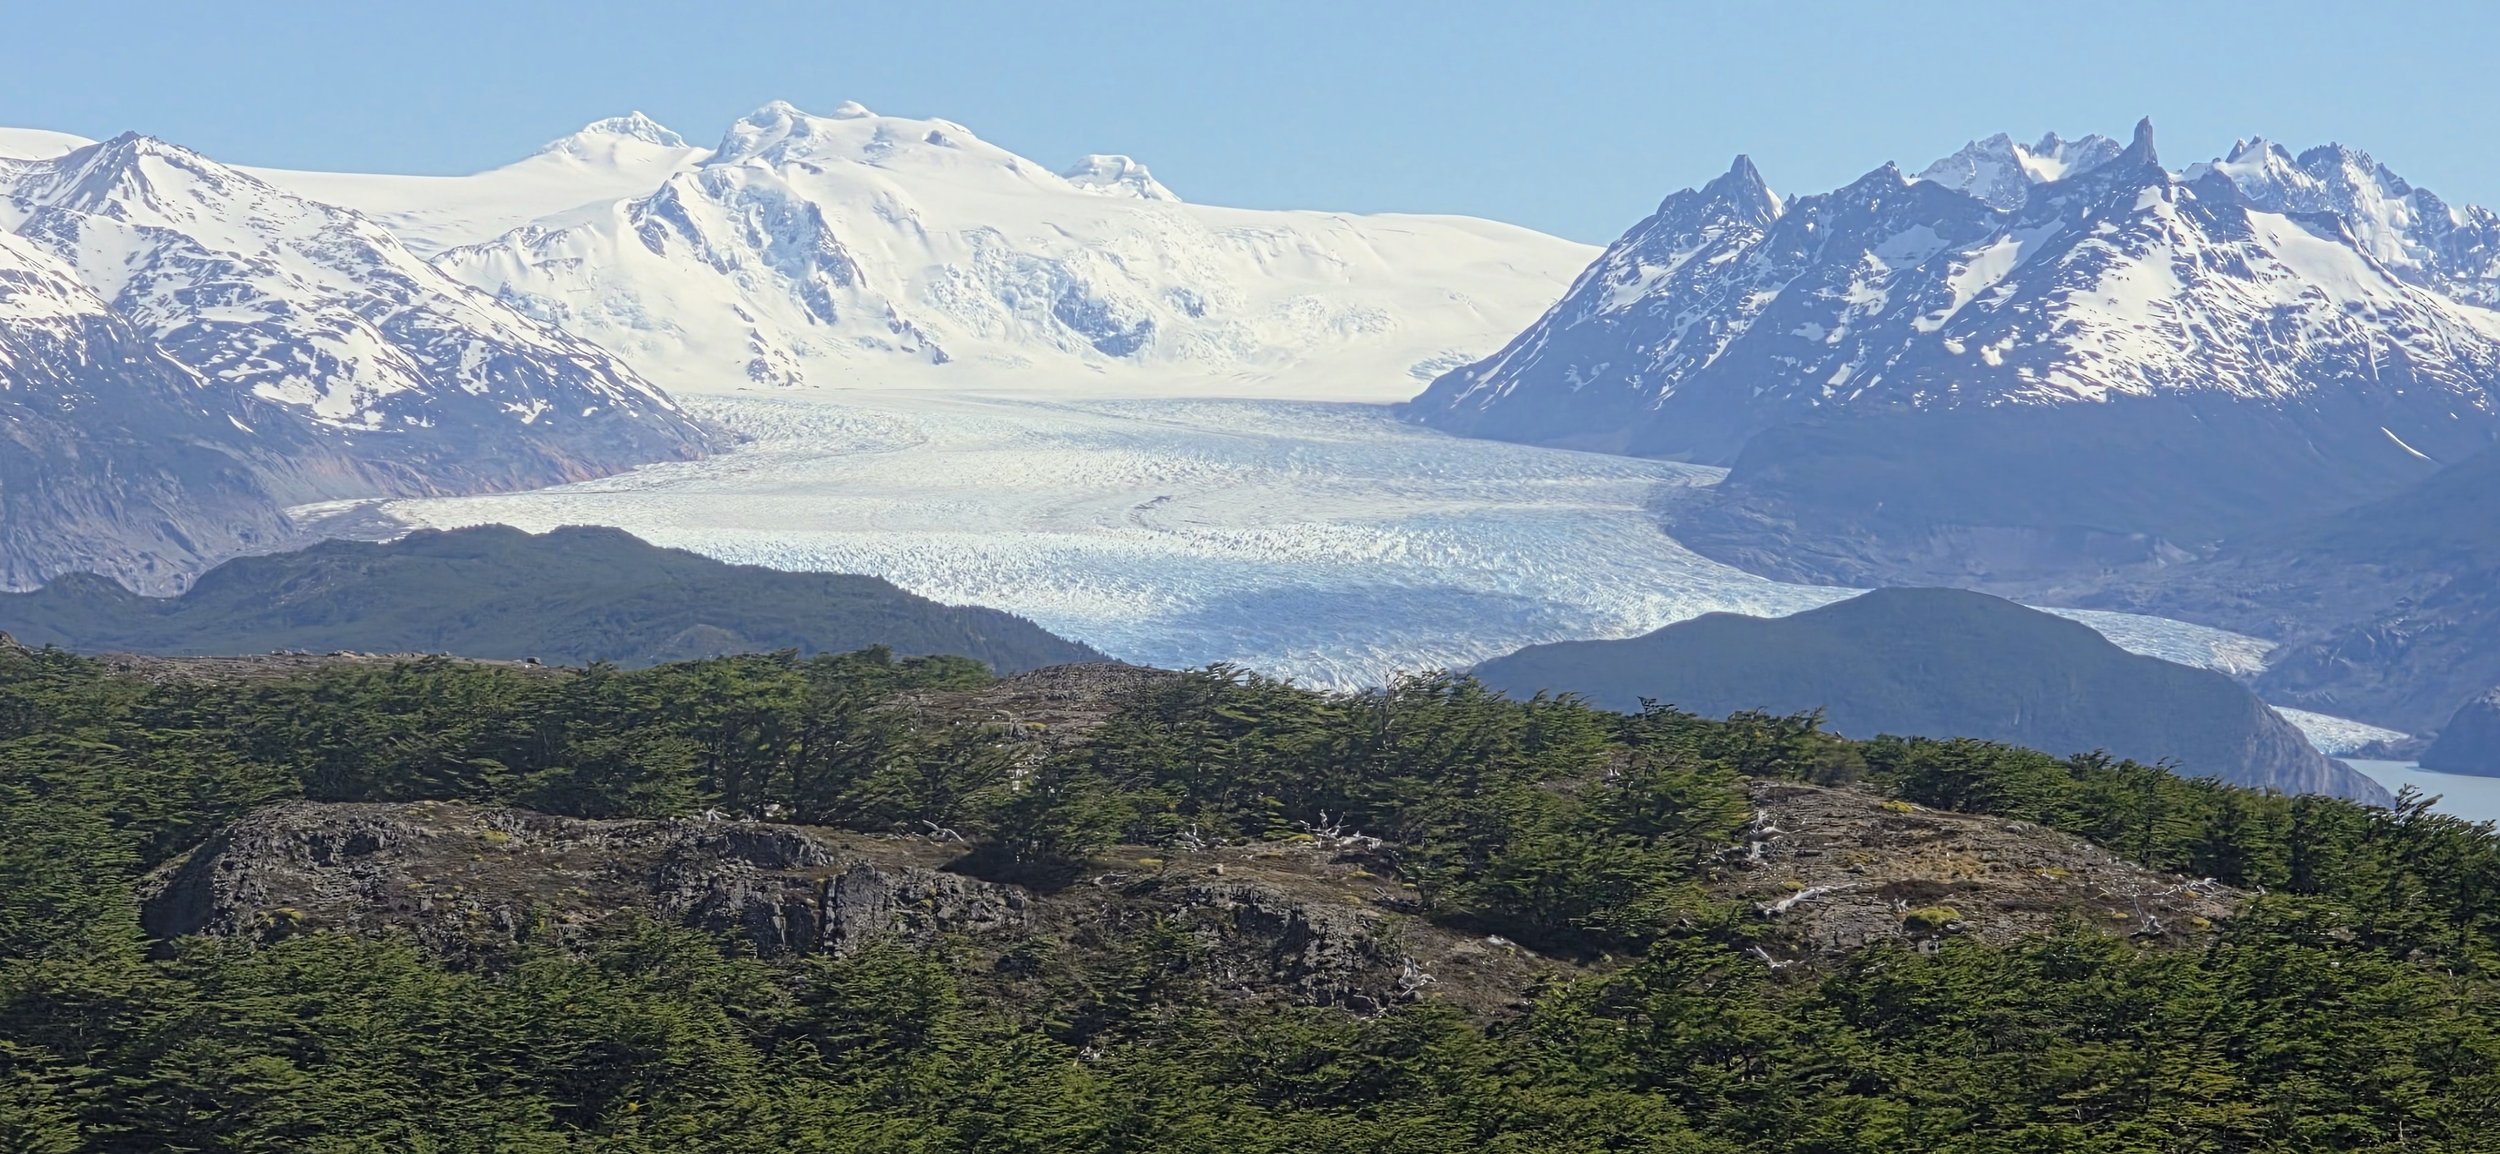
If you’re doing well on time and want to challenge yourself to another scenic trail, the Ferrier hike is a few minutes walk from the same parking lot. I believe there is a small entrance fee and it’s then a 2- 3 hour roundtrip hike depending on your physical conditioning. Make no mistake, the distance is only ~3.5 miles roundtrip, but this is an extremely demanding hike because it’s a continuously, steep incline that takes you 2,000 ft into the sky. The good news is that you should have the trail mostly to yourself since many hikers turn back before even reaching the summit. The glacier view from the summit is incredible if you’re not accustomed to these types of landscapes and it spans much wider than my photo suggests. However, be warned that the weather at the top will likely be extremely cold and windy.
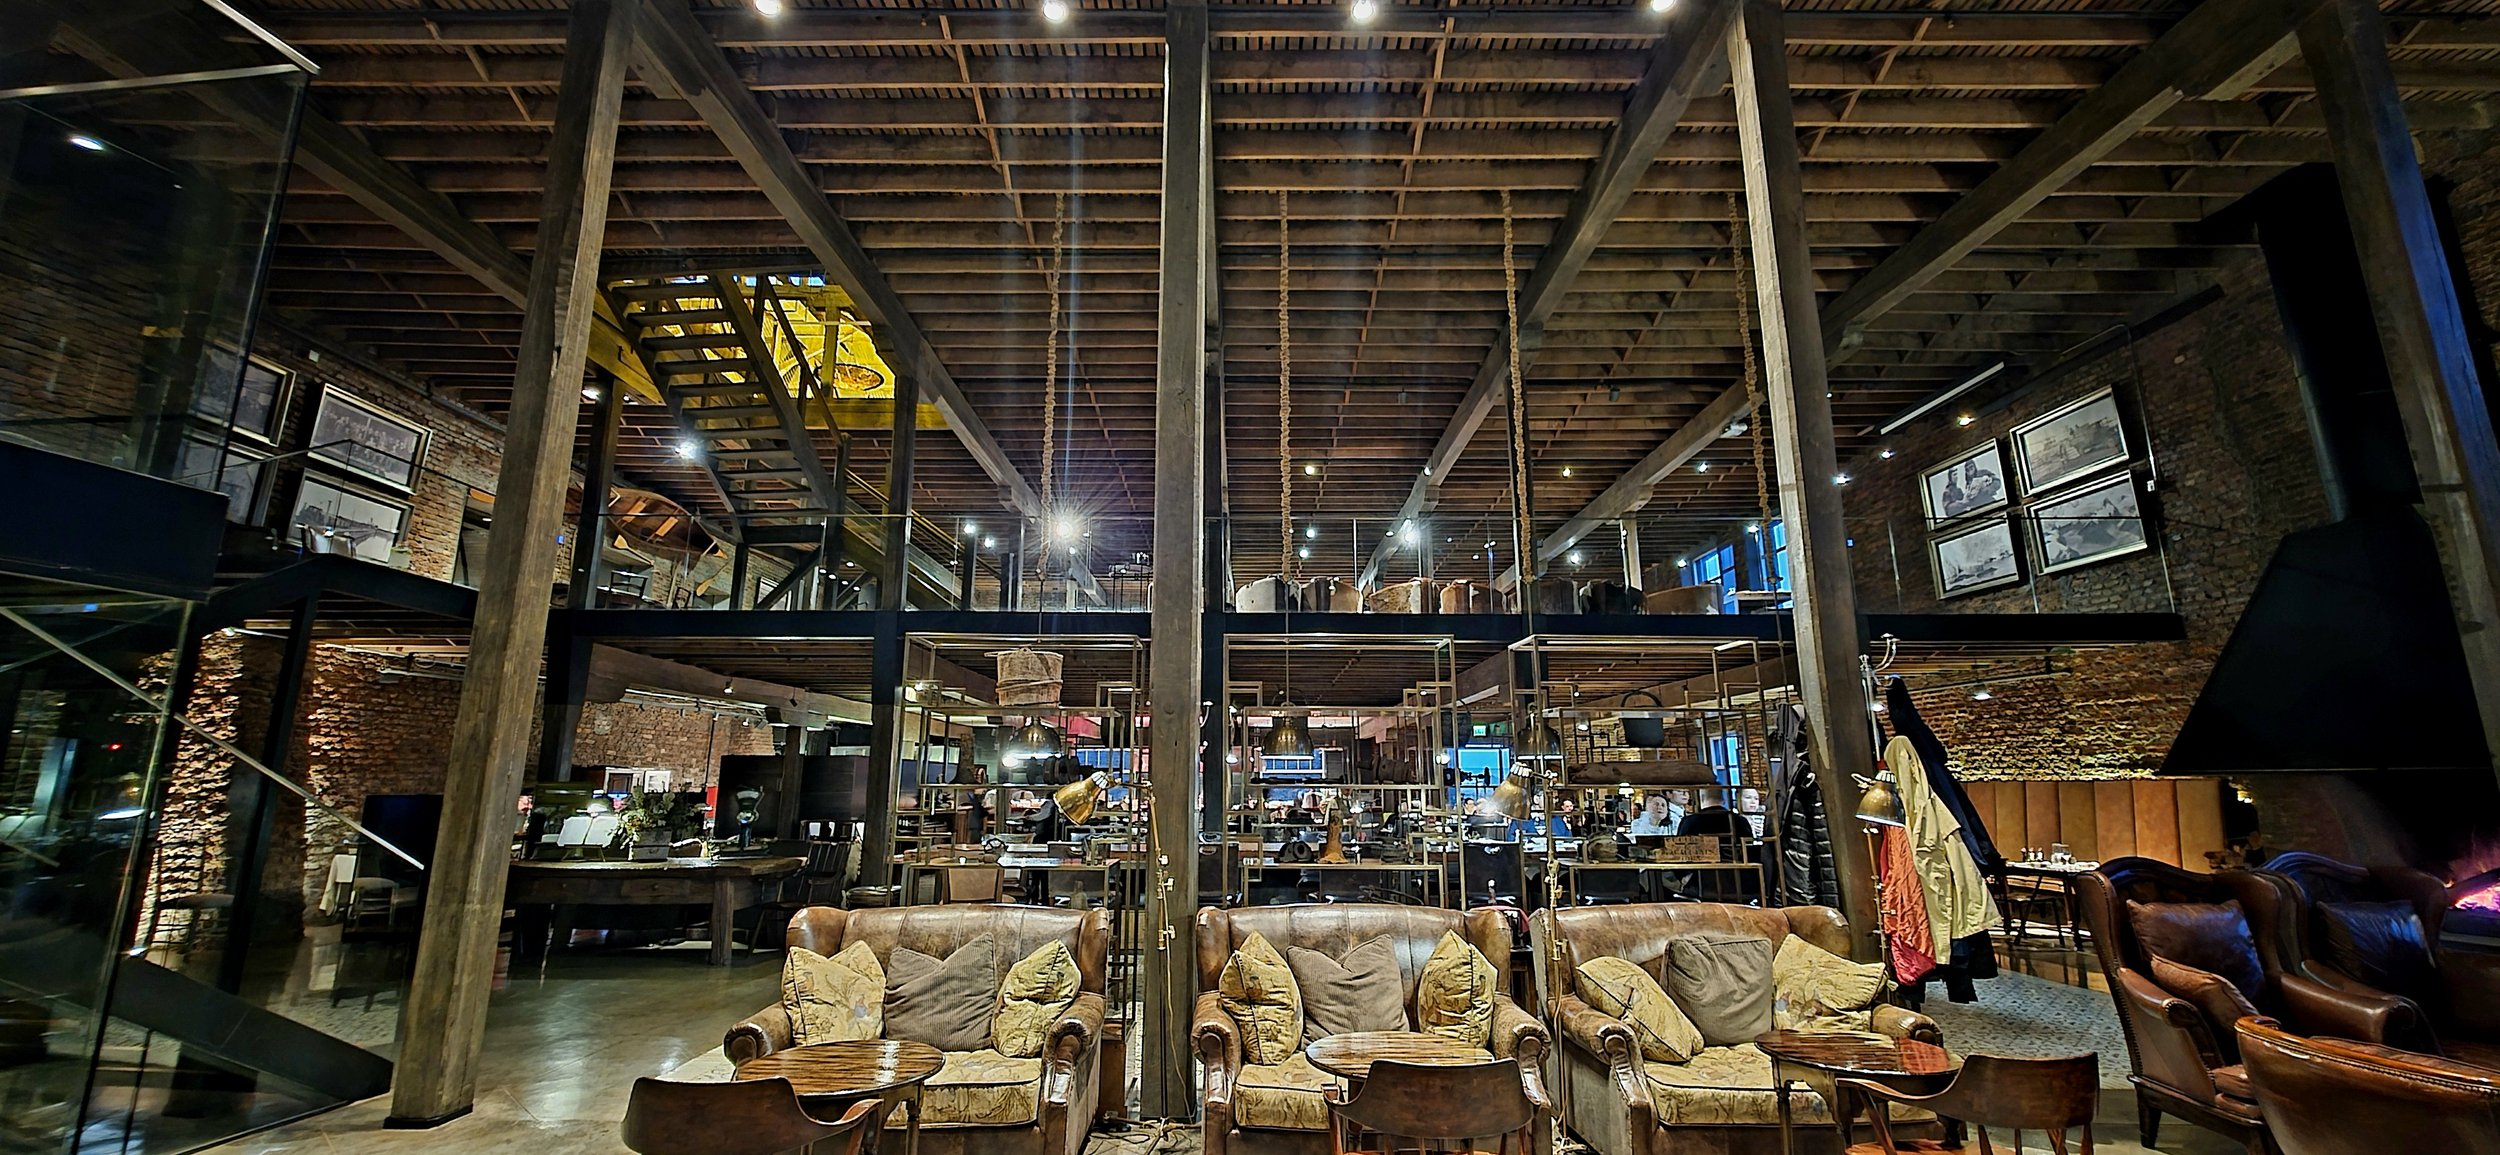
After the full day of activities, consider treating yourself to dinner and drinks at the coolest spot in Puerto Bories, The Singular Hotel (mentioned above). If time doesn’t permit the same day, you should definitely still visit the hotel before the end of your trip. It’s a luxury five-star hotel housed in former cold storage plant, declared a National Monument in 1996— a five minute drive from Puerto Natales. The hotel is almost a tourist attraction in itself with many amenities, hallways and rooms to explore!
Activity #4: The French Valley Hike
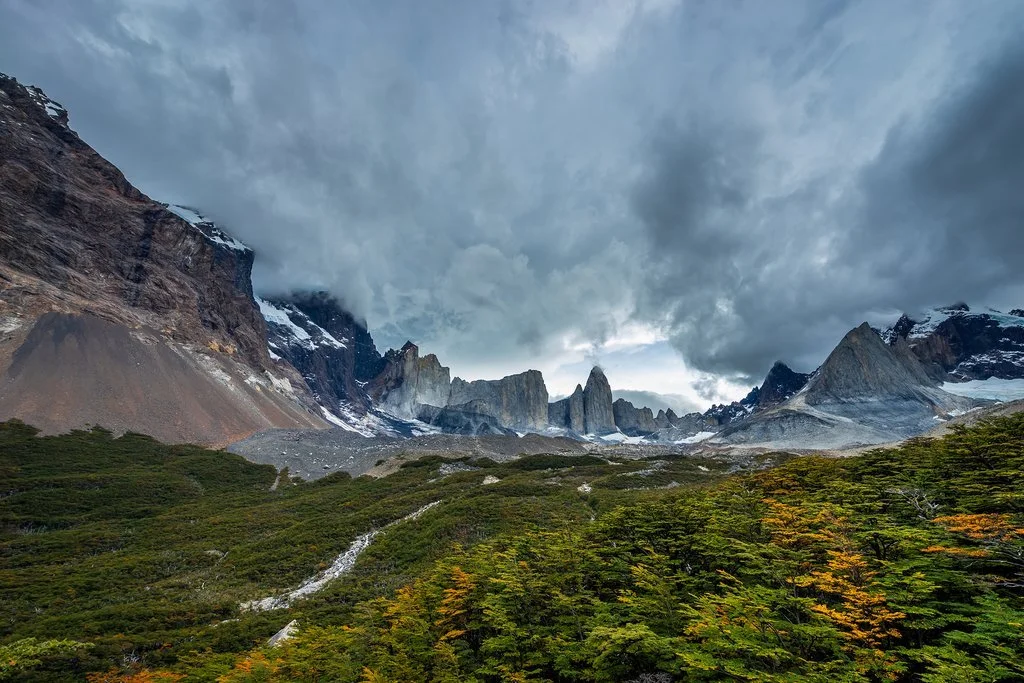
The second most popular hike in the park without doubt, is The French Valley. Unfortunately, this was the only day that weather had prevented me from finishing the hike. In fact, the clouds covered most of the landscapes for the entire excursion, hence taking photos was nearly impossible. That said, I posted the photo above to illustrate what the final destination is supposed to appear like on a less rainy day. To get to the French Valley trailhead, you need to book a catamaran across Lago Pehoé from the Pudeto dock (same parking lot as Cuernos) to the Paine Grande refuge, which is the starting point for the hike. I strongly advise purchasing the ferry tickets in advance which are available on many sites like Viator, GetYourGuide and more. The hike is ~12 miles and ~8 hours roundtrip. The trail is easy to navigate so a guide isn’t necessary, but I’d recommend contacting Javier again if you want a local companion. Similar to the Base of Torres, it will likely be extremely cold at the top so dress accordingly. As a heads up, it doesn’t get super scenic until ~2 hours into the hike.
Overall, these are the four “must-do” activities in my opinion when visiting Torres Del Paine. However, there are many more options that can easily fill 2-3 weeks including longer treks, ice climbing, kayaking and horseback riding to name a few. I also listed a couple more shorter excursions below that can be added to your itinerary if time permits.
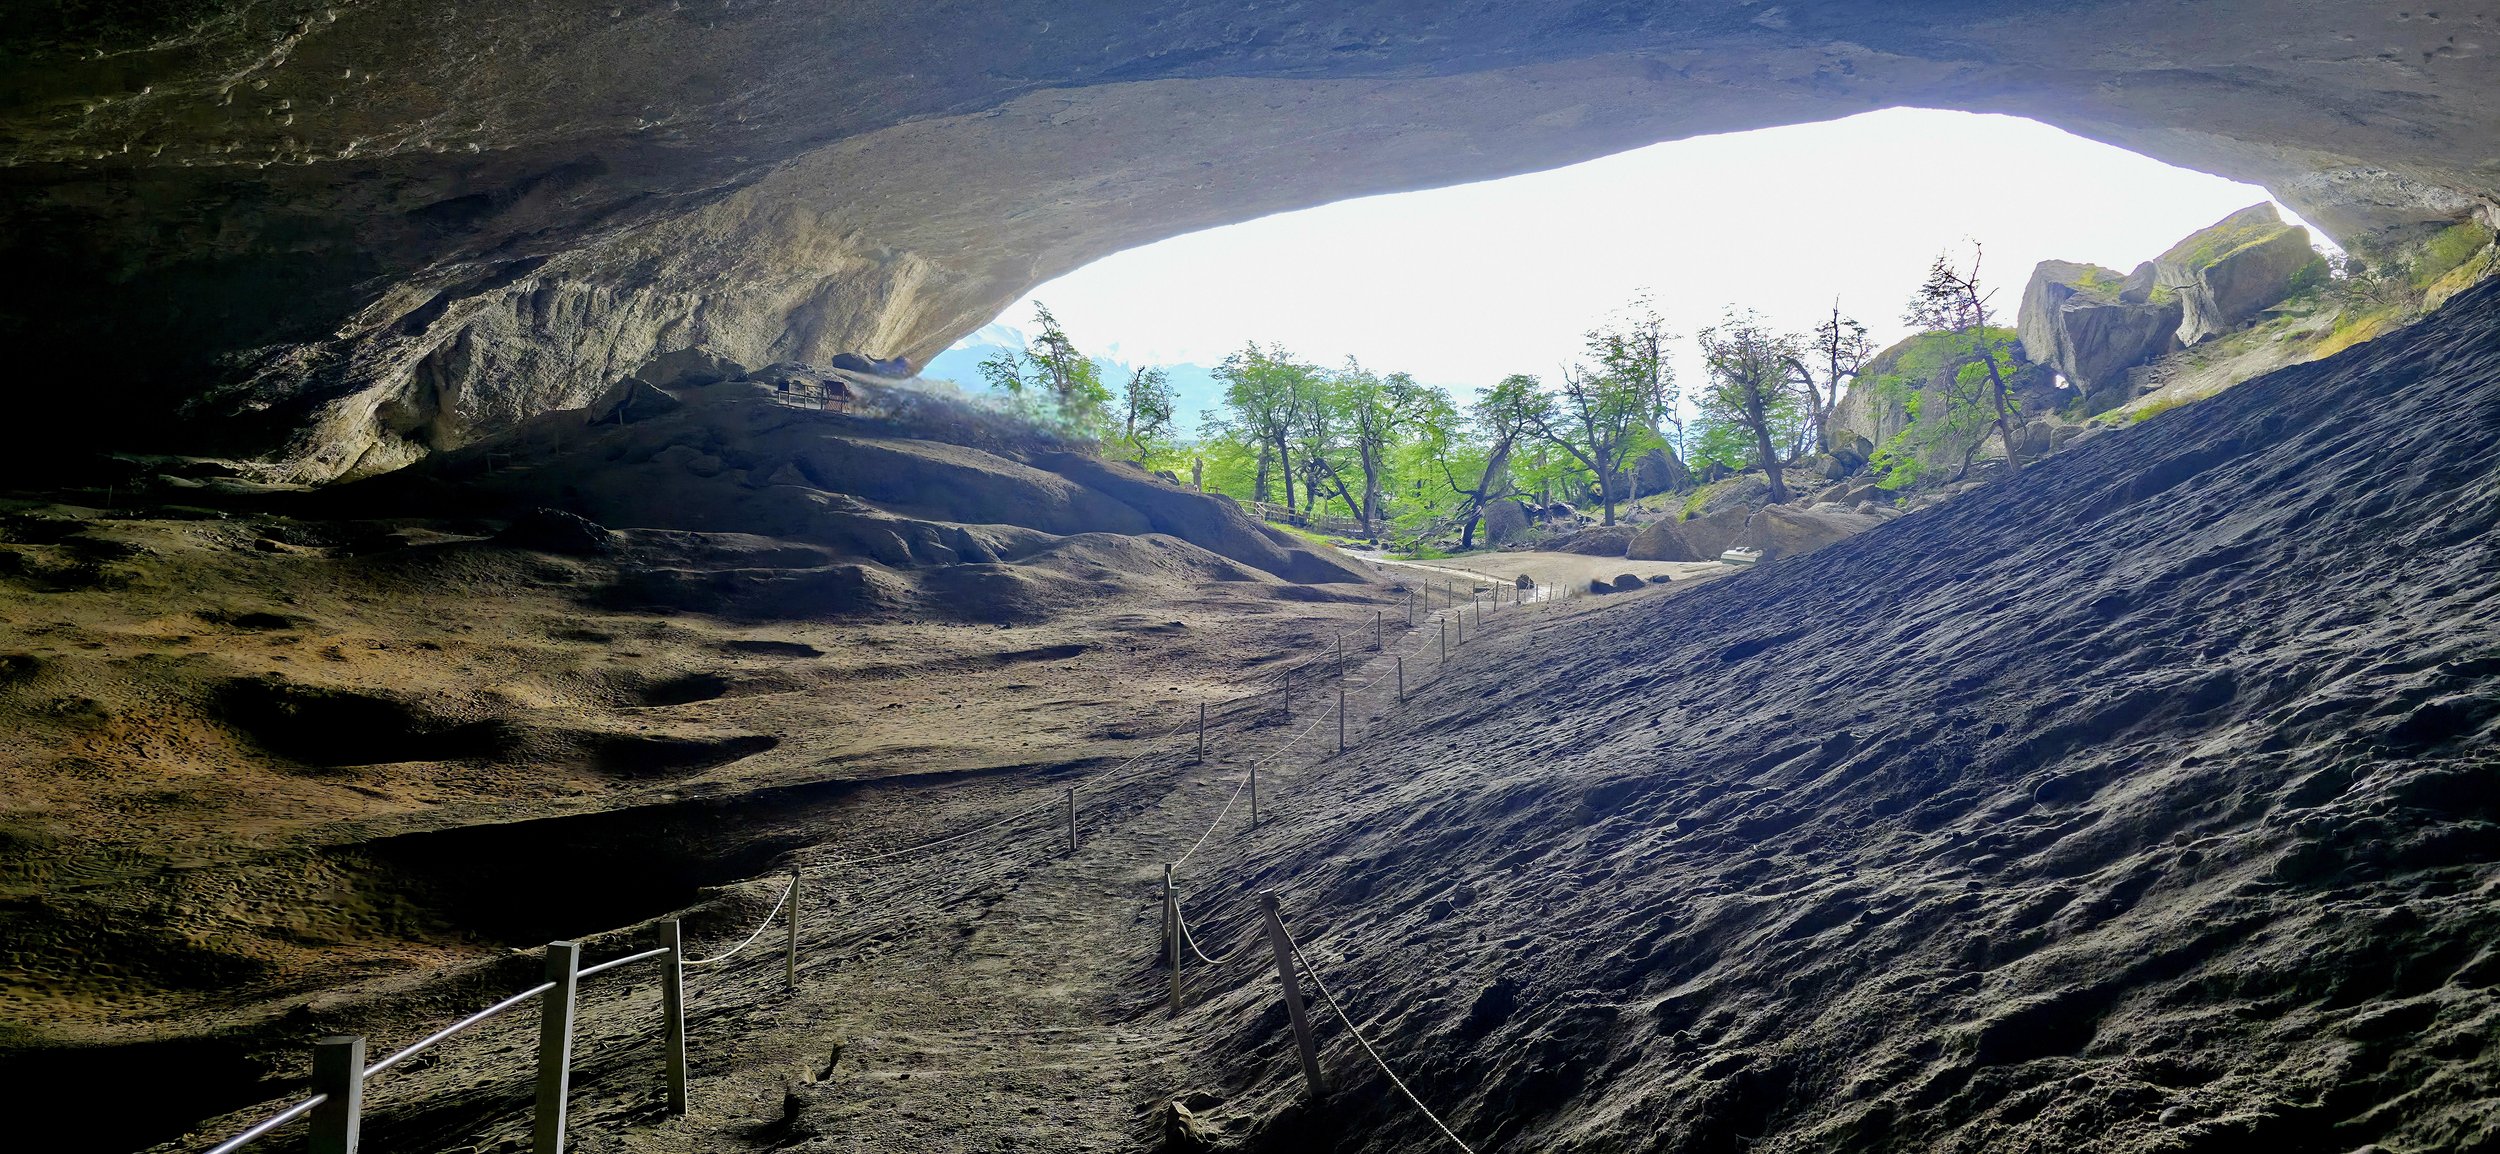
Cueva del Milodon Natural Monument is a ~30 min drive from Puerto Natales and on the way to Torres del Paine. From the parking lot, it’s a short walk to the massive cave where prehistoric remains were found. The photo above was taken inside the cave from the top of the stairs. There are a few other smaller caves in the park, but not worth the long walk in my opinion. I believe the caves are open M-Sun 8:30am- 5pm for ~$10/person. Late afternoon is the busiest time of day since most of the tour buses make a stop on the return trip from Torres del Paine.
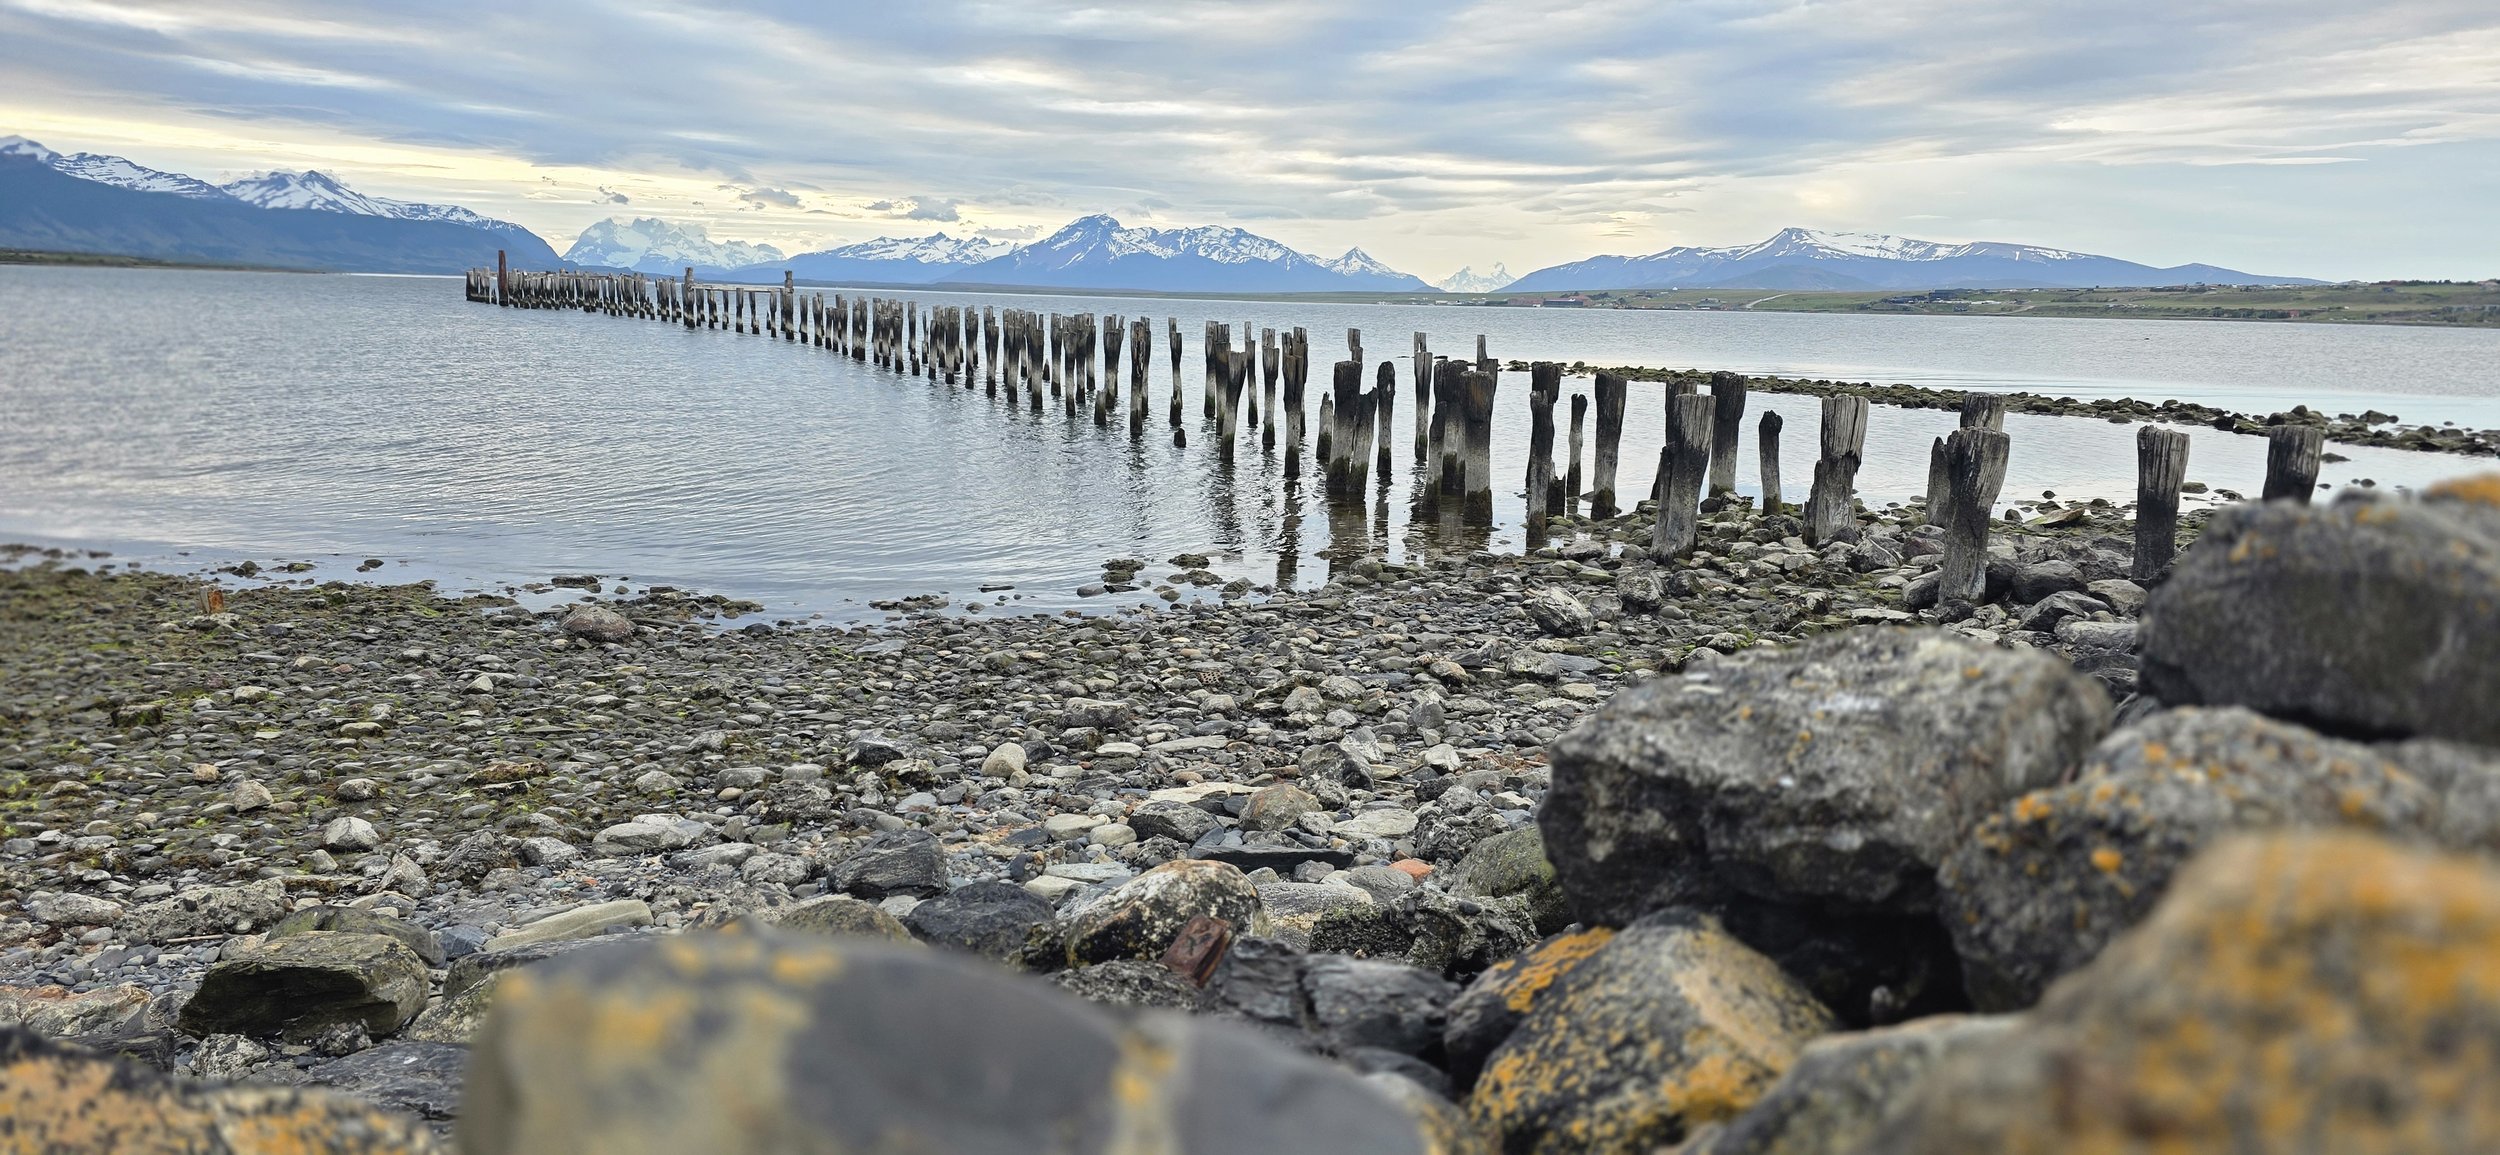
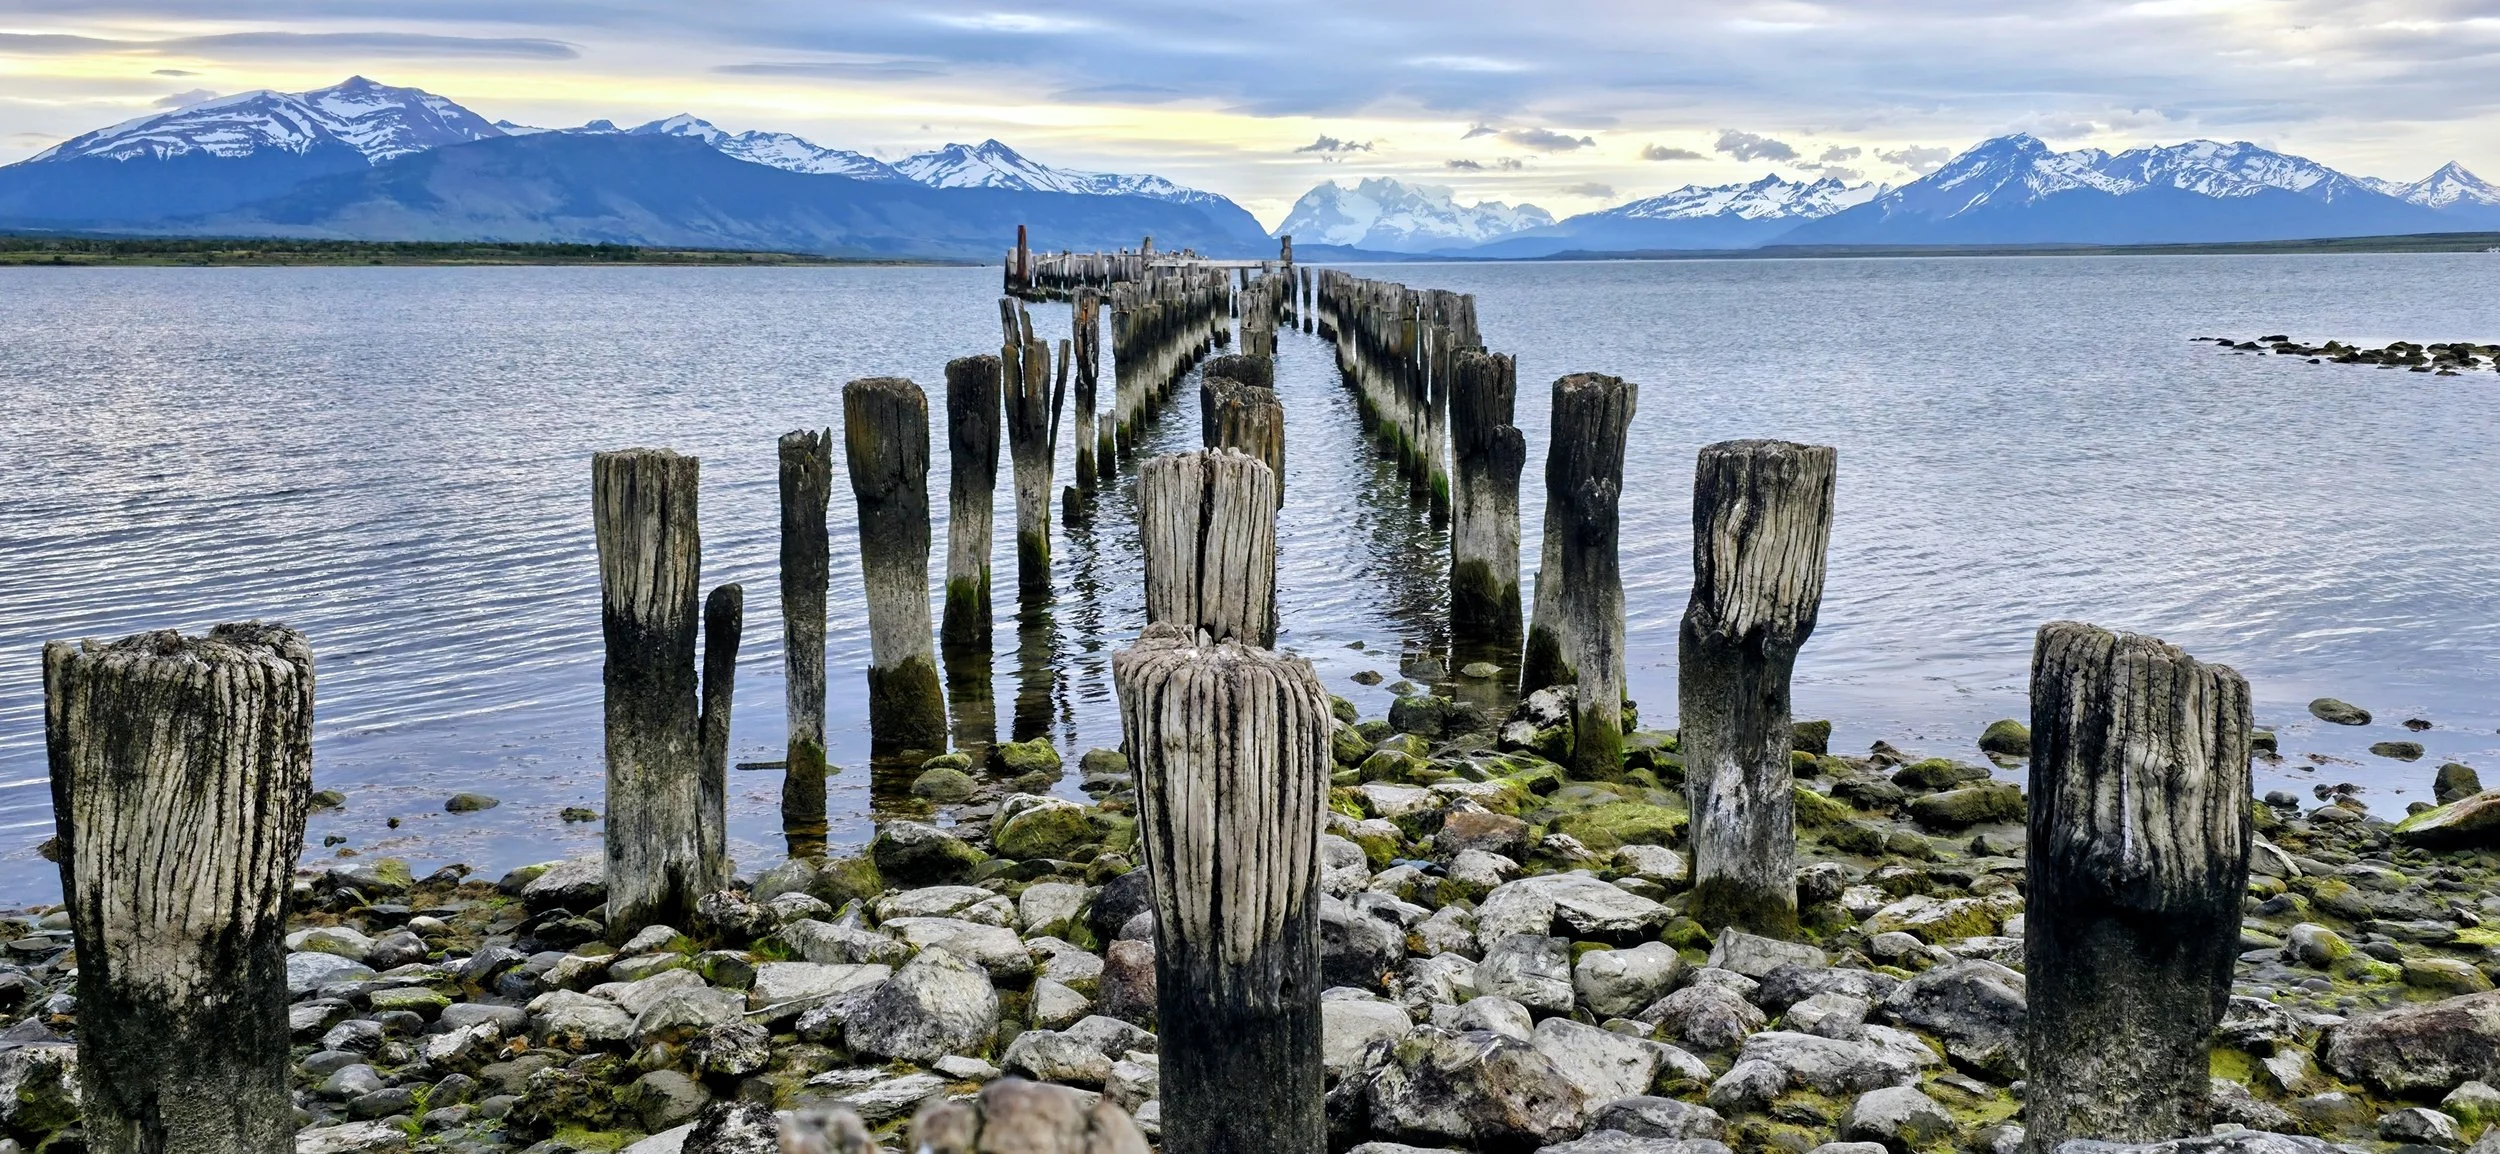
Take a late afternoon stroll to explore Puerto Natales and you’ll likely be surprised by the quantity of boutique stores and cafes, I was! The most iconic picture in Puerto Natales features its historic pier, often with the dramatic peaks of Torres del Paine as a backdrop, especially during a sunset, capturing reflections on the water and the vast Patagonian landscape. To find these photos, I suggest getting as close to the water as possible and crouching low when snapping the picture.
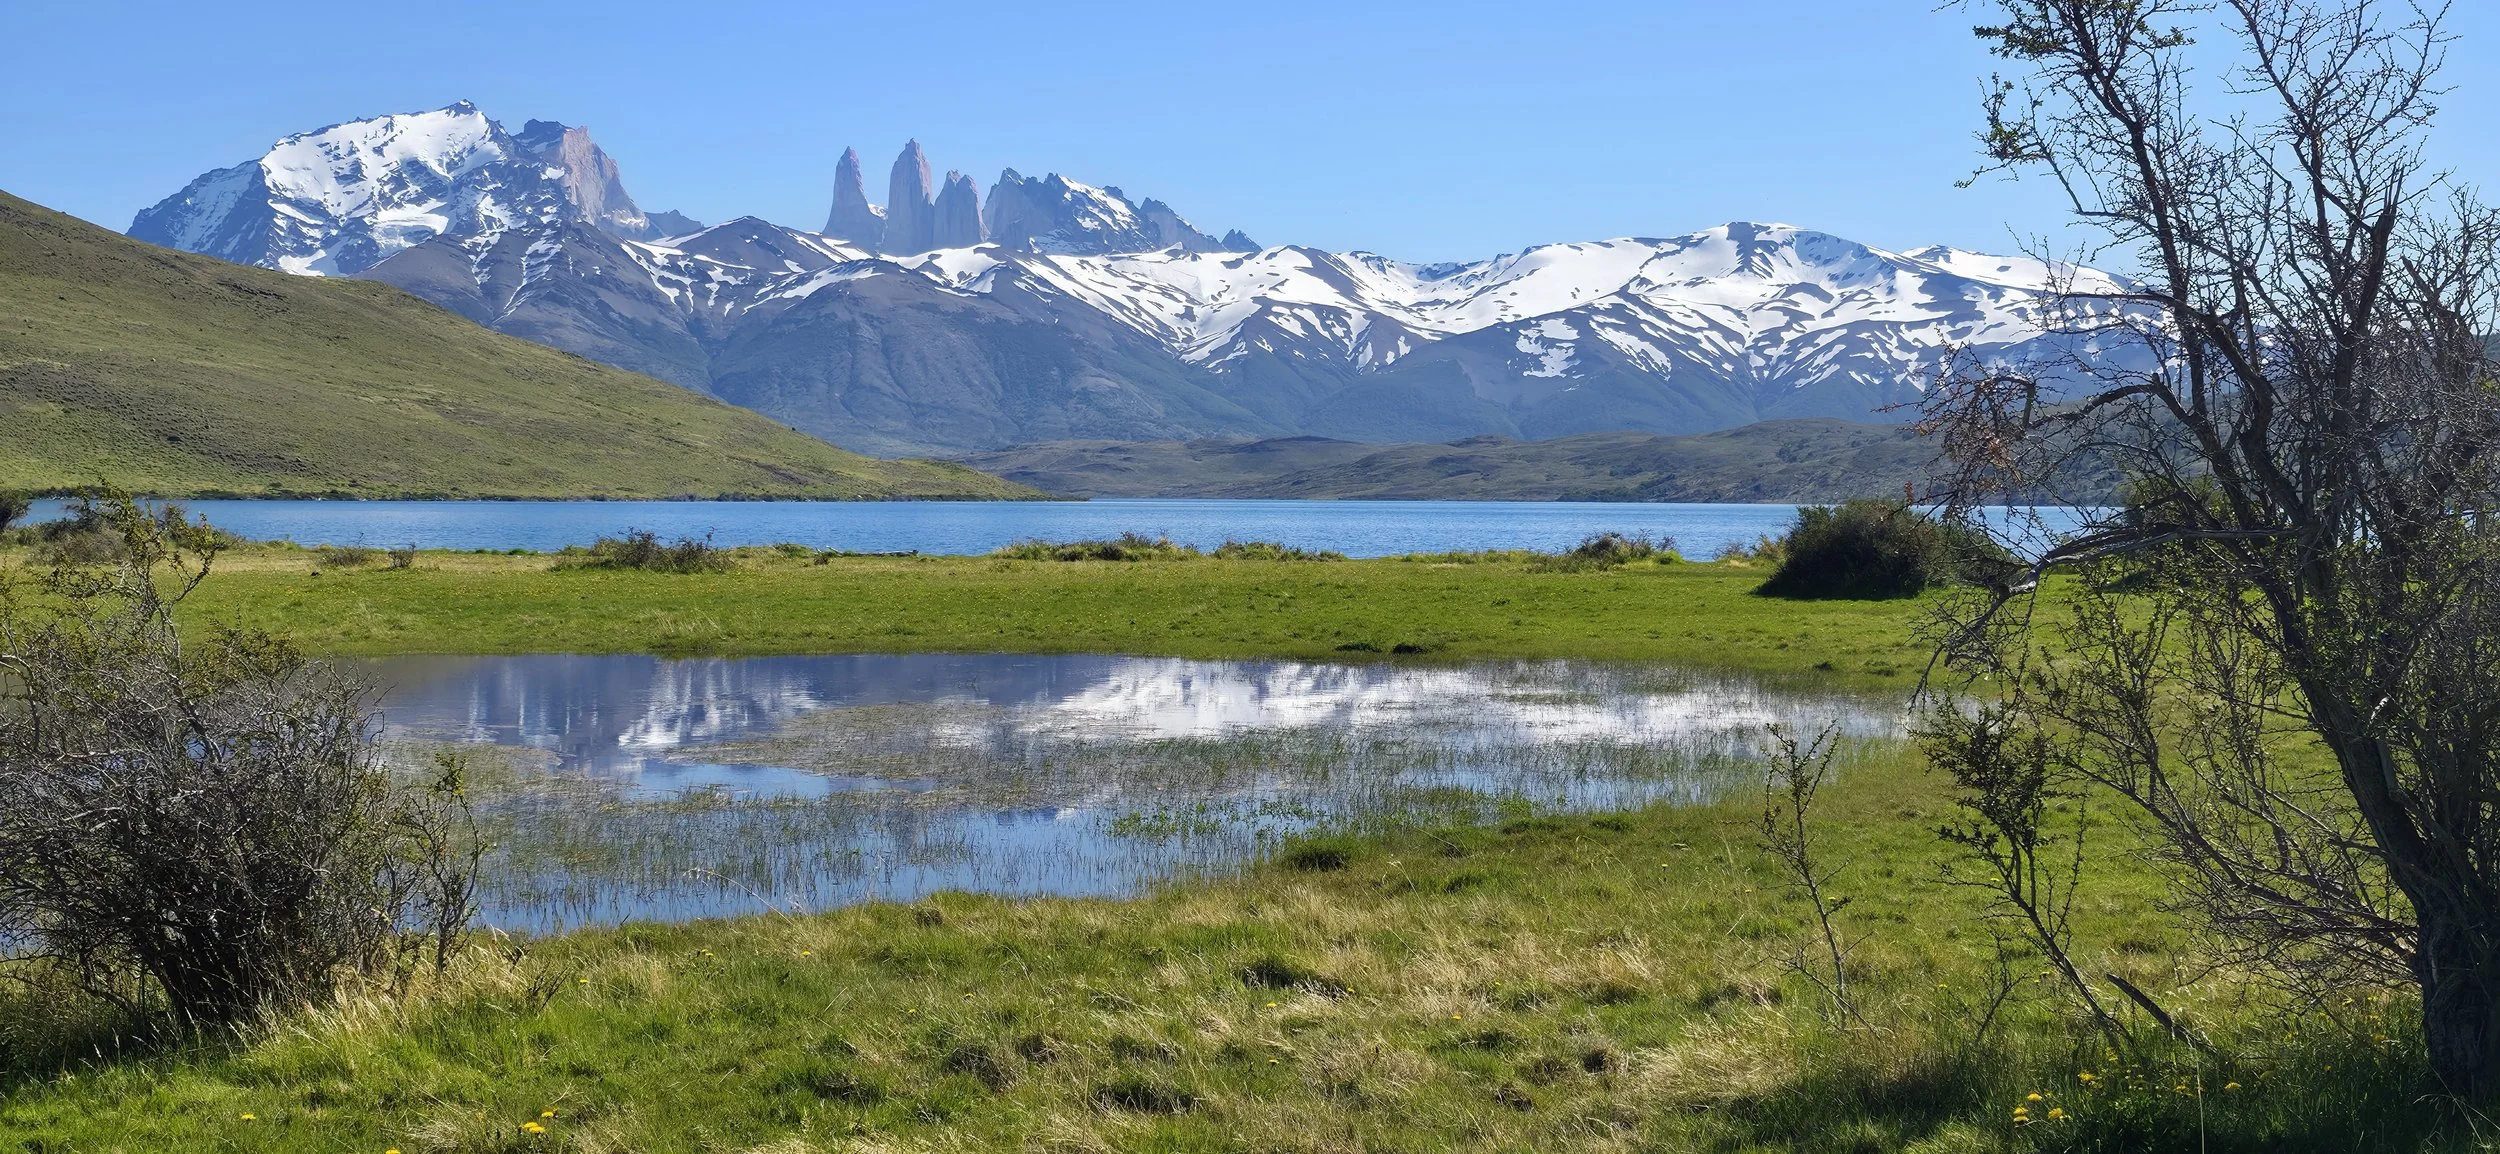
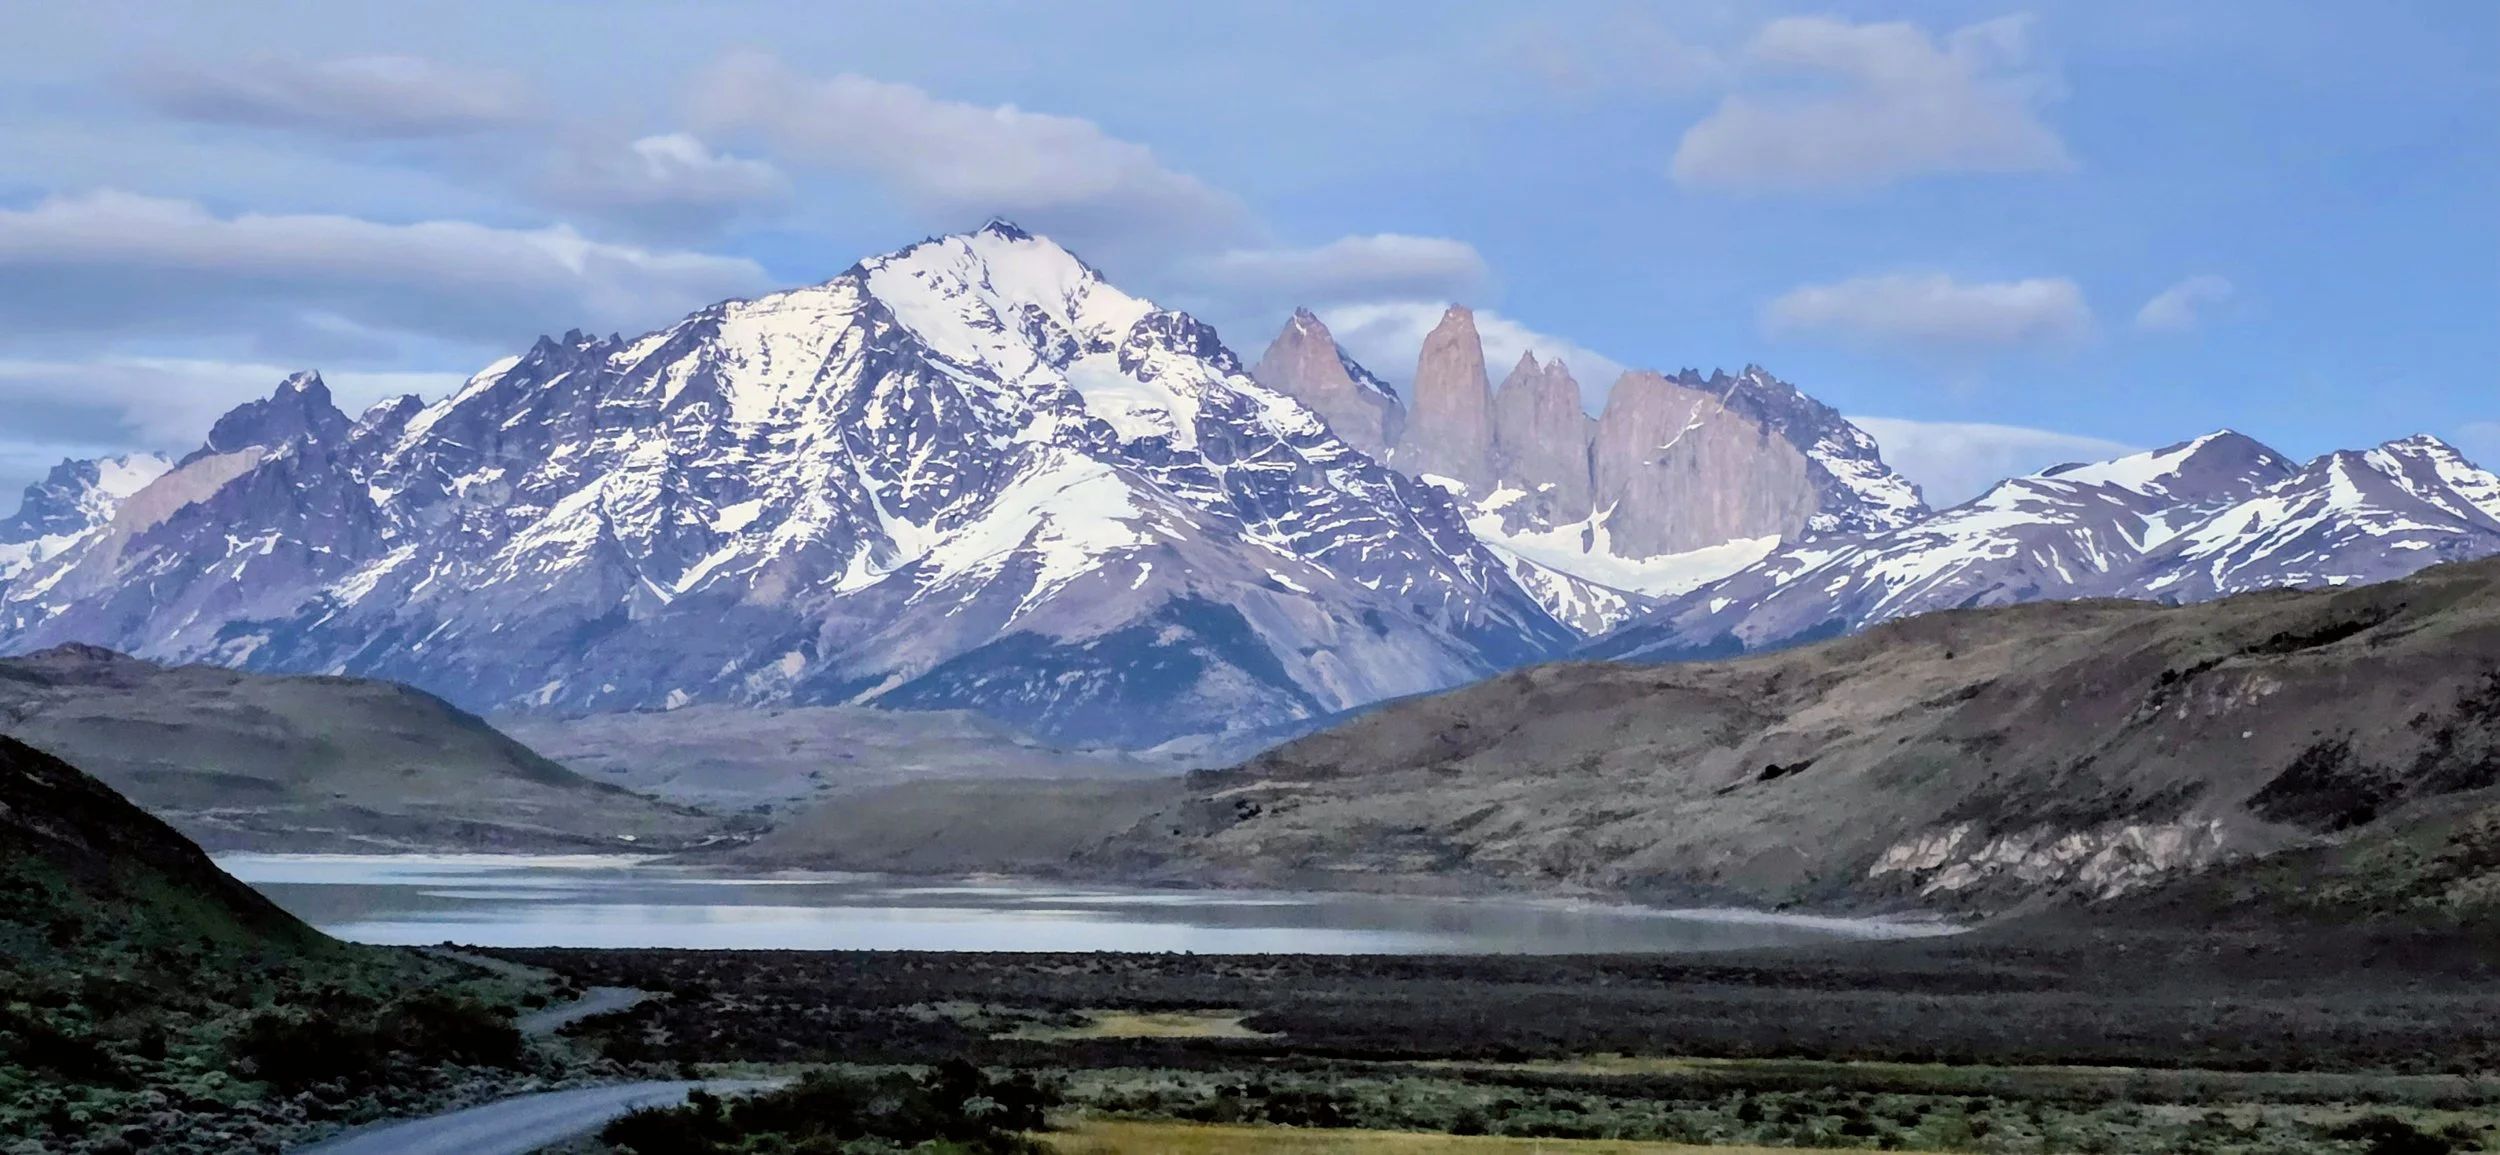
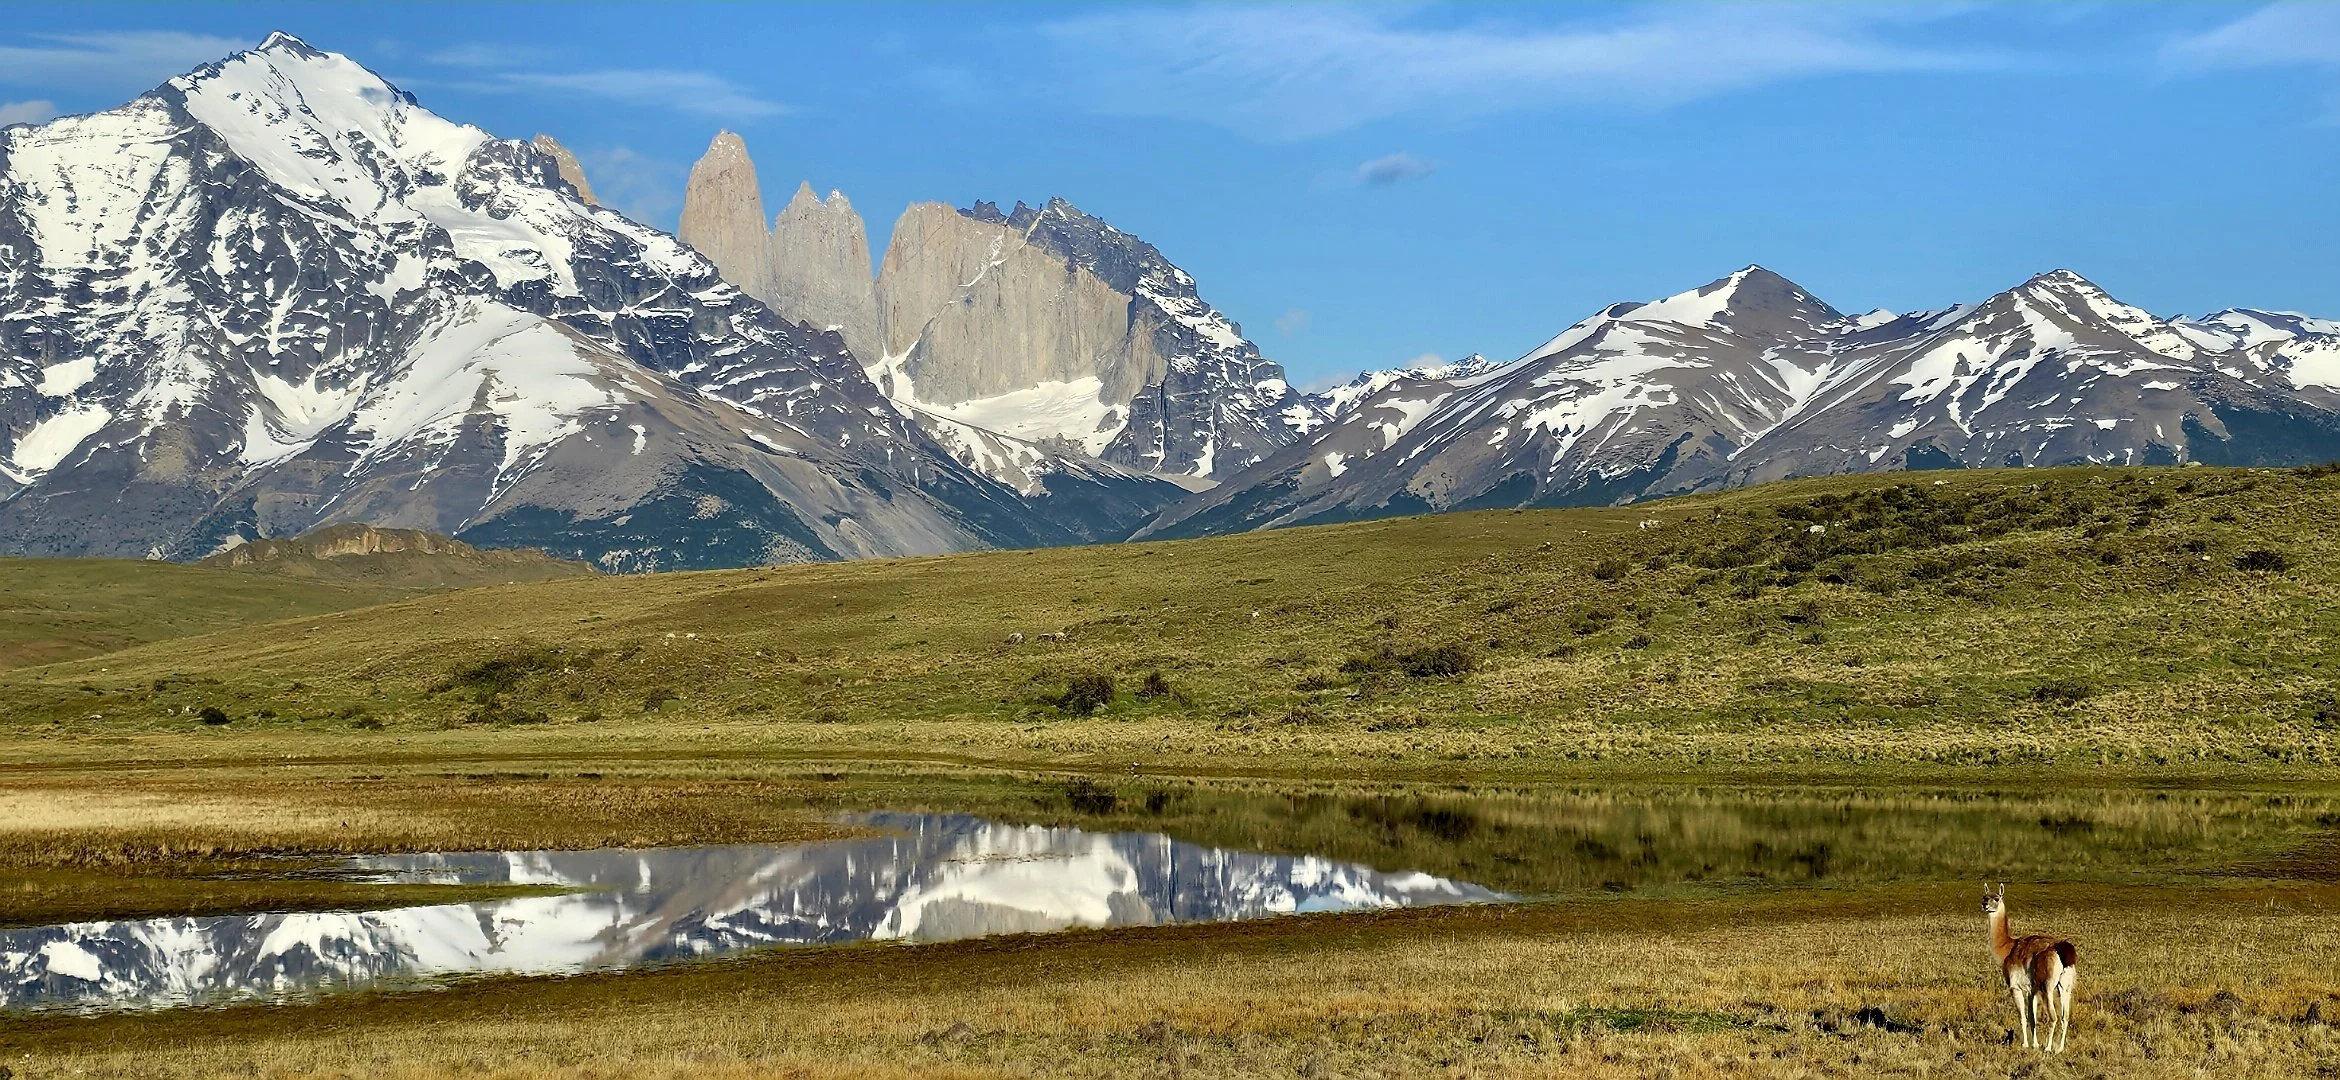
Laguna Azul
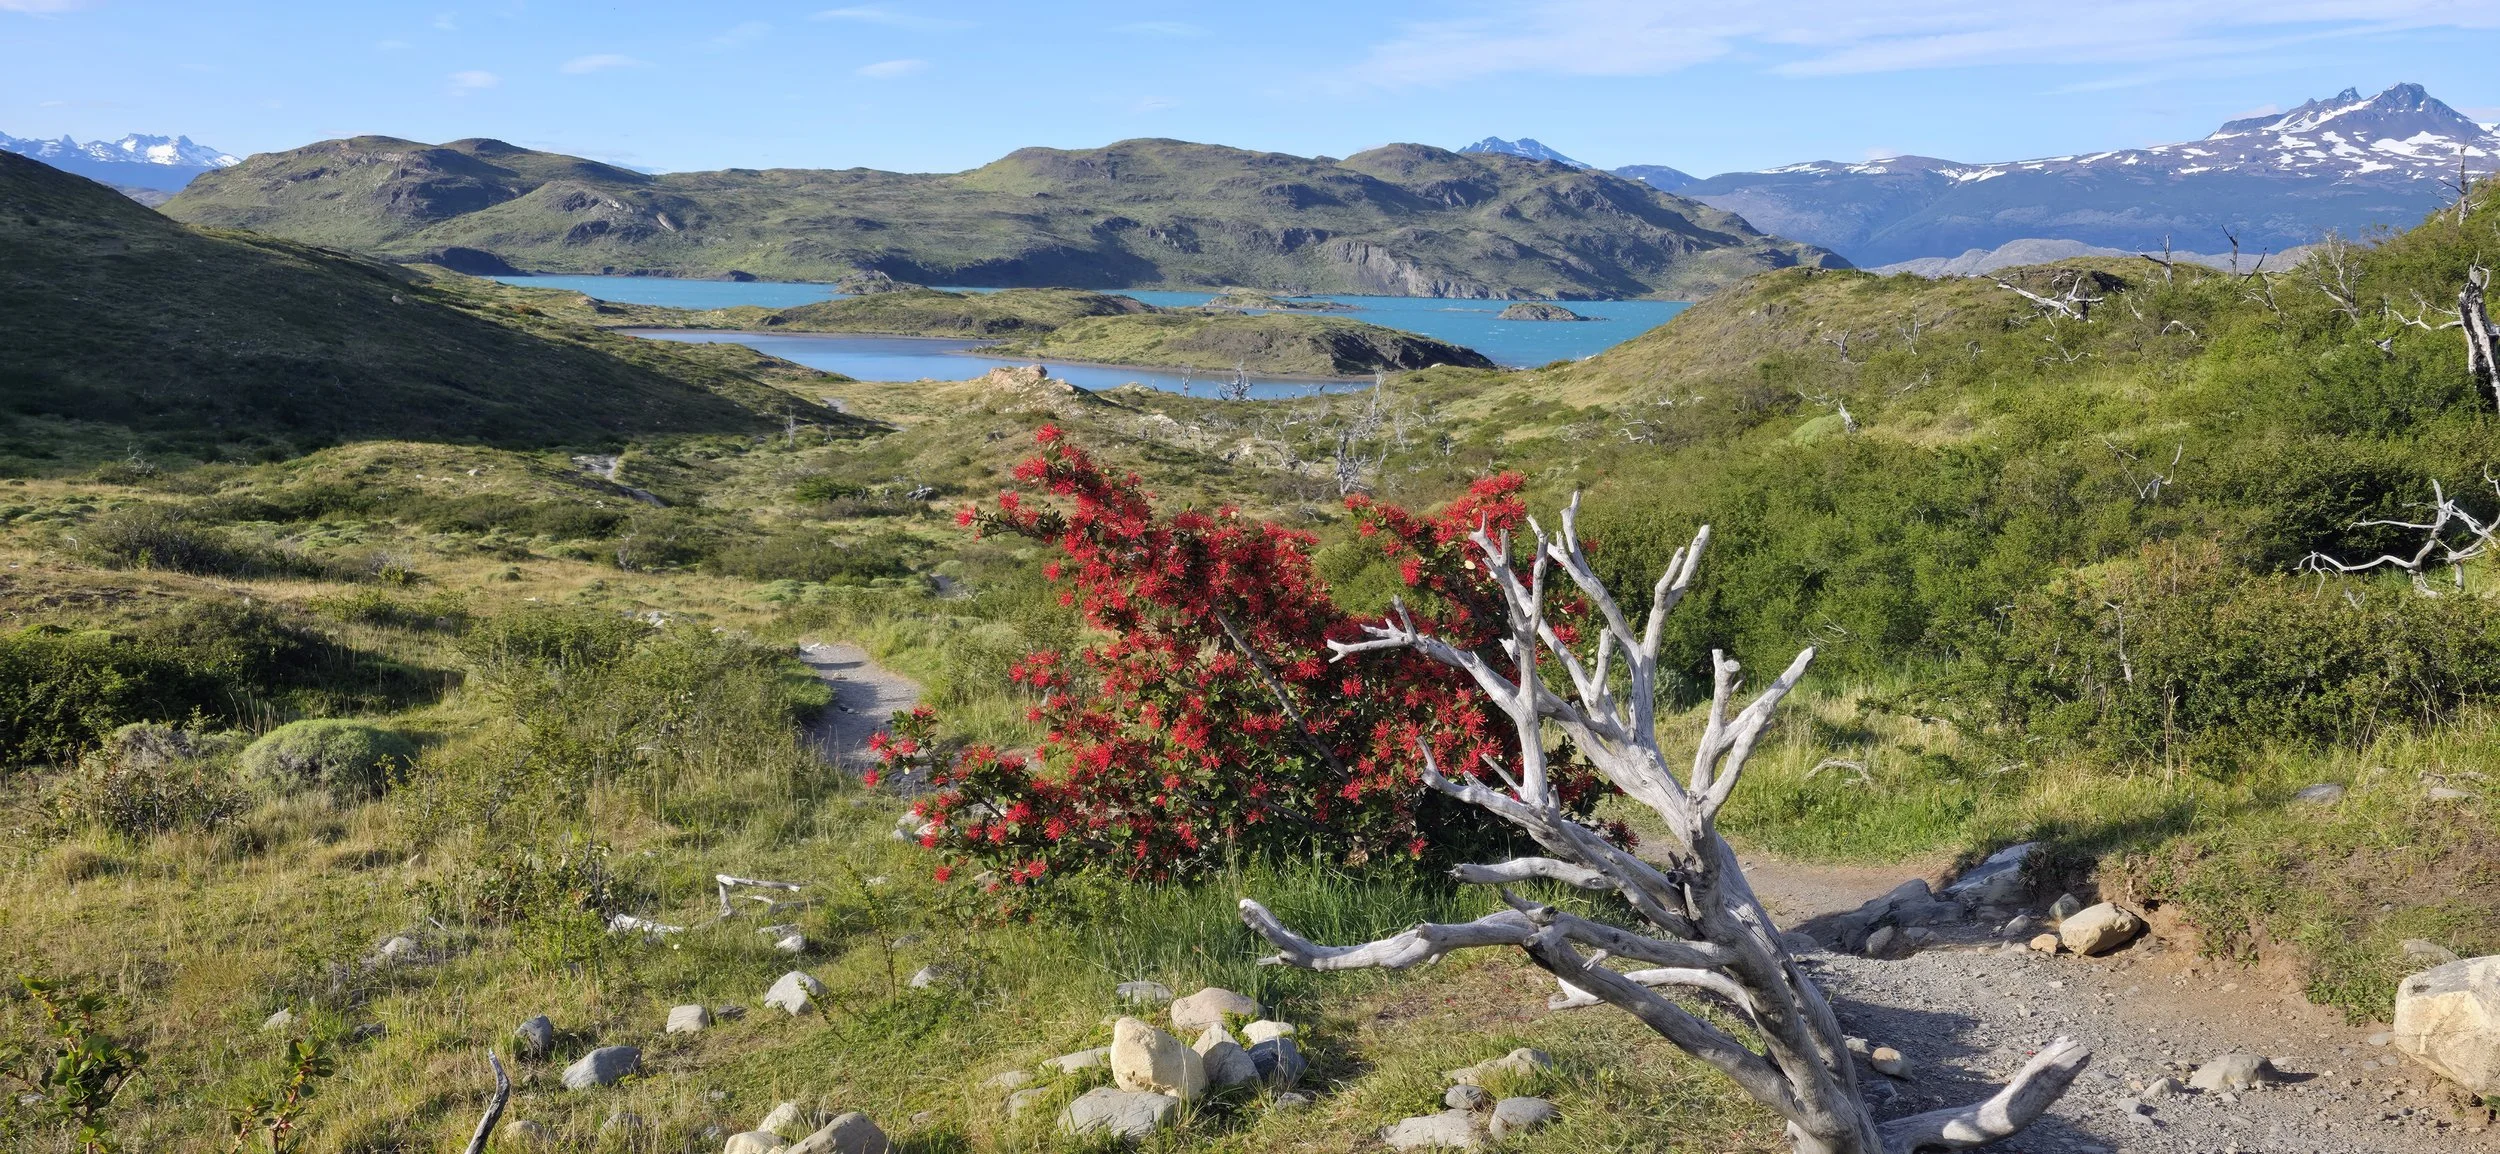
(Blue Lagoon) is one of the most accessible and picturesque destinations in the National Park. It is famous for offering a clear, panoramic view of the three granite towers without the intense hiking required by the park's more famous circuits. It’s a bit out of the way (~30 minute drive) from the other stops which is the reason for not mentioning it earlier. The drive to the lake is scenic and you’ll likely encounter groups of guanacos and possibly pumas stalking them nearby. To get the photo above, you’ll need to drive past the Estancia at the end of the route and navigate over the rocky trail for ~200 yards to the second parking area.
Bariloche, Argentina
Similar to Torres del Paine, I’ve separated Bariloche into a few sections, with each section covering a day or two. Note, the activities are listed in priority from top to bottom, and purely my own opinion.
Day 1: Circuito Chico Scenic Loop Drive
The Circuito Chico is the most iconic scenic drive in San Carlos de Bariloche, Argentina. It offers a circular route through lush forests and spectacular Andean lake landscapes. The main loop is approximately 25– 27 km (17 miles) and it takes about 40 minutes without any stops. To enjoy the viewpoints and activities, plan for full day or possibly two. As a heads up, my suggested route might seem a little out of order compared to other blogs because it accounts for tourist traffic and photo lighting. Lastly, it might sound obvious but make sure to drive the entire circuit because there are additional viewpoints that are not mentioned below.
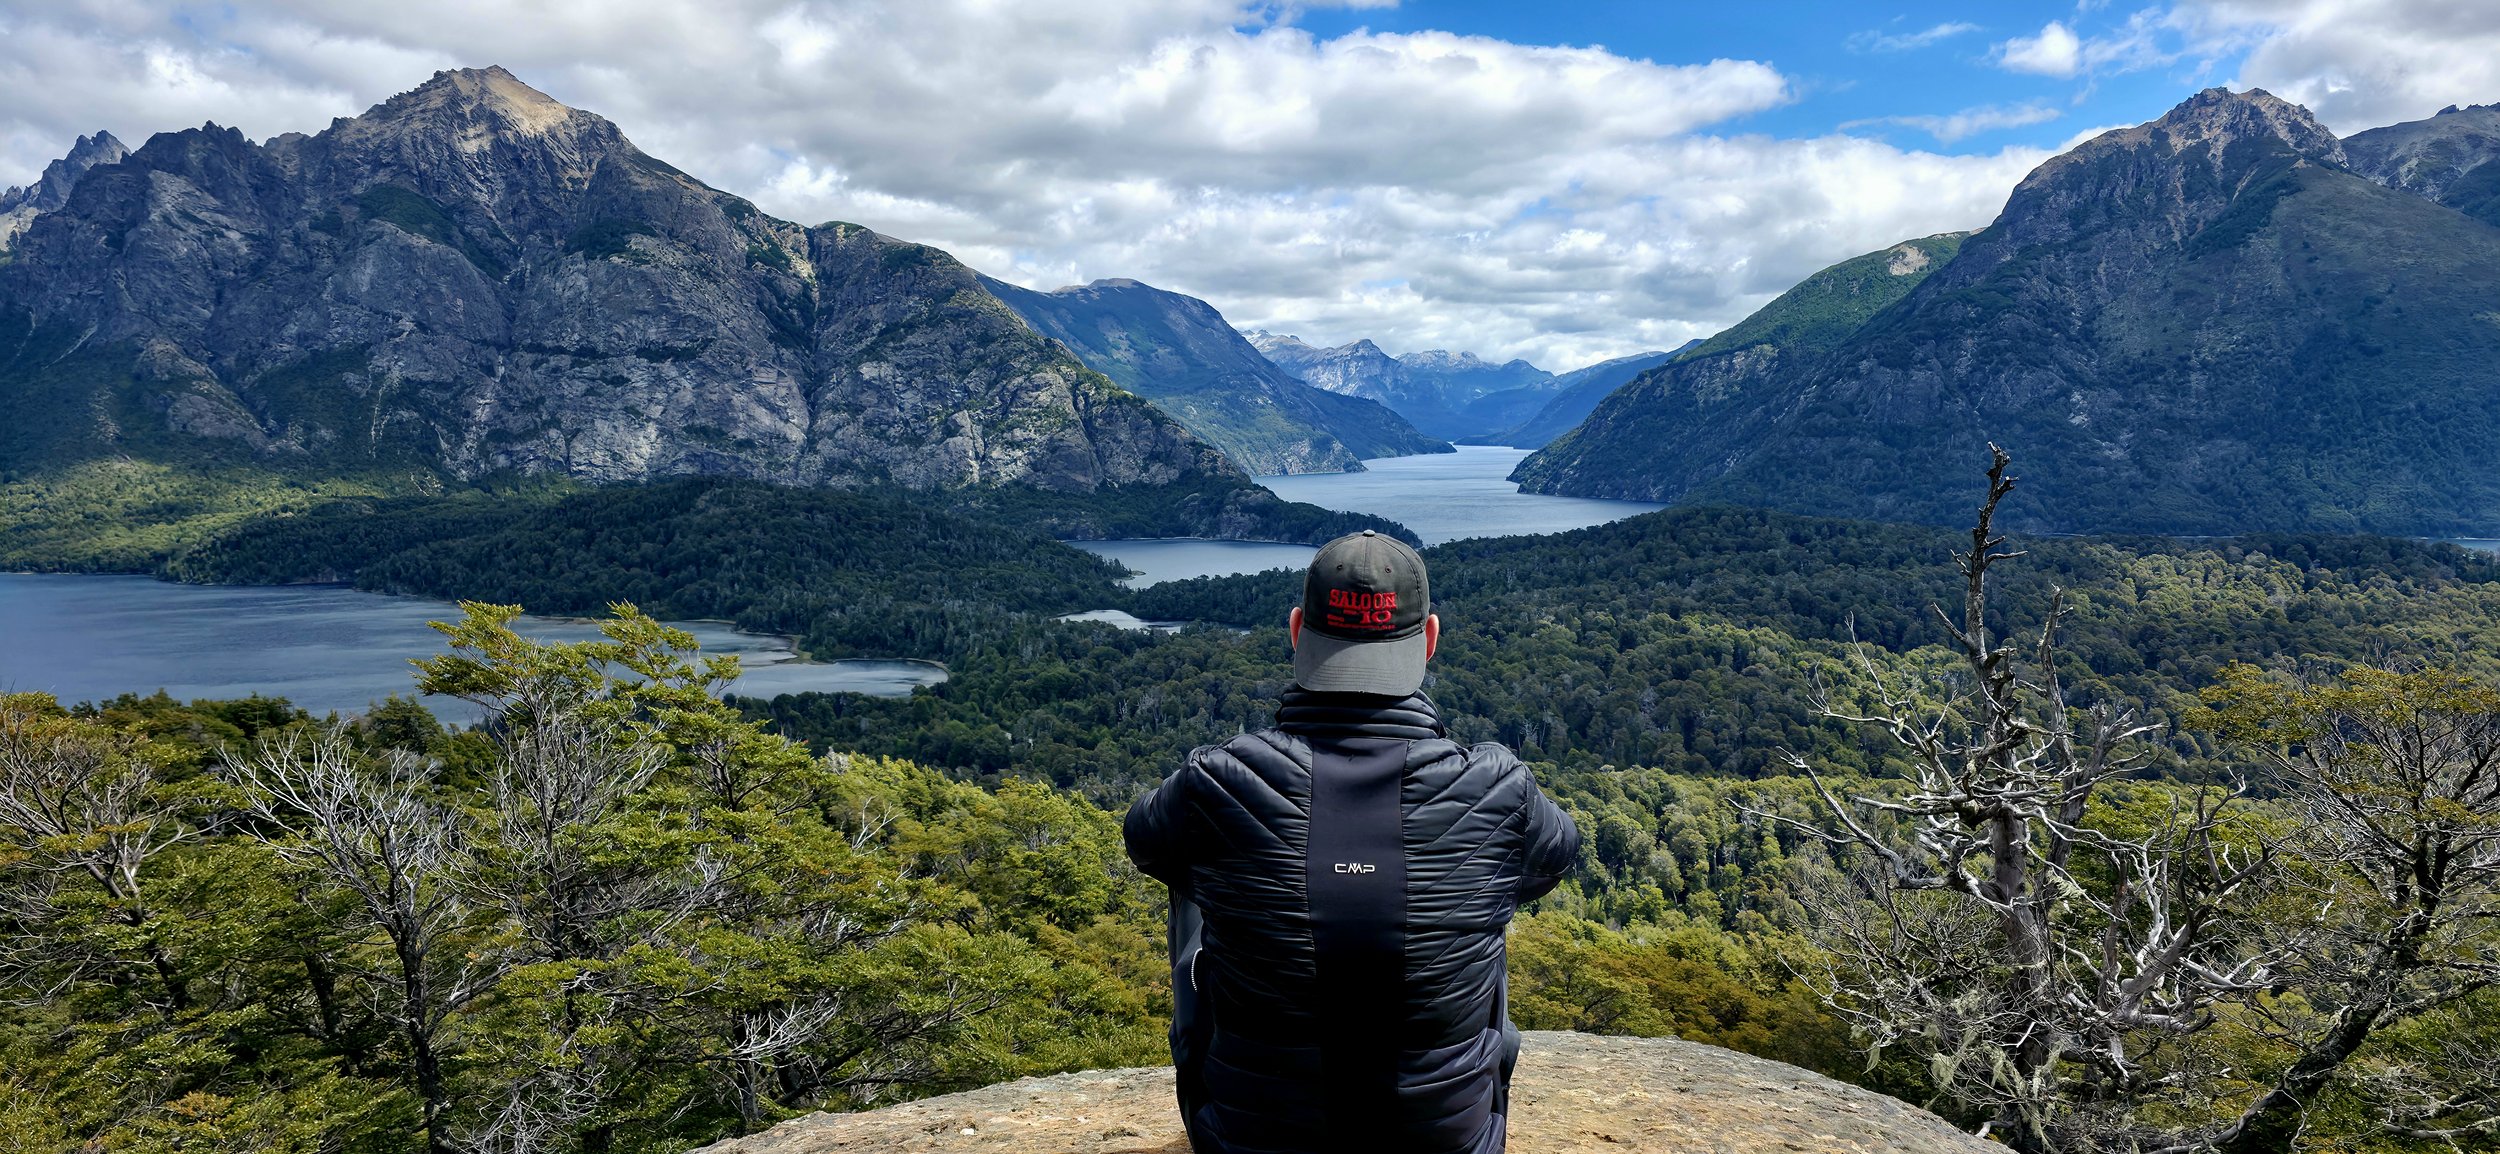
The Llao Llao Hike: I highly recommend starting the Llao Llao hike in the early morning to capture the sunrise and avoid heavier foot traffic. You’ll need to park on the side of the road because there isn’t a designated parking lot. I would consider it an intermediate hike that starts off very easy for the first ~15 minutes, but transitions into a much steeper incline for the remaining 45 minutes. The trail is generally easy to navigate and can be accomplished even quicker for those in really good shape. You’ll pass some nice lookout points along the trail, however I’d suggest keeping moving to have more privacy time at the top. This photo was taken from one of the two main boulders at the end of the hike. Note, you might see people hanging their feet over the boulder for the “Instagram” photo, but I felt this was a bit dangerous if you’re not careful.
The Los Arrayanes hike is a few minutes’ drive from the Llao Llao hike and is worth a quick walk while you’re in the area. The loop is ~1.8 miles and the difficulty level is very low. The hike includes wooden boardwalks through a smaller Myrtle grove and ends at a beach on Lake Moreno with views of the Llao Llao Hotel. Honestly, you only need to walk for ~20 minutes to see the Arrayanes trees and their unique features before heading back to the car. I have a better hotel photo opportunity coming up next. The trees are between 300- 650 years old and reach heights of ~50 ft. This photo was after ~10 minutes into the hike where you’ll run into more of the larger trees.
After the two hikes, you could plan on heading to the Llao Llao Hotel for a short rest and to possibly grab a bite to eat— it’s just a ~5 minute drive and the guest parking is free.
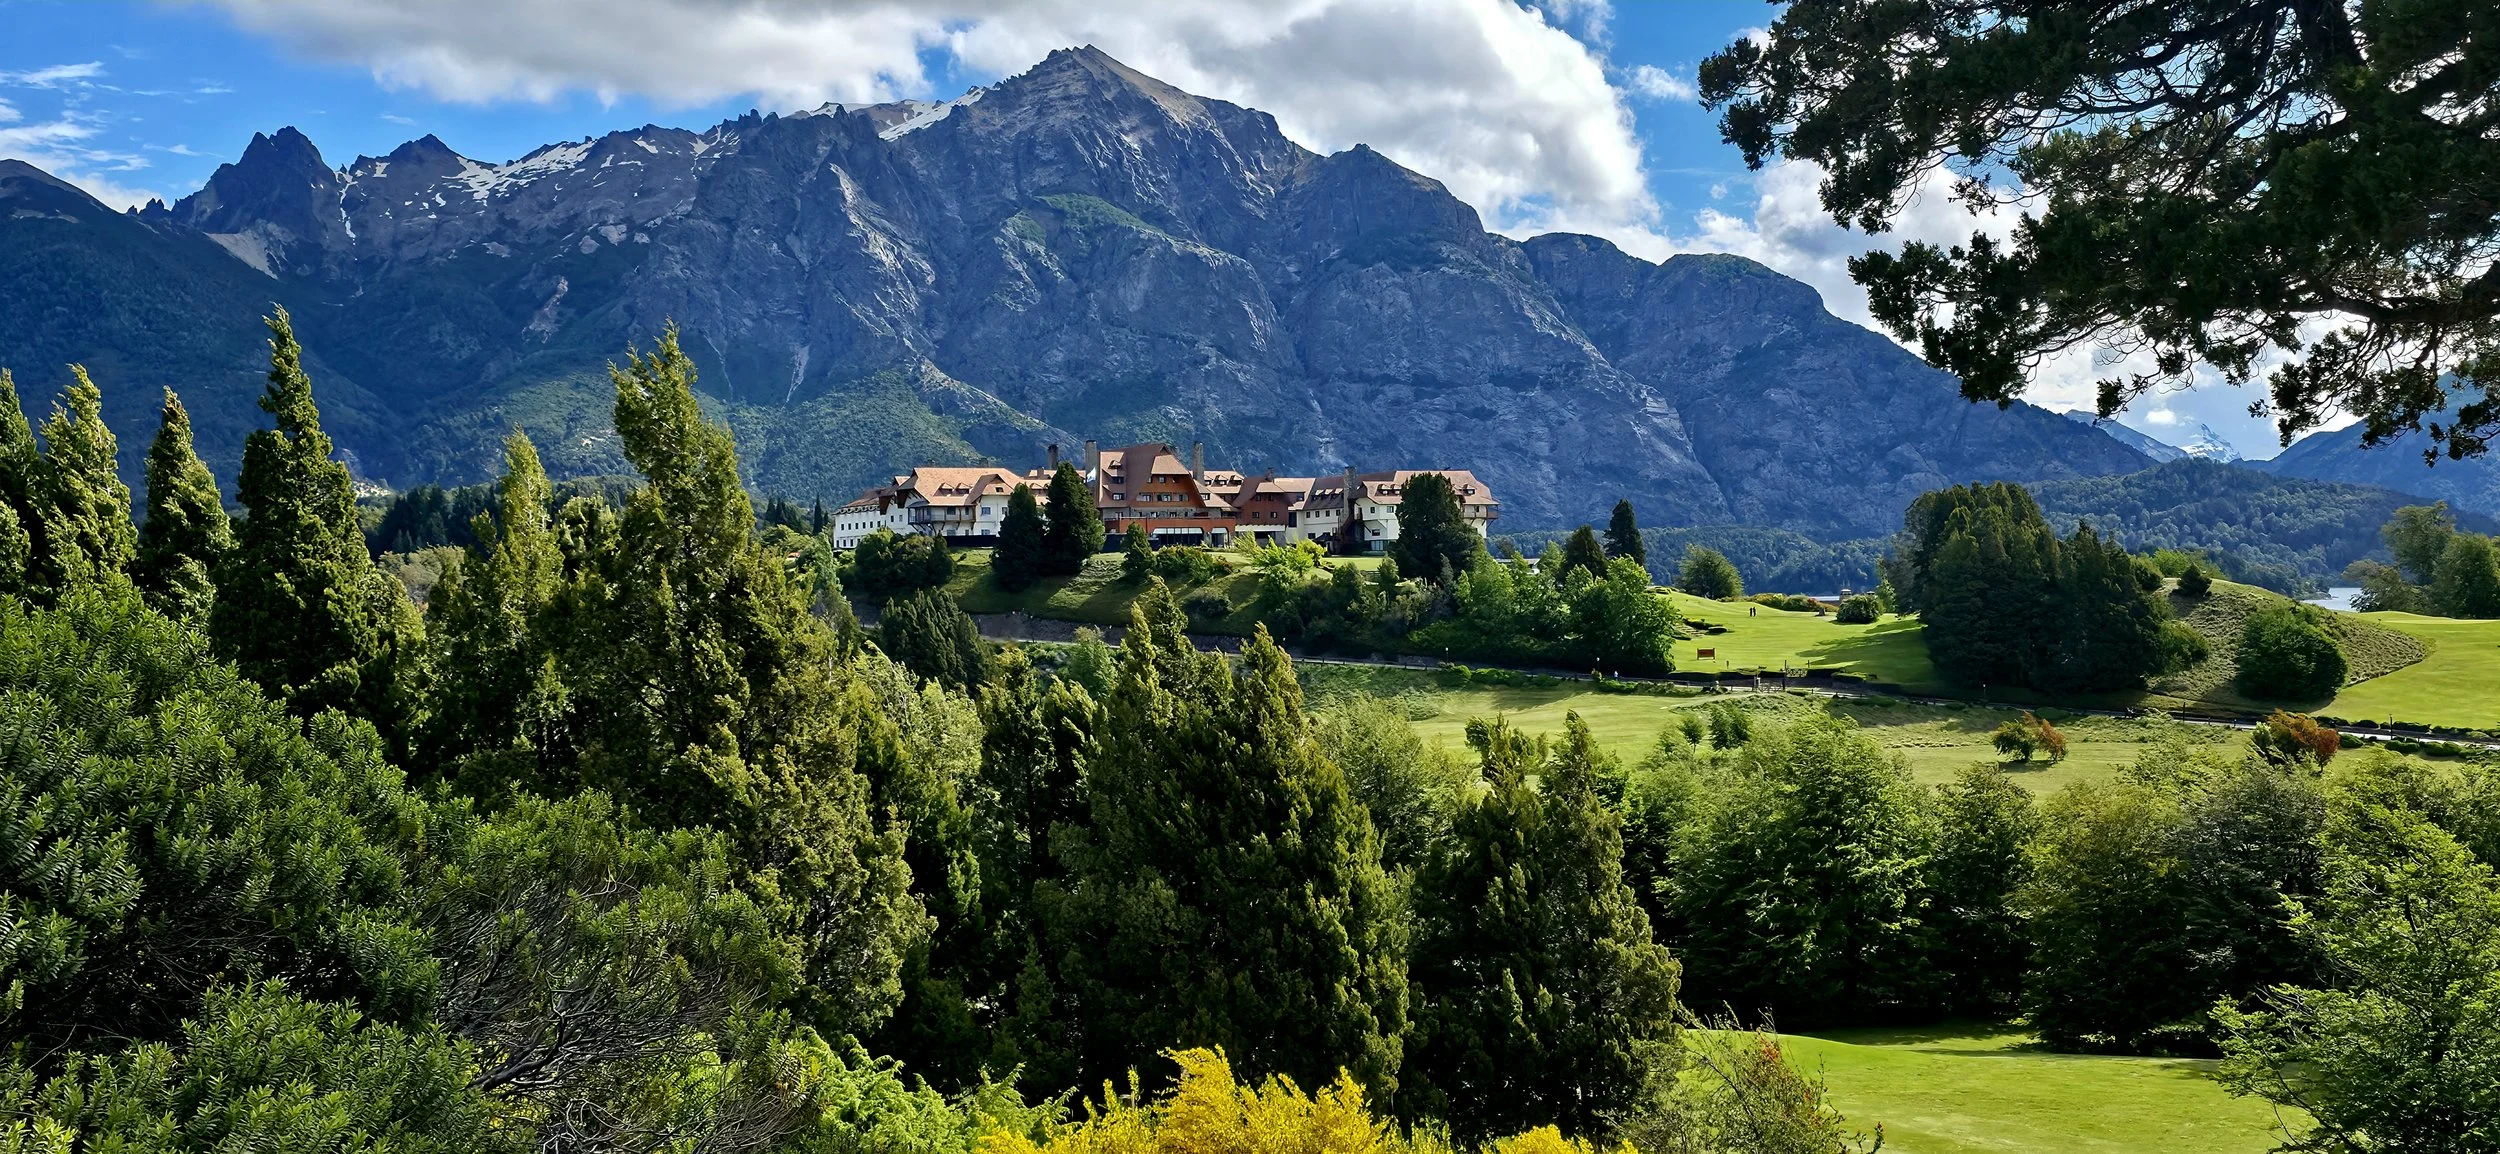
The
is an iconic five-star resort renowned for its stunning mountain architecture and panoramic views of the surrounding lakes and snow-capped peaks. The photo above was taken from the top of the steps at the Parroquia San Eduardo Chapel, a ~3 minute drive from the hotel. I also recommend wandering the inside of the hotel for additional photo opportunities.
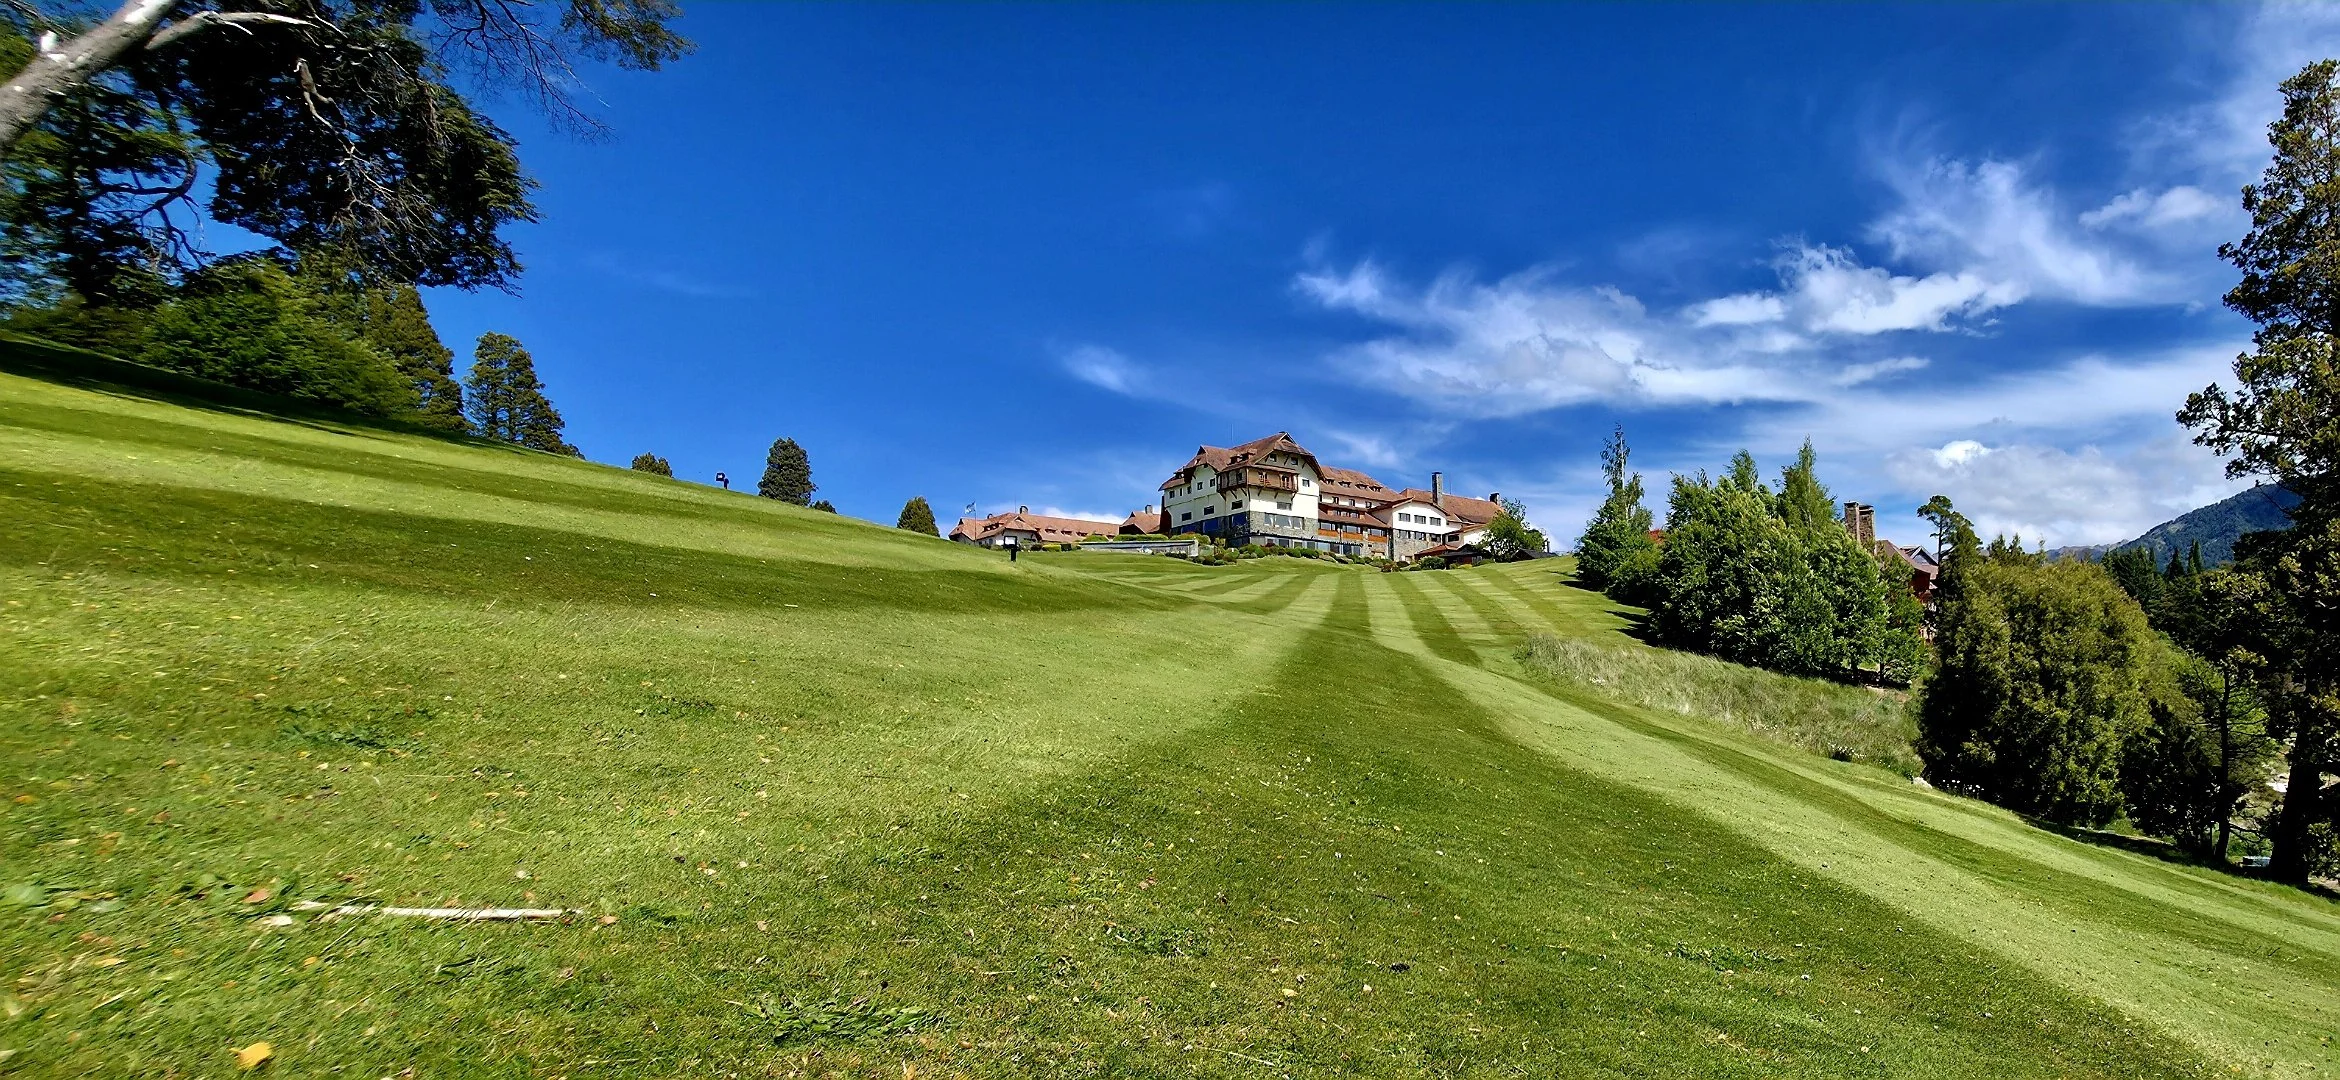
Another distinct photo of Llao Llao Hotel can be taken from the large grassy lawn in the back of the hotel. You’ll need to pass through the dining area to reach the lawn and then walk down the hill towards the lake to capture this photo.
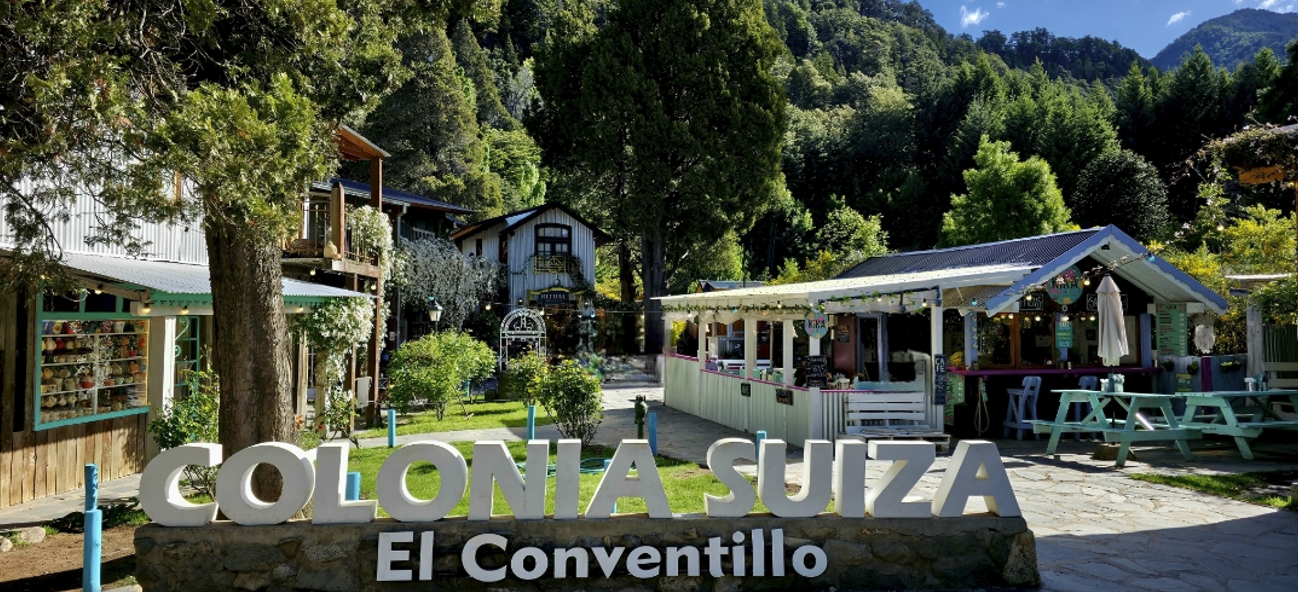
From the Llao Llao Hotel, I suggest taking a ~15 minute drive to the small, nearby Swiss Village. The village hosts a popular artisan market, especially on Wednesdays and Sundays. On these market days, traffic and parking in the area can become chaotic, so the drive may take longer than usual. As a side note, I’m a big fan of hot chocolate, especially when visiting Latin American countries, and there are a few great spots to try in the town. Overall, the Swiss Village is a unique experience, but it’s not the end of the world if there is one activity that needs to be skipped.
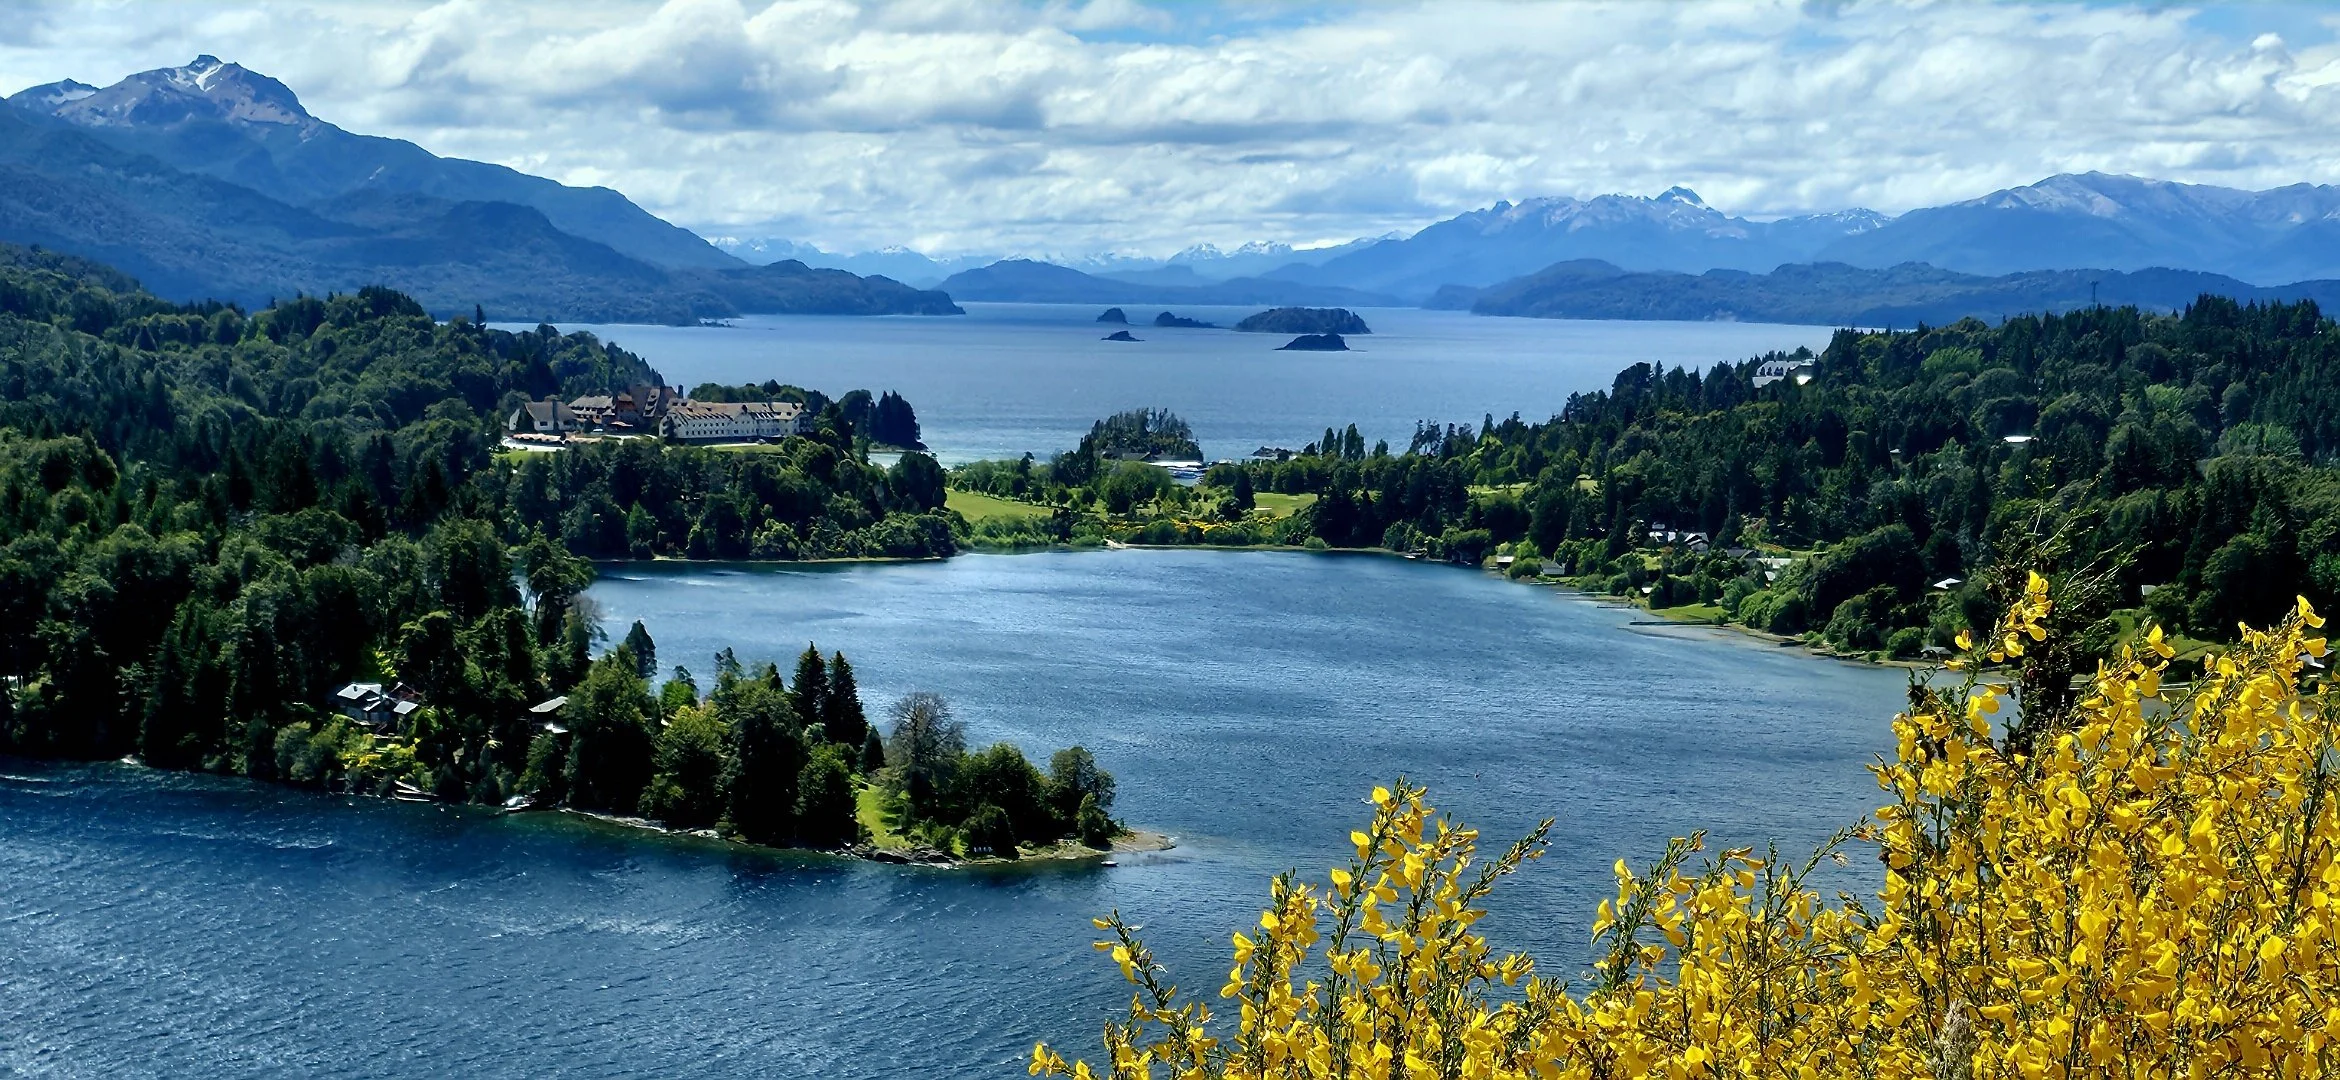
After visiting the Swiss Village, it might be getting closer to sunset and there is no better place to be than Punto Panoramico! Even though more crowded, it’s better to visit the mirador during the evening than early morning hours for lighting purposes. It’s a fairly quick drive up the mountain from the Swiss Village up, ~10 minutes. If I’m remembering correctly, this photo with the yellow plants was taken from just to the left of the wooden platform when facing the hotel.

For an epic end to the day, make your way to Cerveceria Patagonia, less than 1 mile from Punto Panoramico. Here you’ll find the most famous brewery in Bariloche and another unbelievable mirador. It can be difficult to find a seat with a view, so I’d order food from the bar and find seating outside in the garden area. This photo was taken from the brewery entrance facing the mirador. If you can’t make it to Cerveceria Patagonia, another option with a lake view and closer to city center is Manush Centro— I ate here a few times because the food was decent and it had a good social scene.
Day 2: Bariloche Half Day
Depending on your time, I would recommend adding some of the following activities which can easily be accomplished in a half day (not including Catedral’s Mountain Ridge hike). As a reminder, there are many more activities that are not covered in my blog so research accordingly.
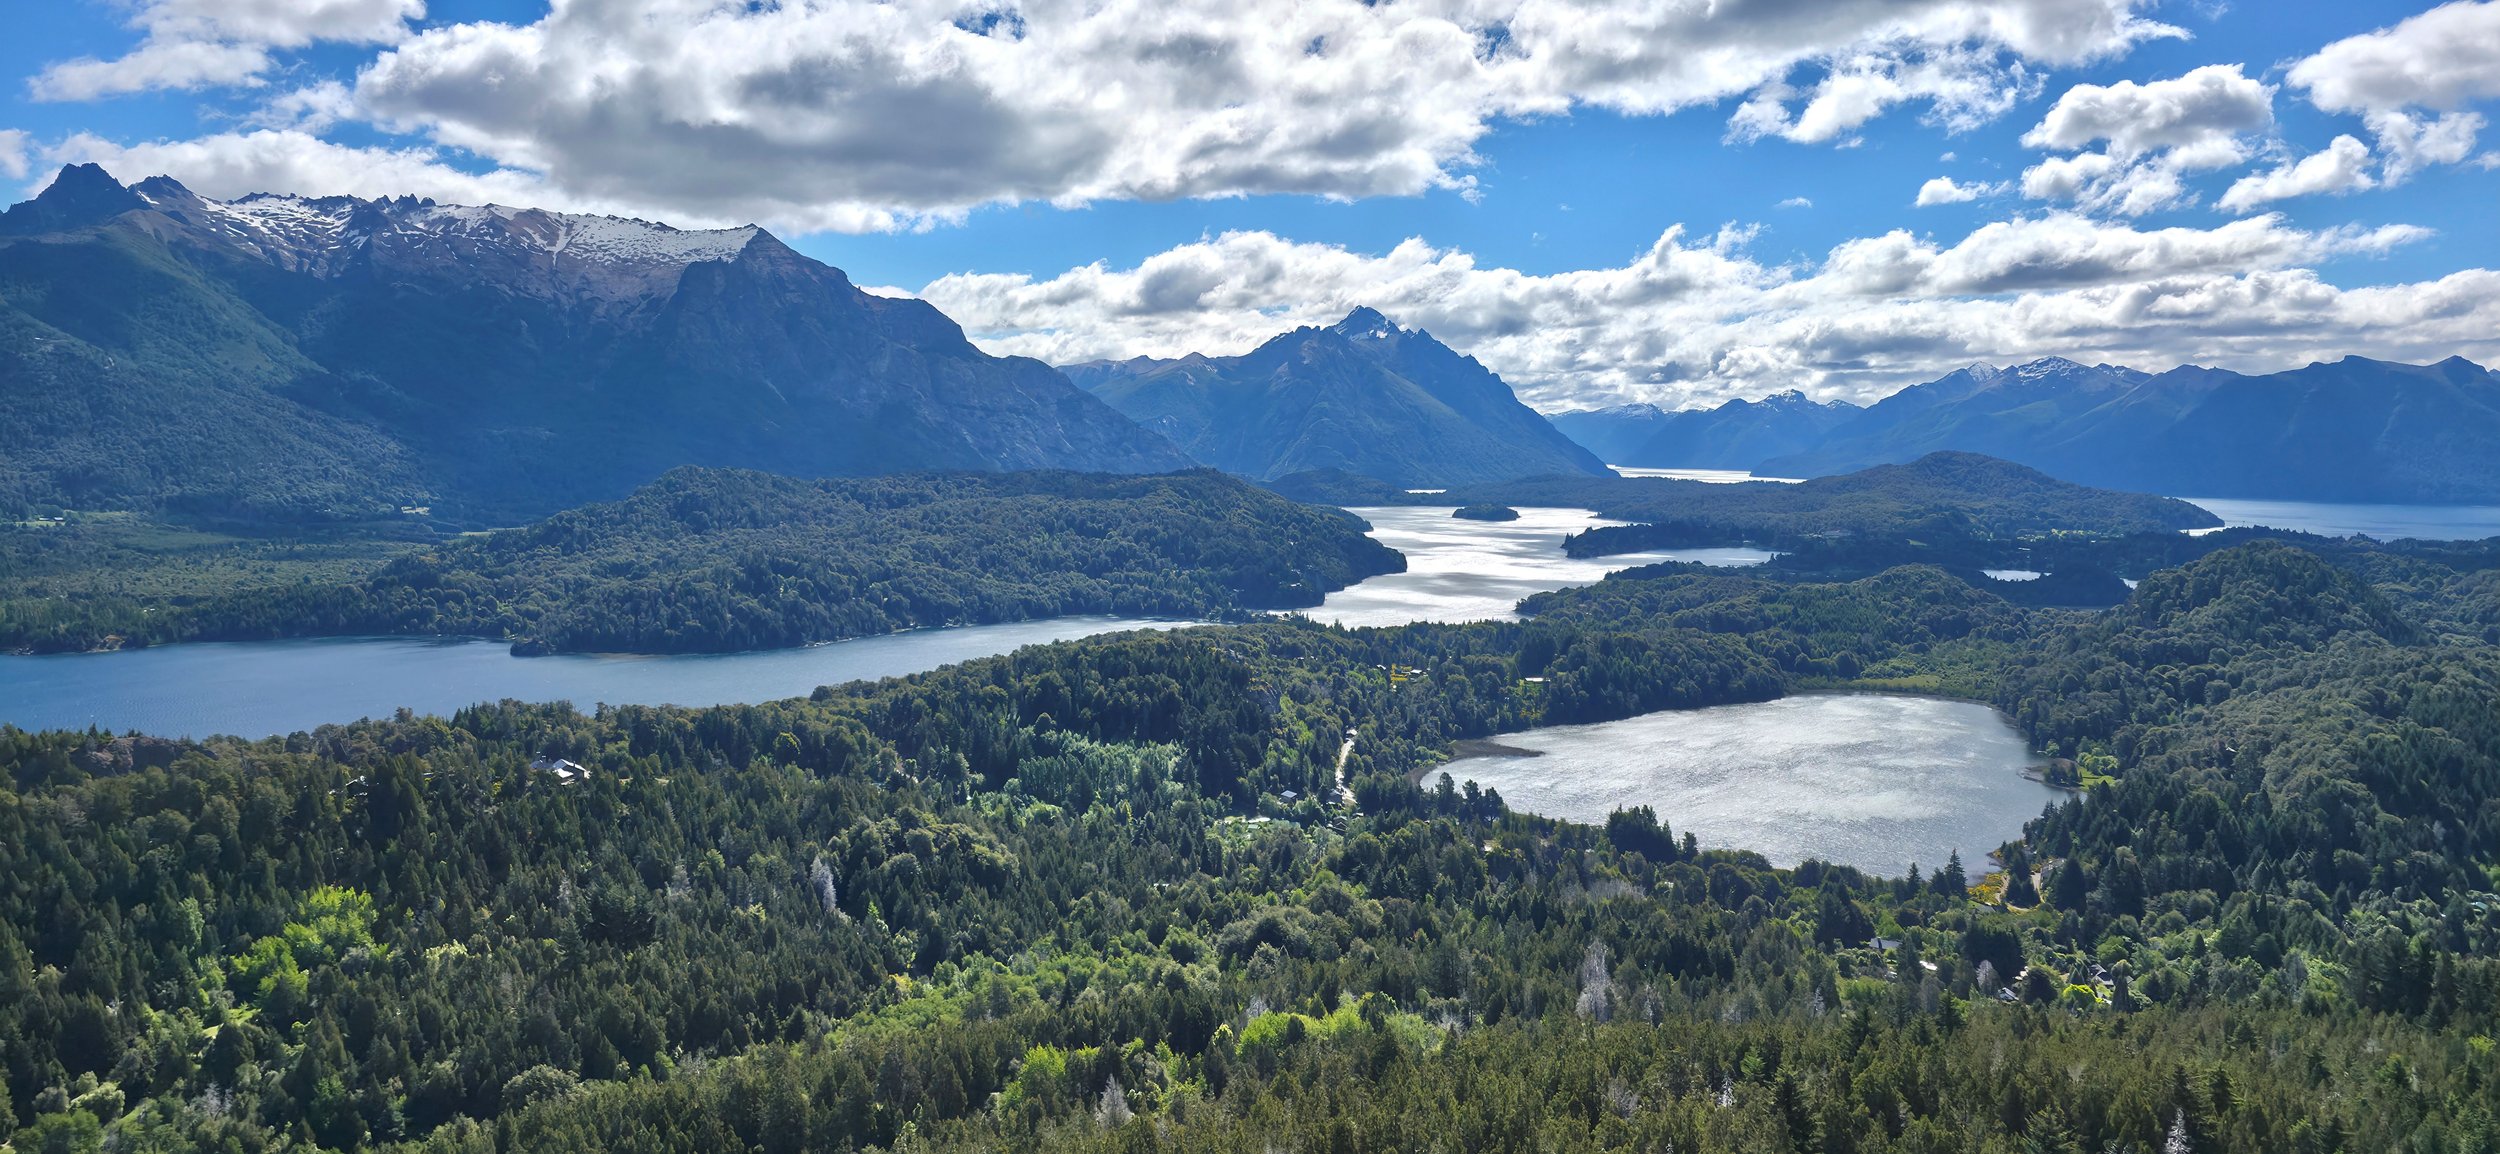
Cerro Campanario is the famous Teleferico (chairlift) located right nearby the Circuit and runs from 9am- 5/6pm, but hours can vary by season. It’s one of the most popular activities for all ages in Bariloche, so I would suggest arriving at 8:45am to beat the crowds and to secure a close parking spot. The cost is ~$20 and takes ~10 minutes to reach the summit. I’ve heard that you can also hike up the mountain which takes ~45 minutes if you’re looking for exercise, then take the lift back down. The best photo opportunity is from below the restaurant area where you’ll see a few seating benches.
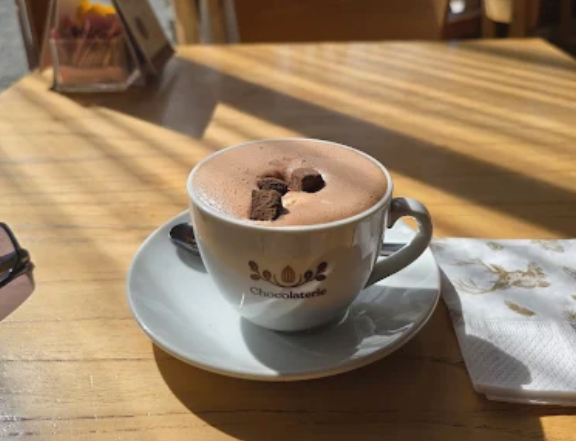
As hinted above, one of my favorite cheat snacks (whatever you call it!) is a sweet hot chocolate. Bariloche is the hot chocolate capital of Argentina, so you’ll find plenty of chocolateria’s to give a try. One of my favorites, Chocolaterie, is located nearby the Circuit and an easy stop on the way back to city center. They had many unique flavors with plenty of seating whereas other chocolateria’s were overcrowded with tourists. Furthermore, they had a store that specialized in all types of gourmet chocolates. Another “must-try” chocolateria is the famous Mamuschka, but it’s almost always packed— their flagship store is located off Calle Mitre in the City Center.
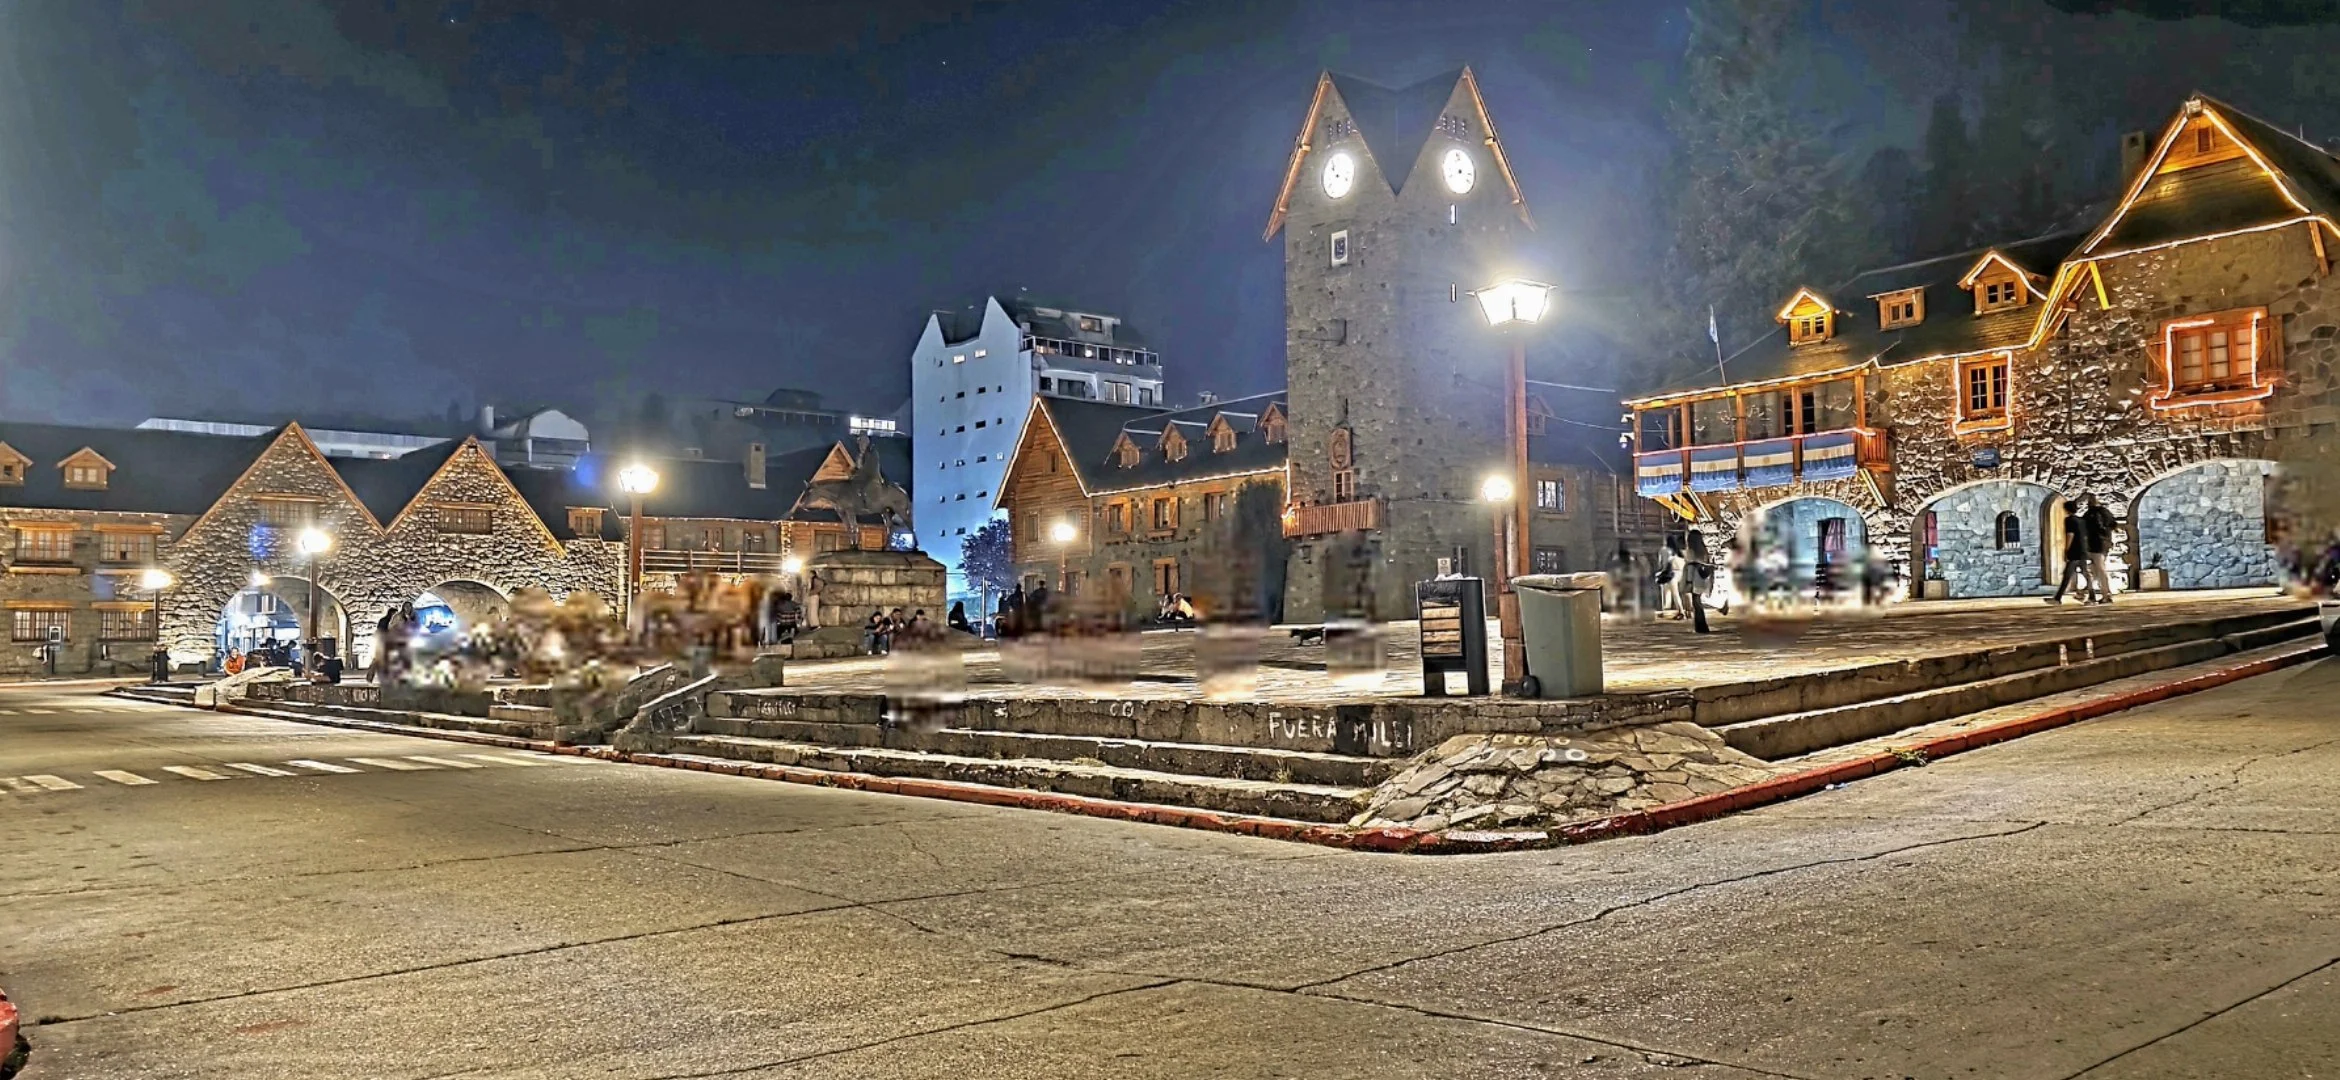
After hitting the spots above and if time permits, spend a few hours wandering Bariloche’s city center. Honestly, I was a bit disappointed and surprised by Bariloche’s downtown scene, but you’ll find plenty of restaurants, tour agencies, shopping and at least you can check it off the list. However, it didn’t have any distinct character or the elegance that I was hoping for. It’s still worth strolling the streets for an hour or two, starting with the Centro Civico (aka the town square) and then continuing under the two arches to Calle Mitre, Bariloche’s main drag. This photo was taken from the northwest corner in Centro Civico— you can see the two arches to the left that lead directly into Calle Mitre.

Catedral’s Mountain Ridge is the most iconic hike in Bariloche, but it would probably take a full day to complete for most people. That said, this would likely need to be an additional day to the activities listed above, or mix and match as you see fit. I originally had this hike planned, but ended up canceling because I had just completed multiple demanding hikes and wanted a break. There are many tour companies in town that offer the hike, but I suggest using ToursbyLocals for a more private experience. Transparently, this photo was pulled from the ToursbyLocals site, because it’s the photo that convinced me to book in the first place. You can also drive ~30 minutes to the ski resort where the hike begins and do the hike solo.
Day 3, Maybe 4 for Others: The Arraynanes Forest & Villa La Angostura
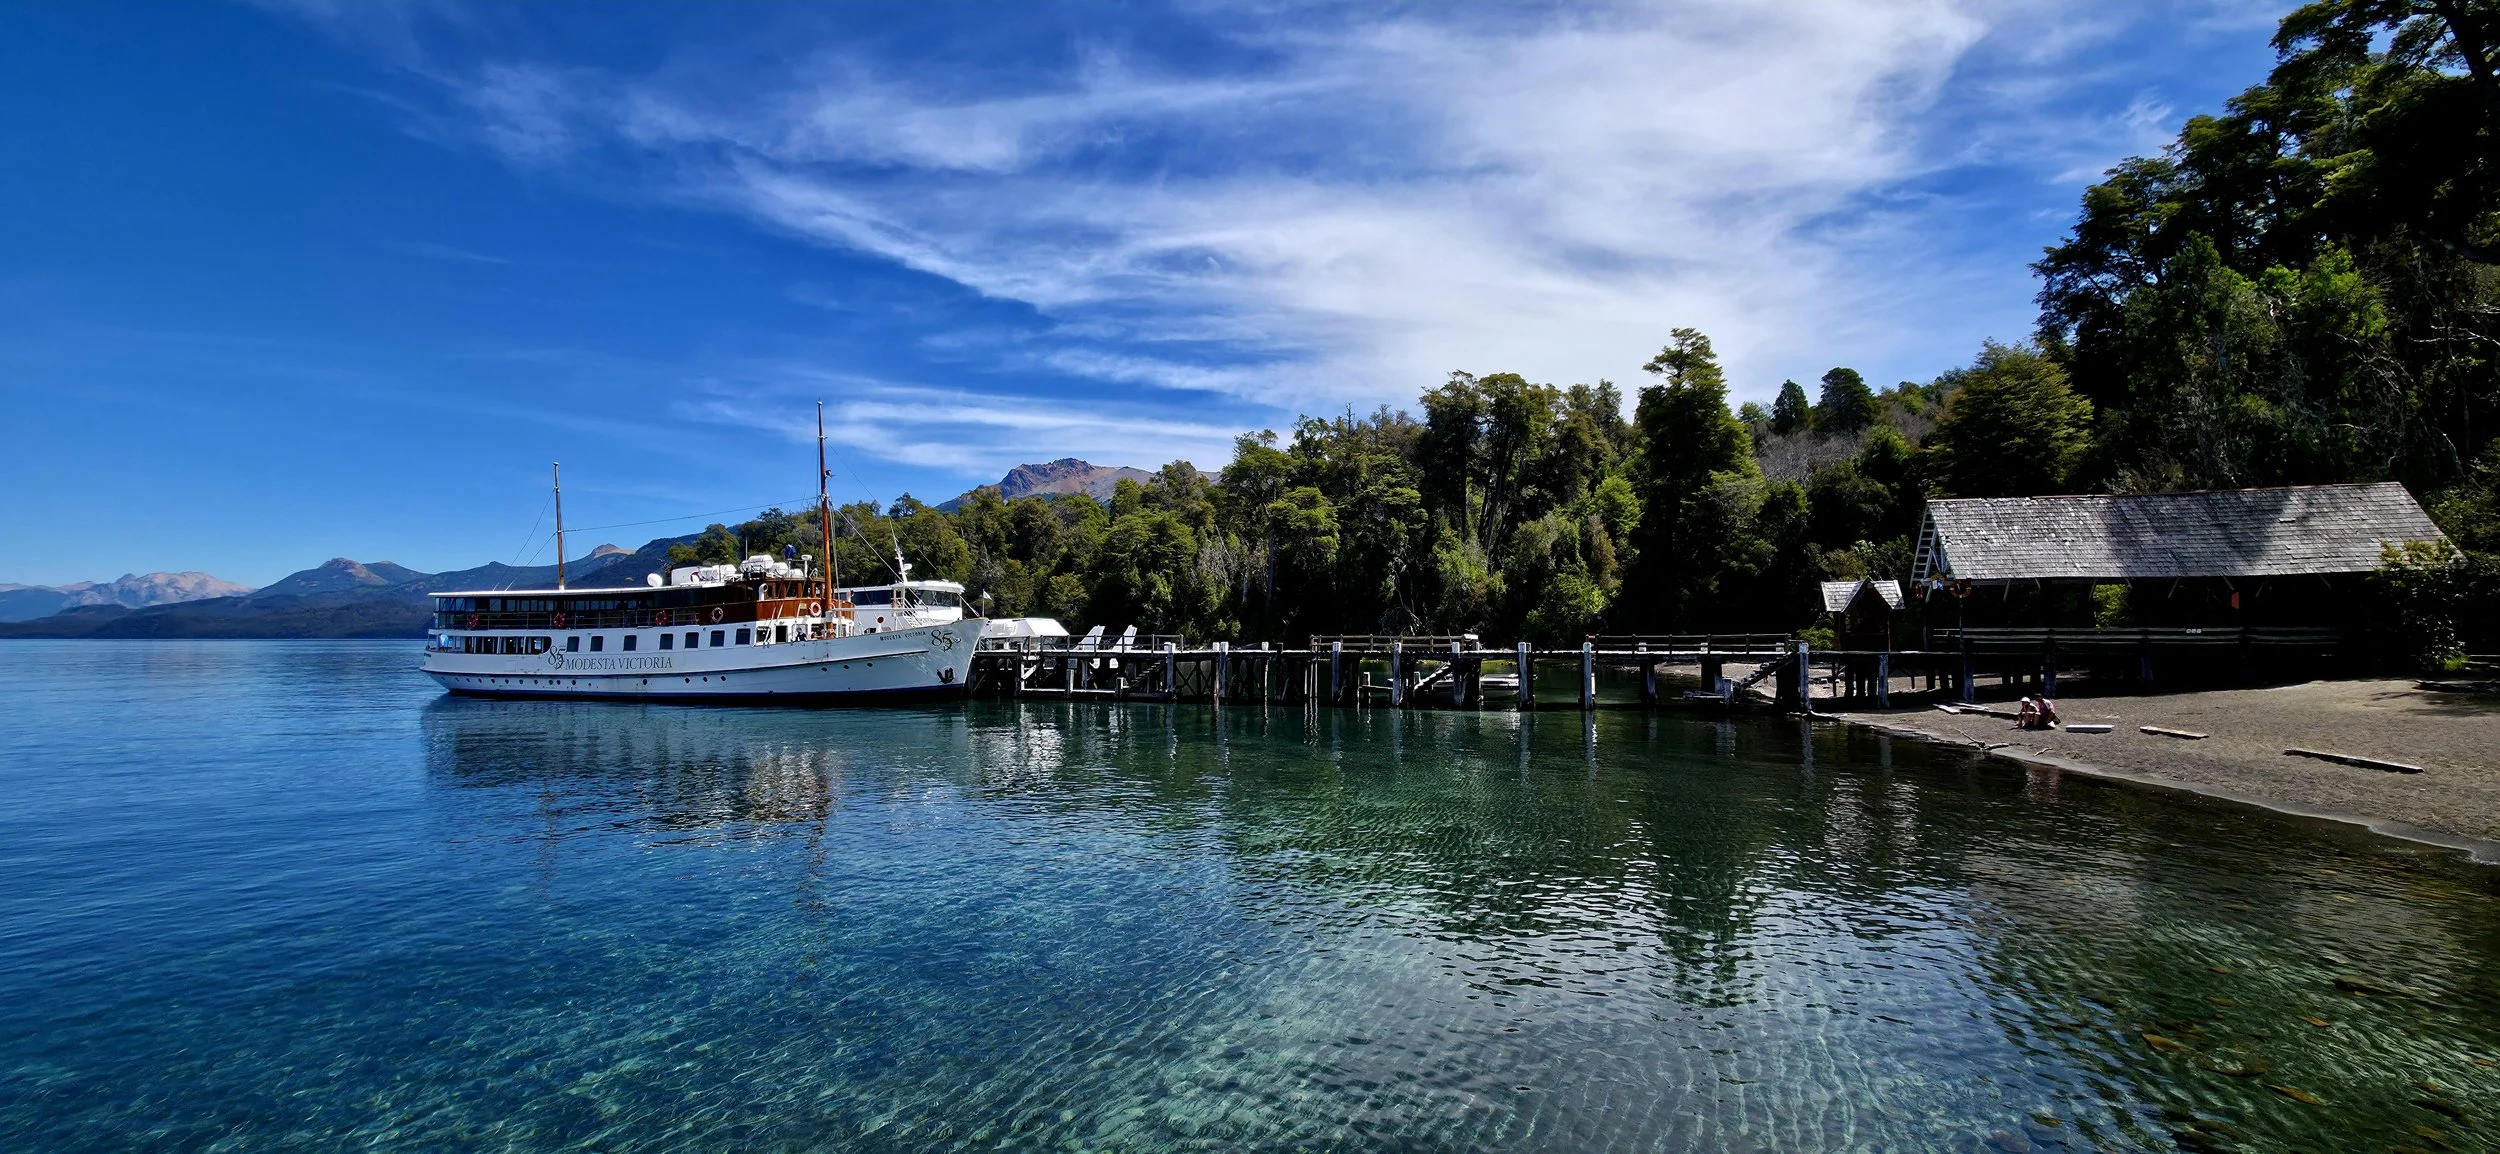
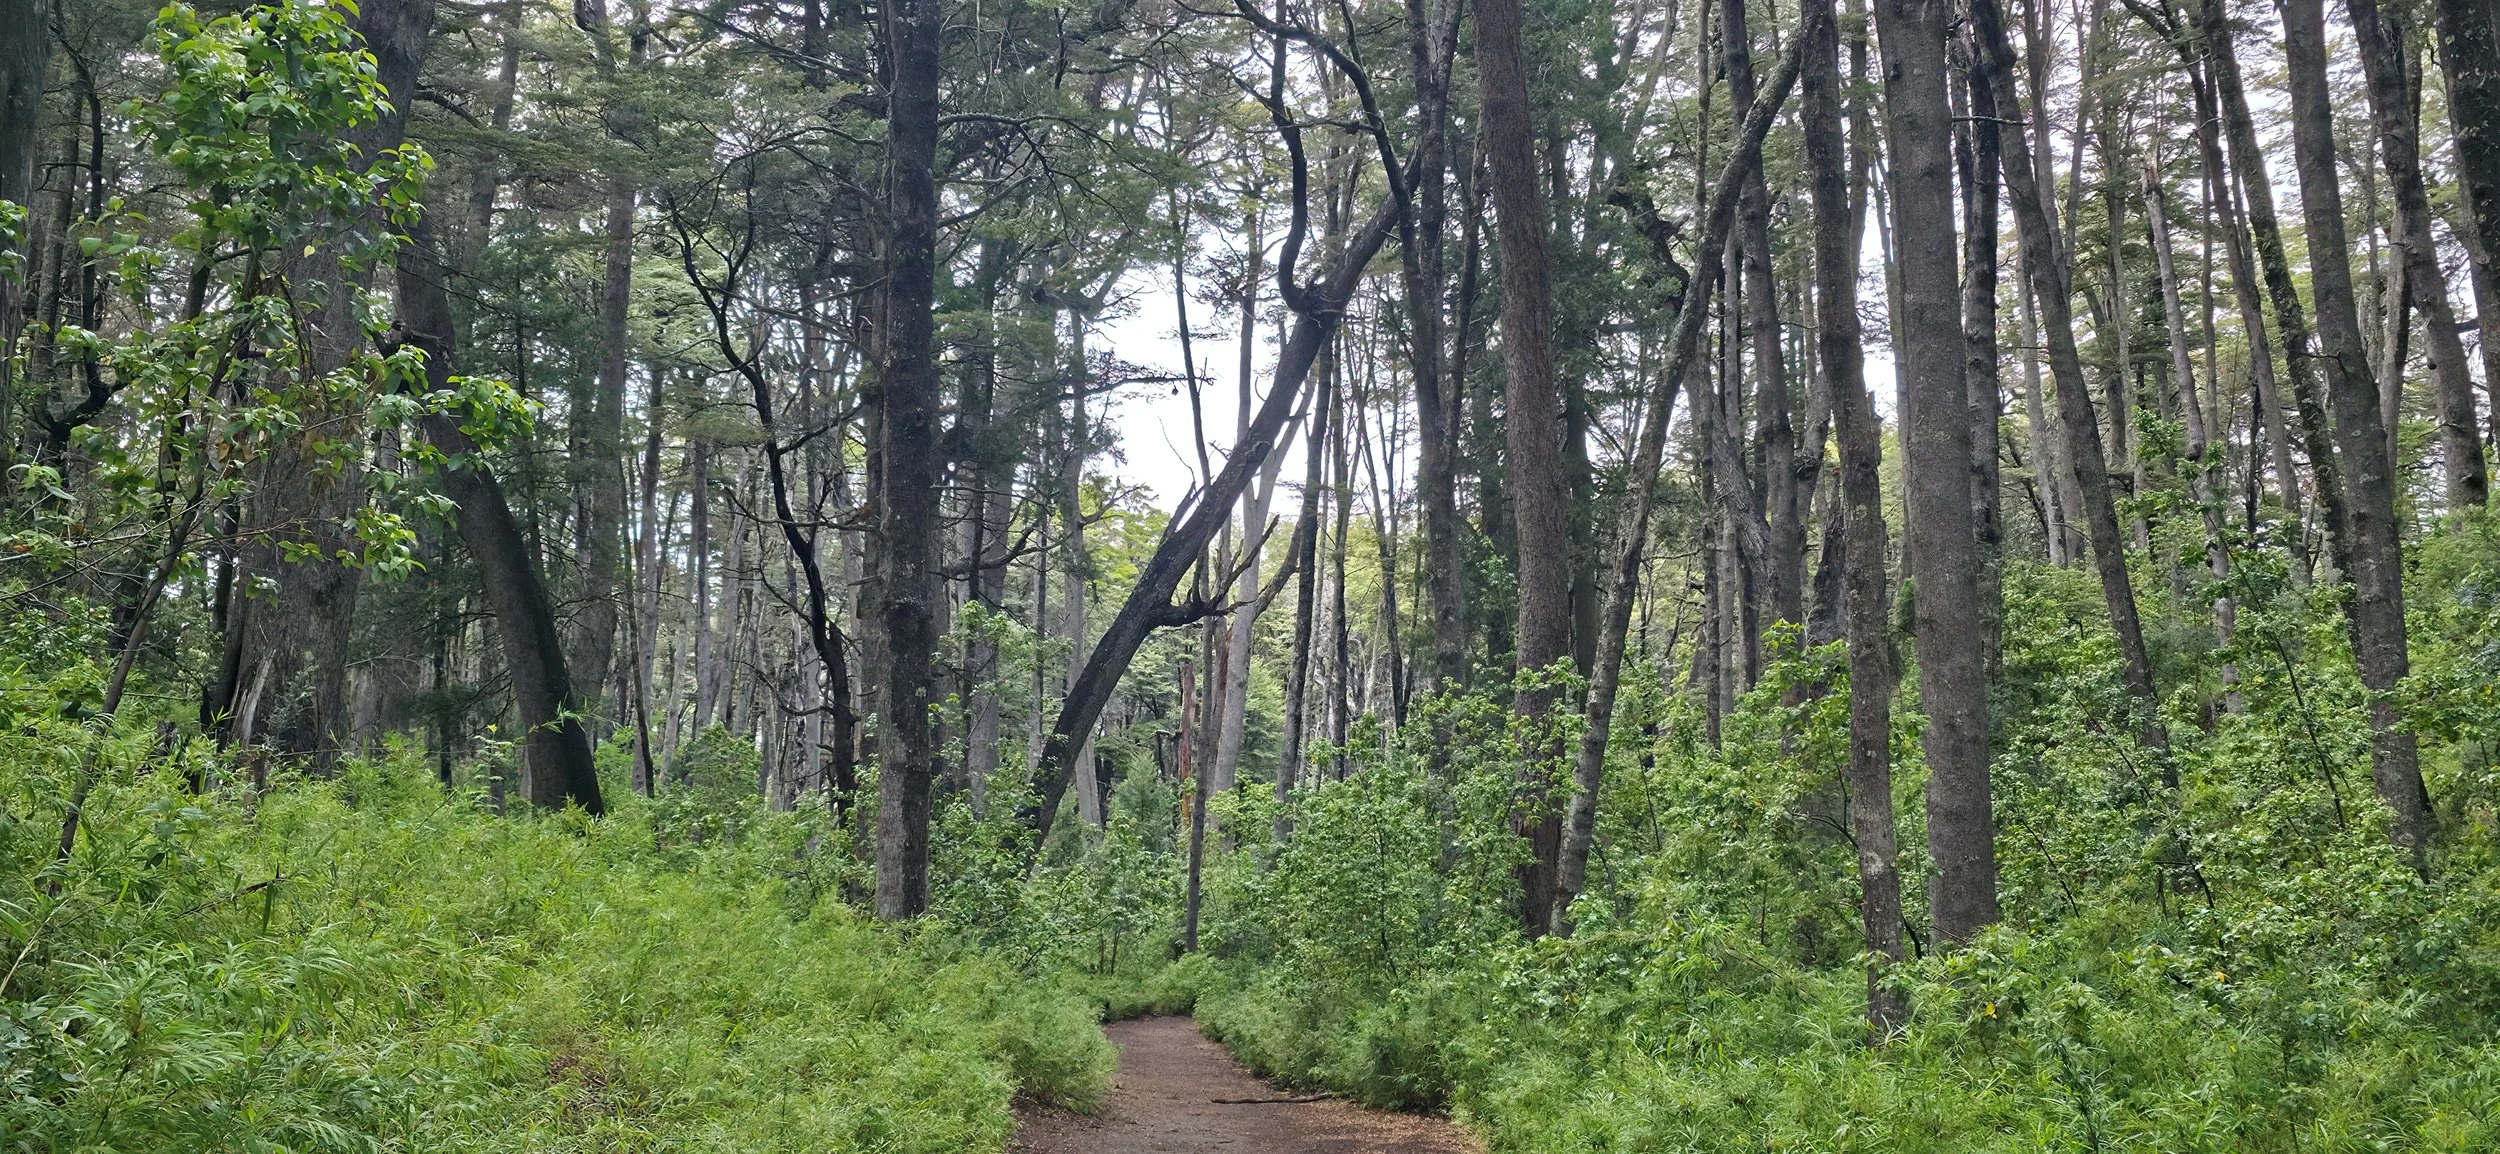
The Arraynanes Forest is home to rare cinnamon-colored trees and the famous forest that supposedly inspired Disney’s Bambi according to local legend. There are a few options for tackling this excursion, including a boat ride from Puerto Panuelo off the Circuito Chico Loop. However, you’ll most likely want to explore the nearby town of Villa La Angostura which is also in the same direction as the Route of the Seven Lakes, and you cannot accomplish these activities without a car. That said, I strongly advise taking the ~1 hour scenic drive to the park. Additionally, there are a few ways to visit the forest including mountain biking. However, I recommend hiring a small private boat ride (fits 6-10 people) to the beginning of the trailhead— don’t take the larger boat because you’ll be stuck with a bunch of tourists in the way of your photos (larger boat in picture)— you can purchase boat tickets on the spot at the dock. The most scenic part of the trail is also located in the most remote part of the forest, so unless you want to spend all day hiking roundtrip, take the boat ride to the section with the iconic trees and then make the ~3 hour return hike to your car. For reference, I saw many mountain bikers, but I chose to walk and enjoy more of the scenery. The photo above was taken just before reaching the boat dock.
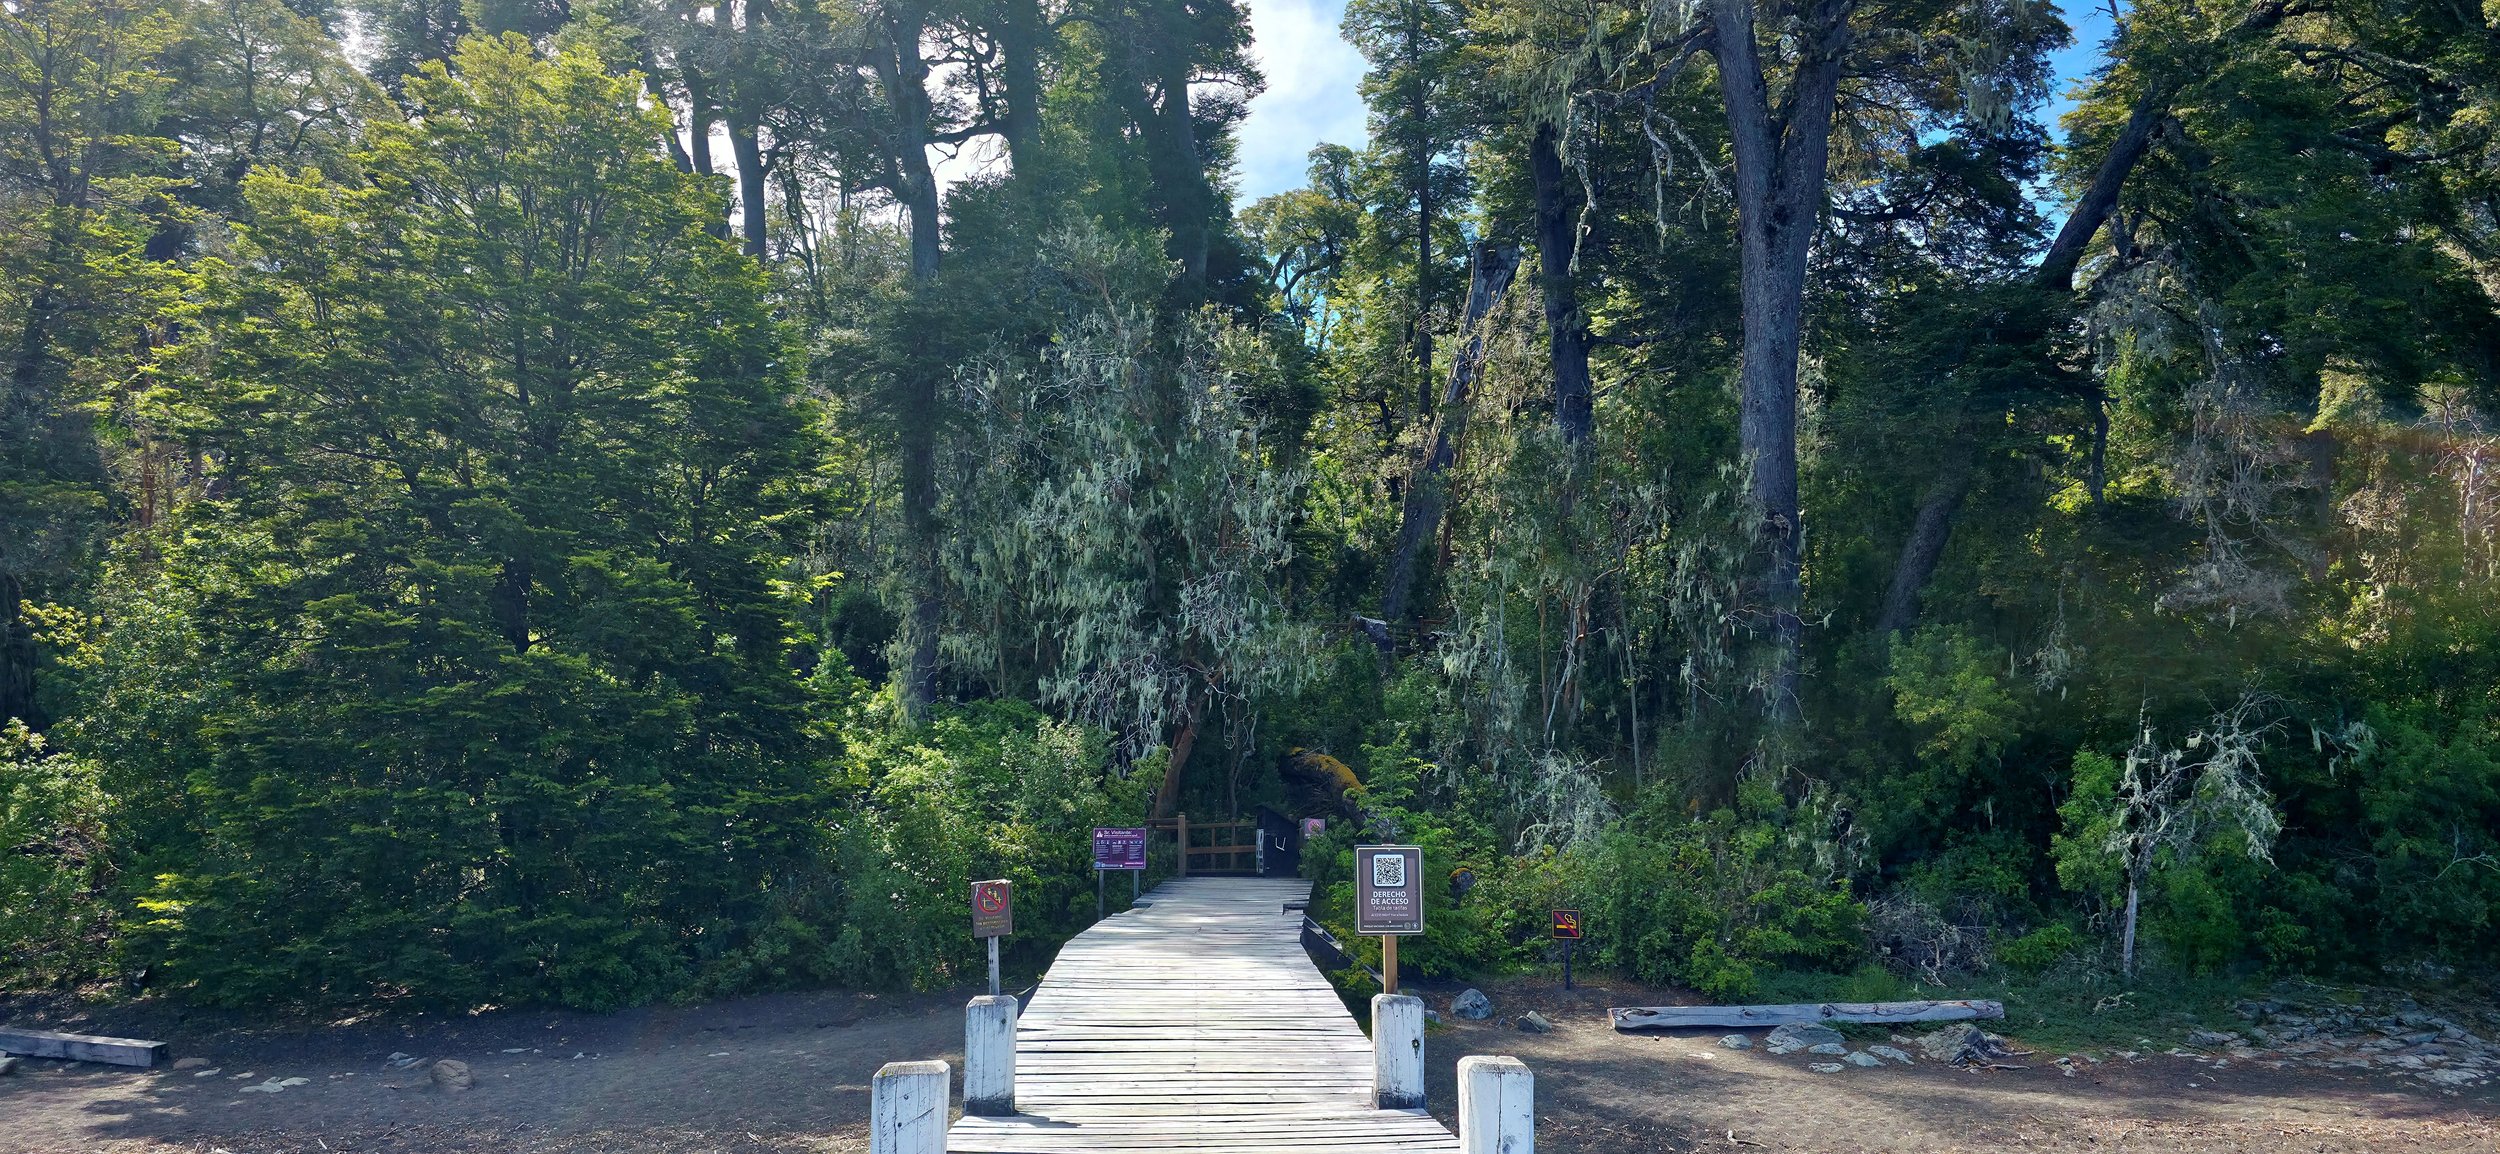
The photo here shows the entrance to the hike from standing on the boat dock. I allowed the rest of the small group to advance so there would be nobody else in my photos.
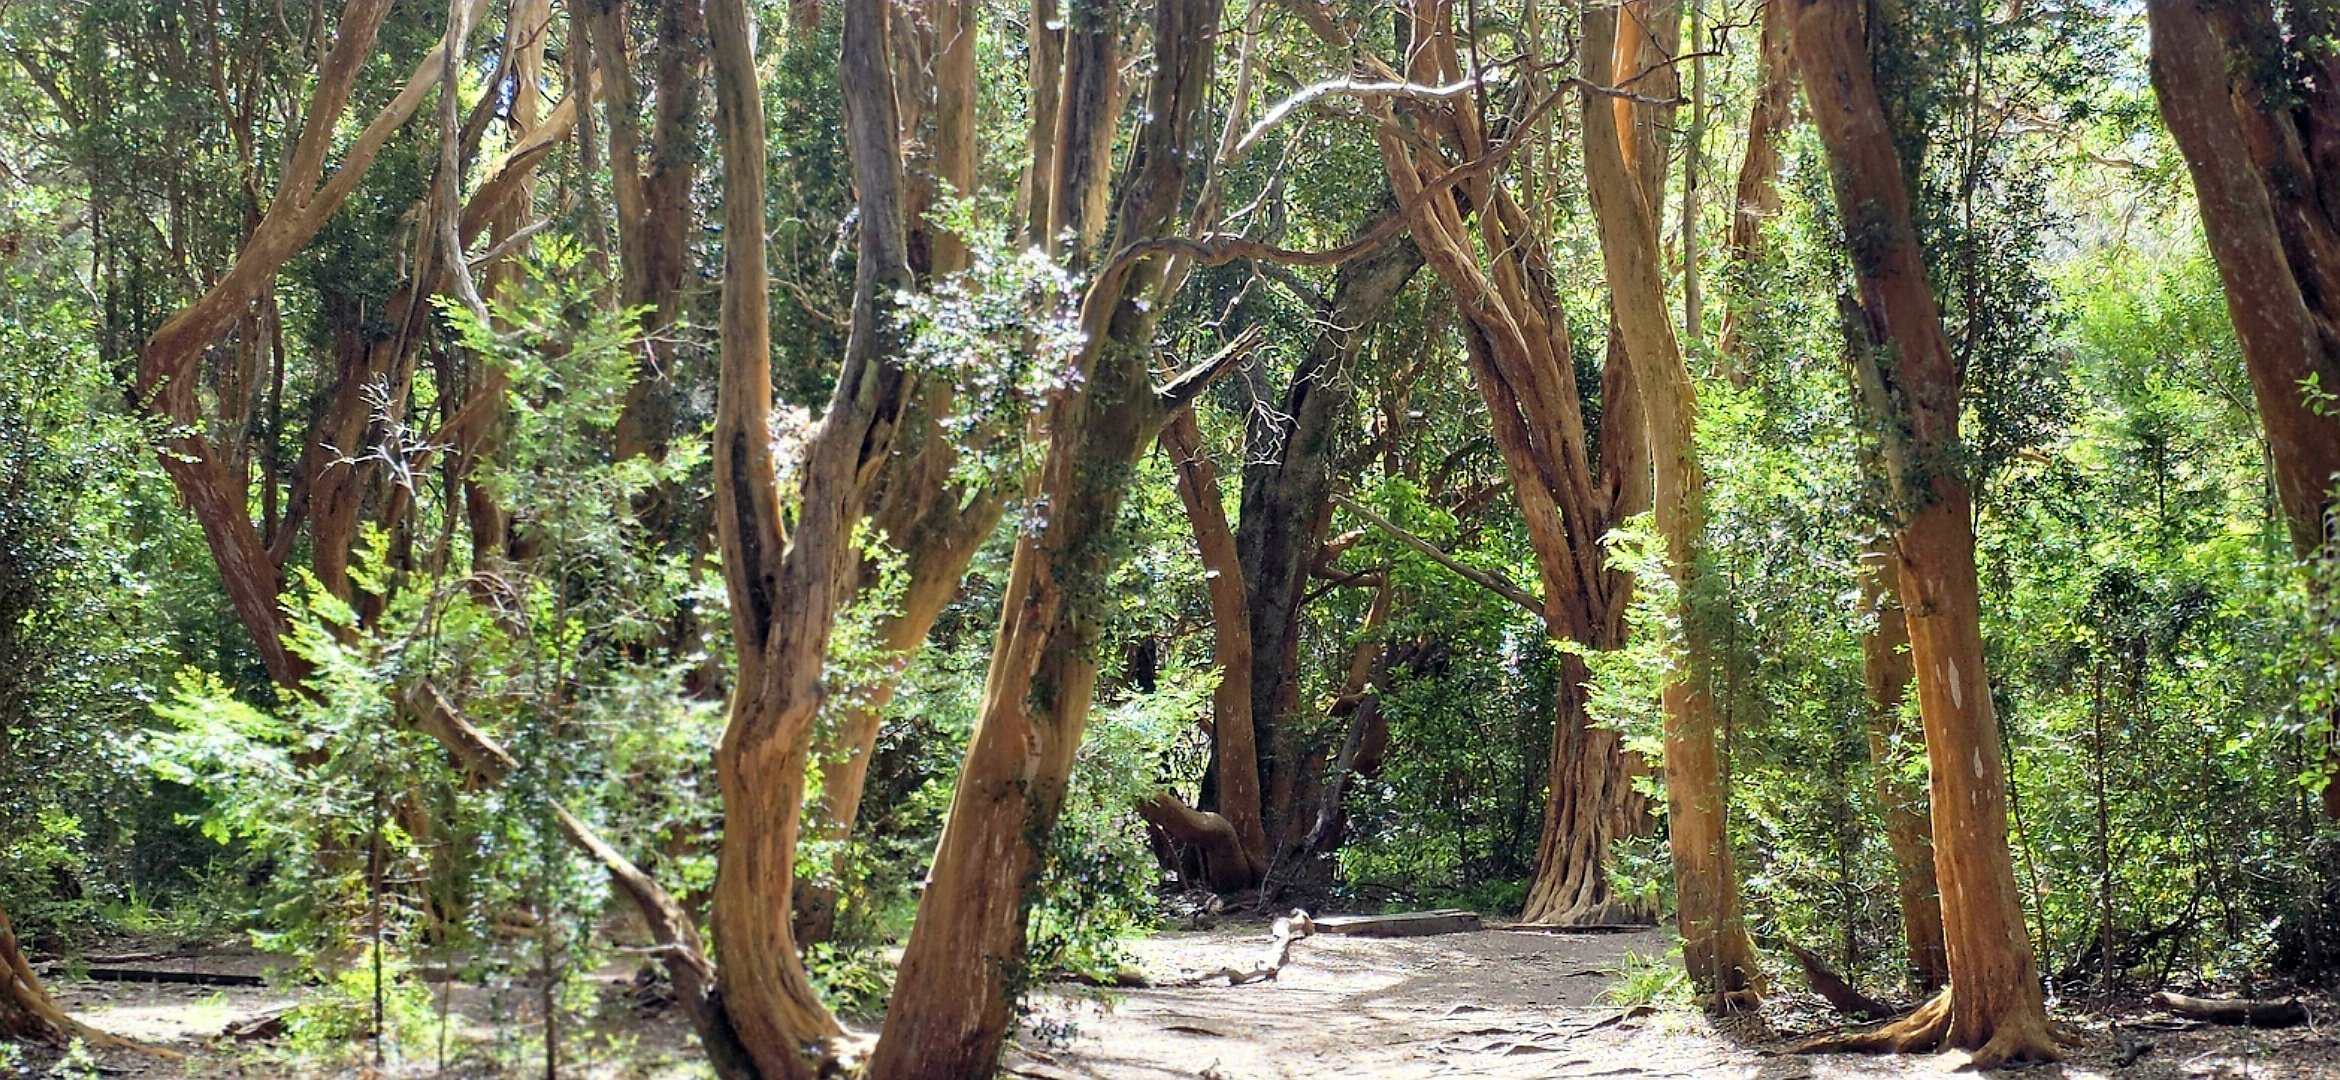
The beginning of the Arraynanes Forest trail is where you’ll find the “Disney inspired trees.” However, the Arraynanes trees don’t last very long into the hike so I recommend taking advantage of the photo opportunities before get too far. After ~20 minutes, it turns into your standard forest, but you’ll still be surrounded by beautiful scenery including water on both sides. Even though it’s a long hike, I would still classify the trail as easy since there aren’t any super, steep and lengthy inclines. You will encounter many small hills, but nothing too stressful.
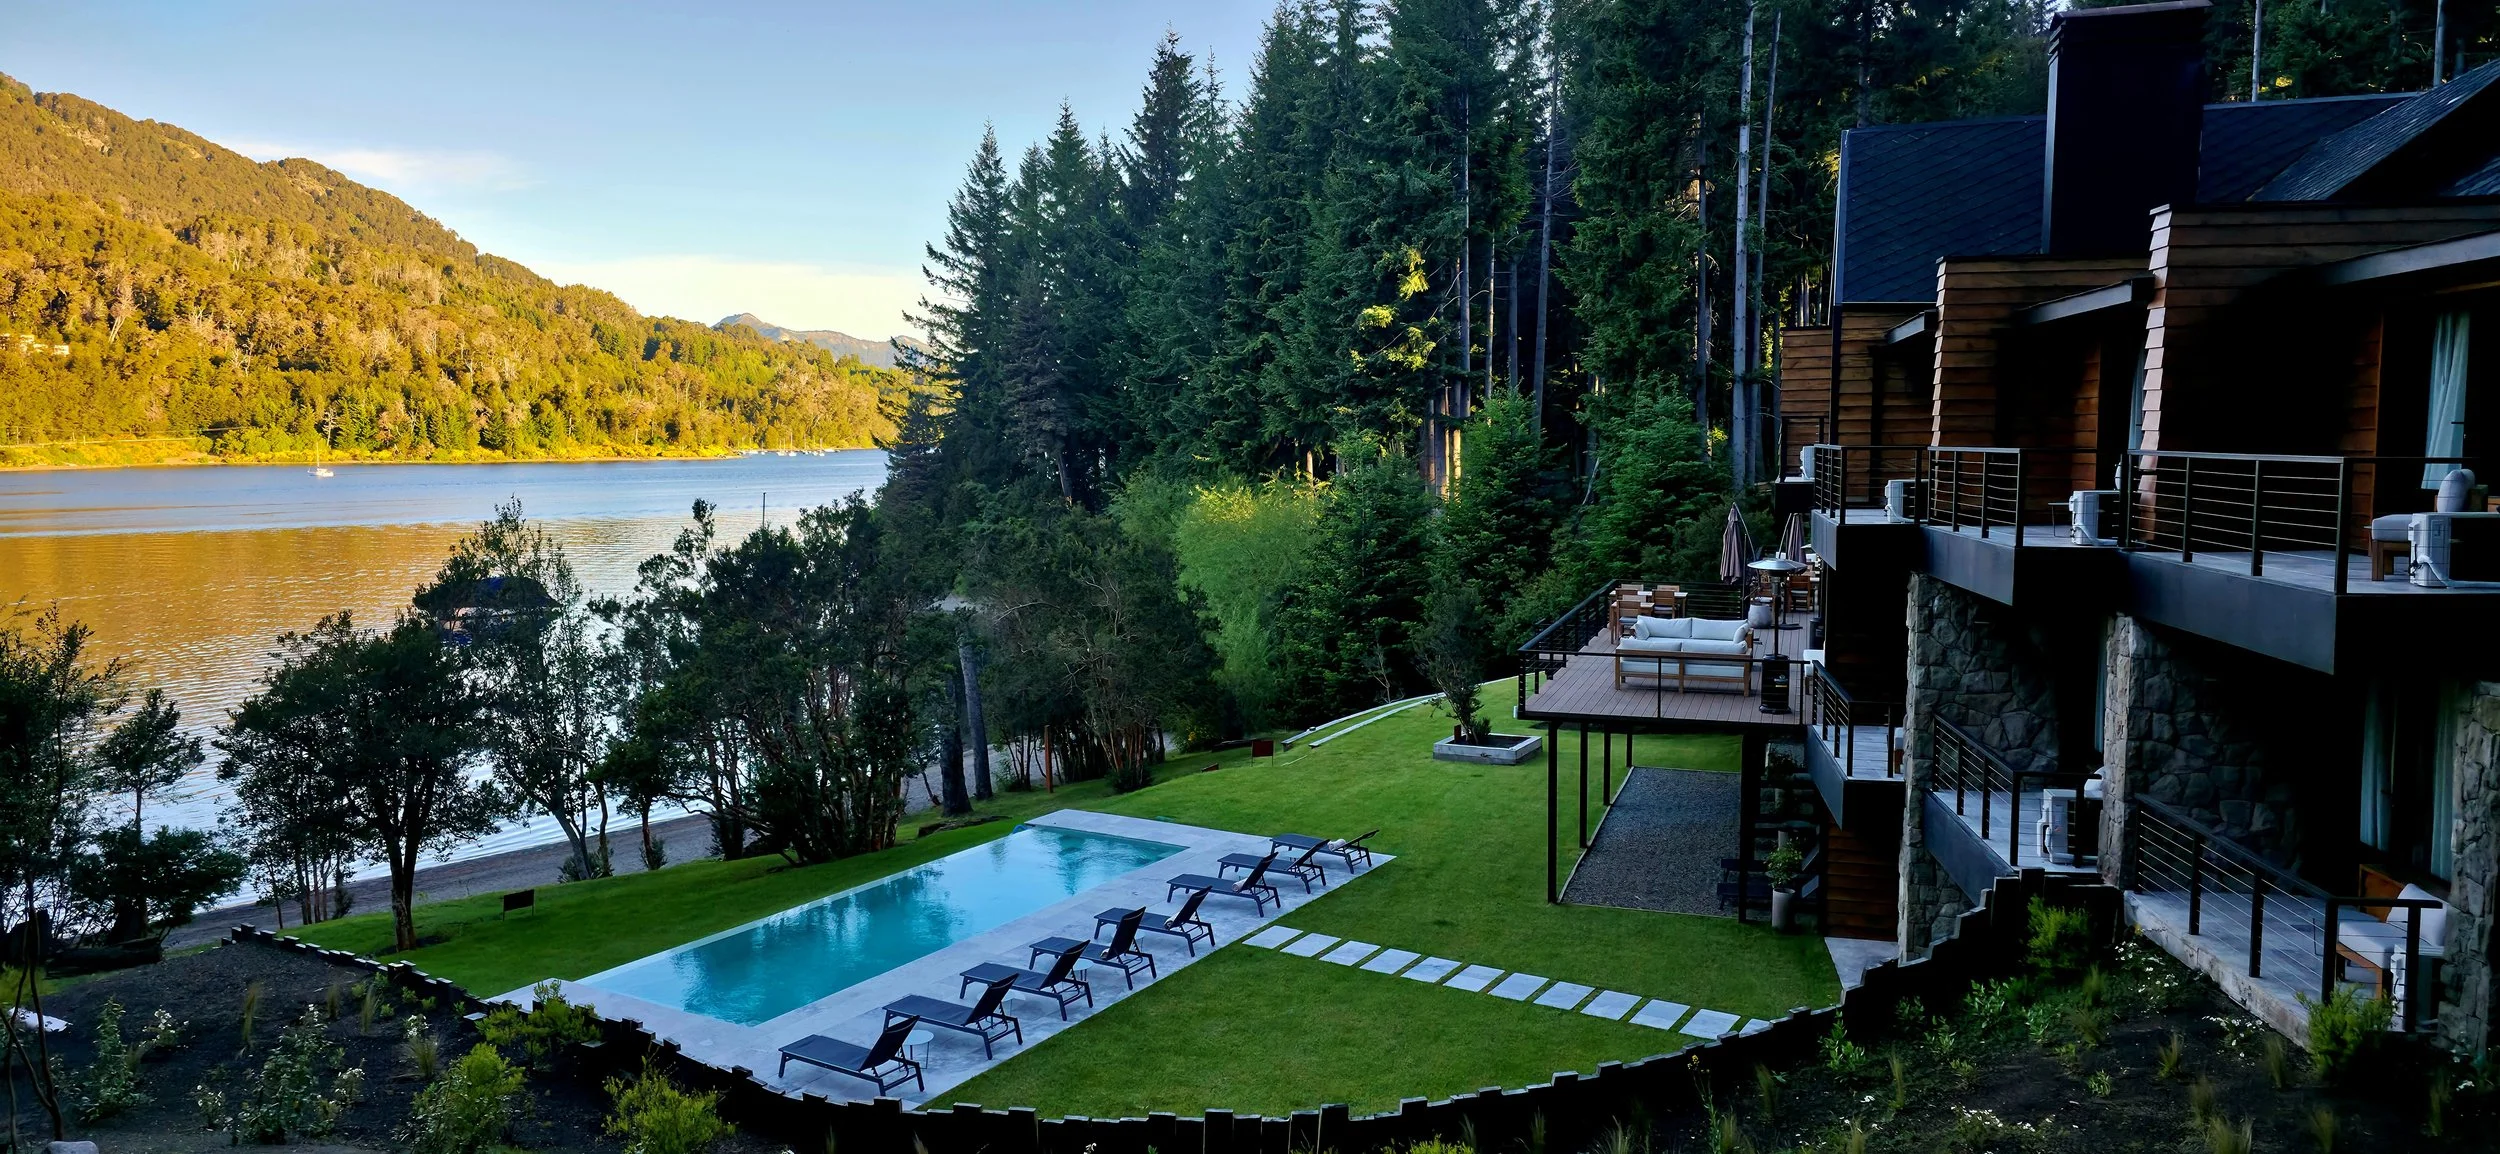
After the day’s adventure, I would recommend finding time to explore Villa La Angostura, an upscale resort town, nestled on the northwest shore of Lake Nahuel Huapi and known for its picturesque alpine architecture and natural beauty. Like me, you might end up wondering how this town receives very little international attention after experiencing everything that it has to offer! For hotel accommodations, I stayed at a small, upscale, lakeside hotel for one night called the Auria Angostura. It provides an elegant restaurant with a fantastic lakeside view, and the rooms are very spacious. I took the photo above from the top of the hill in between the hotel and the hotel next door.
Day 4, Maybe 5 for Others: Ruta de los Siete Lagos (The Route of the Seven Lakes) & San Martin de los Andes
Ruta de los Siete Lagos is known as a stunning scenic drive in Argentina's Lake District, primarily along Route 40, connecting Villa La Angostura and San Martín de los Andes. The ~68 mile stretch winds through forests, mountains, and national parks, showcasing lakes like Correntoso, Espejo, Escondido, Villarino, Falkner, Machónico, and Lácar, offering great views, waterfalls, and charming towns. If you’re starting in the early morning from Villa La Angostura, you should be able to visit the lakes, explore the town of San Martin and return to Bariloche all in one day. Rather than explaining each lake in great detail, I’m only going to showcase a few of my favorite highlights from the trip.
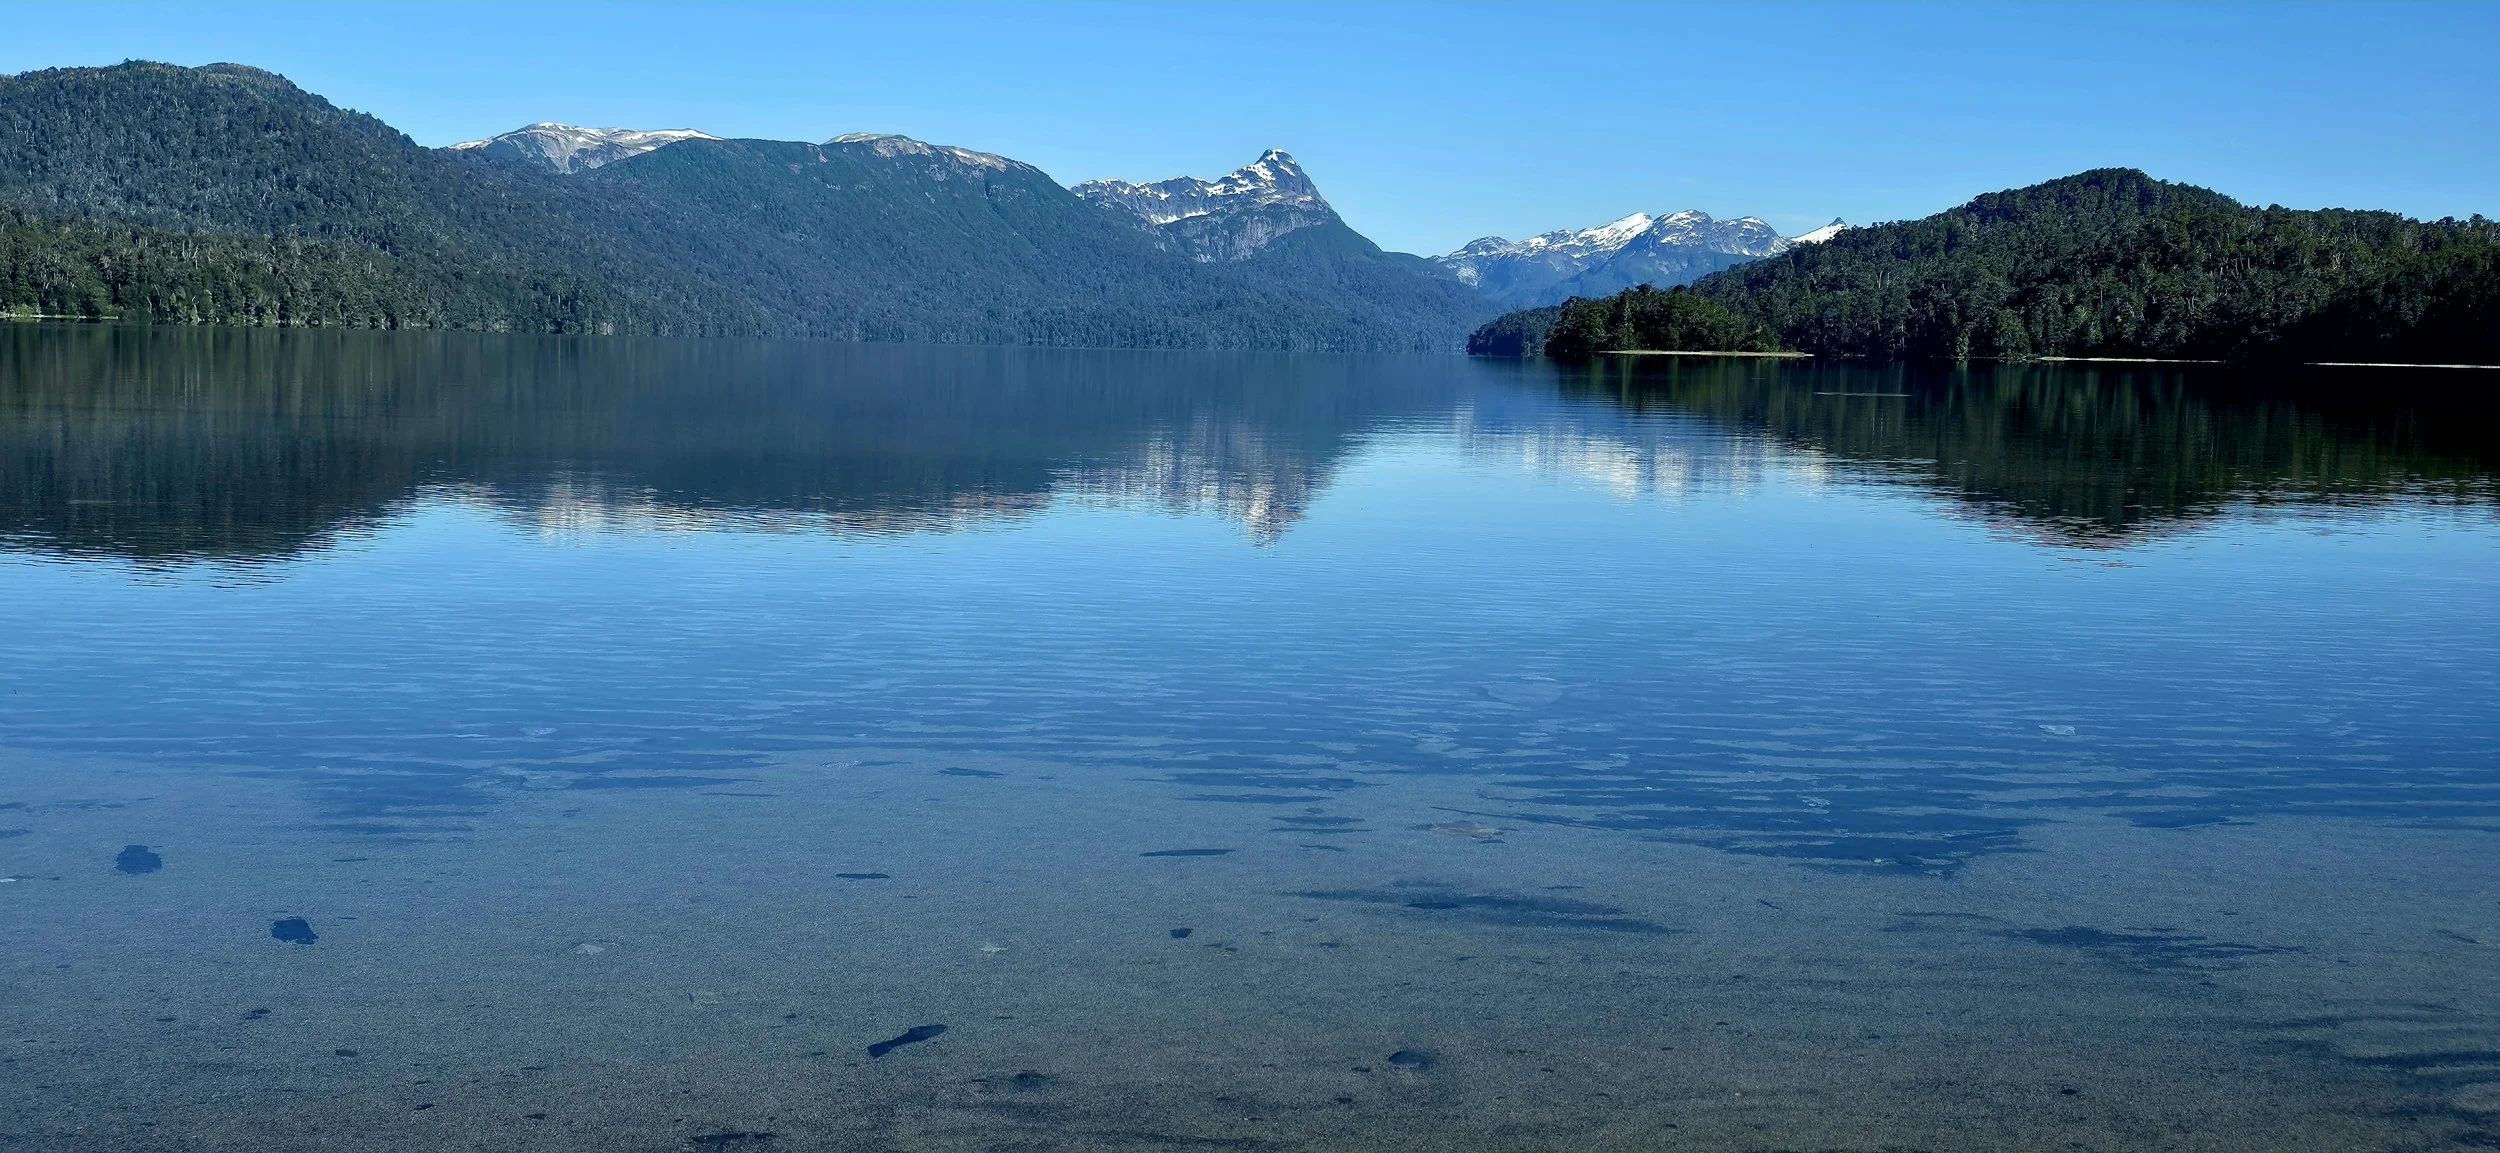
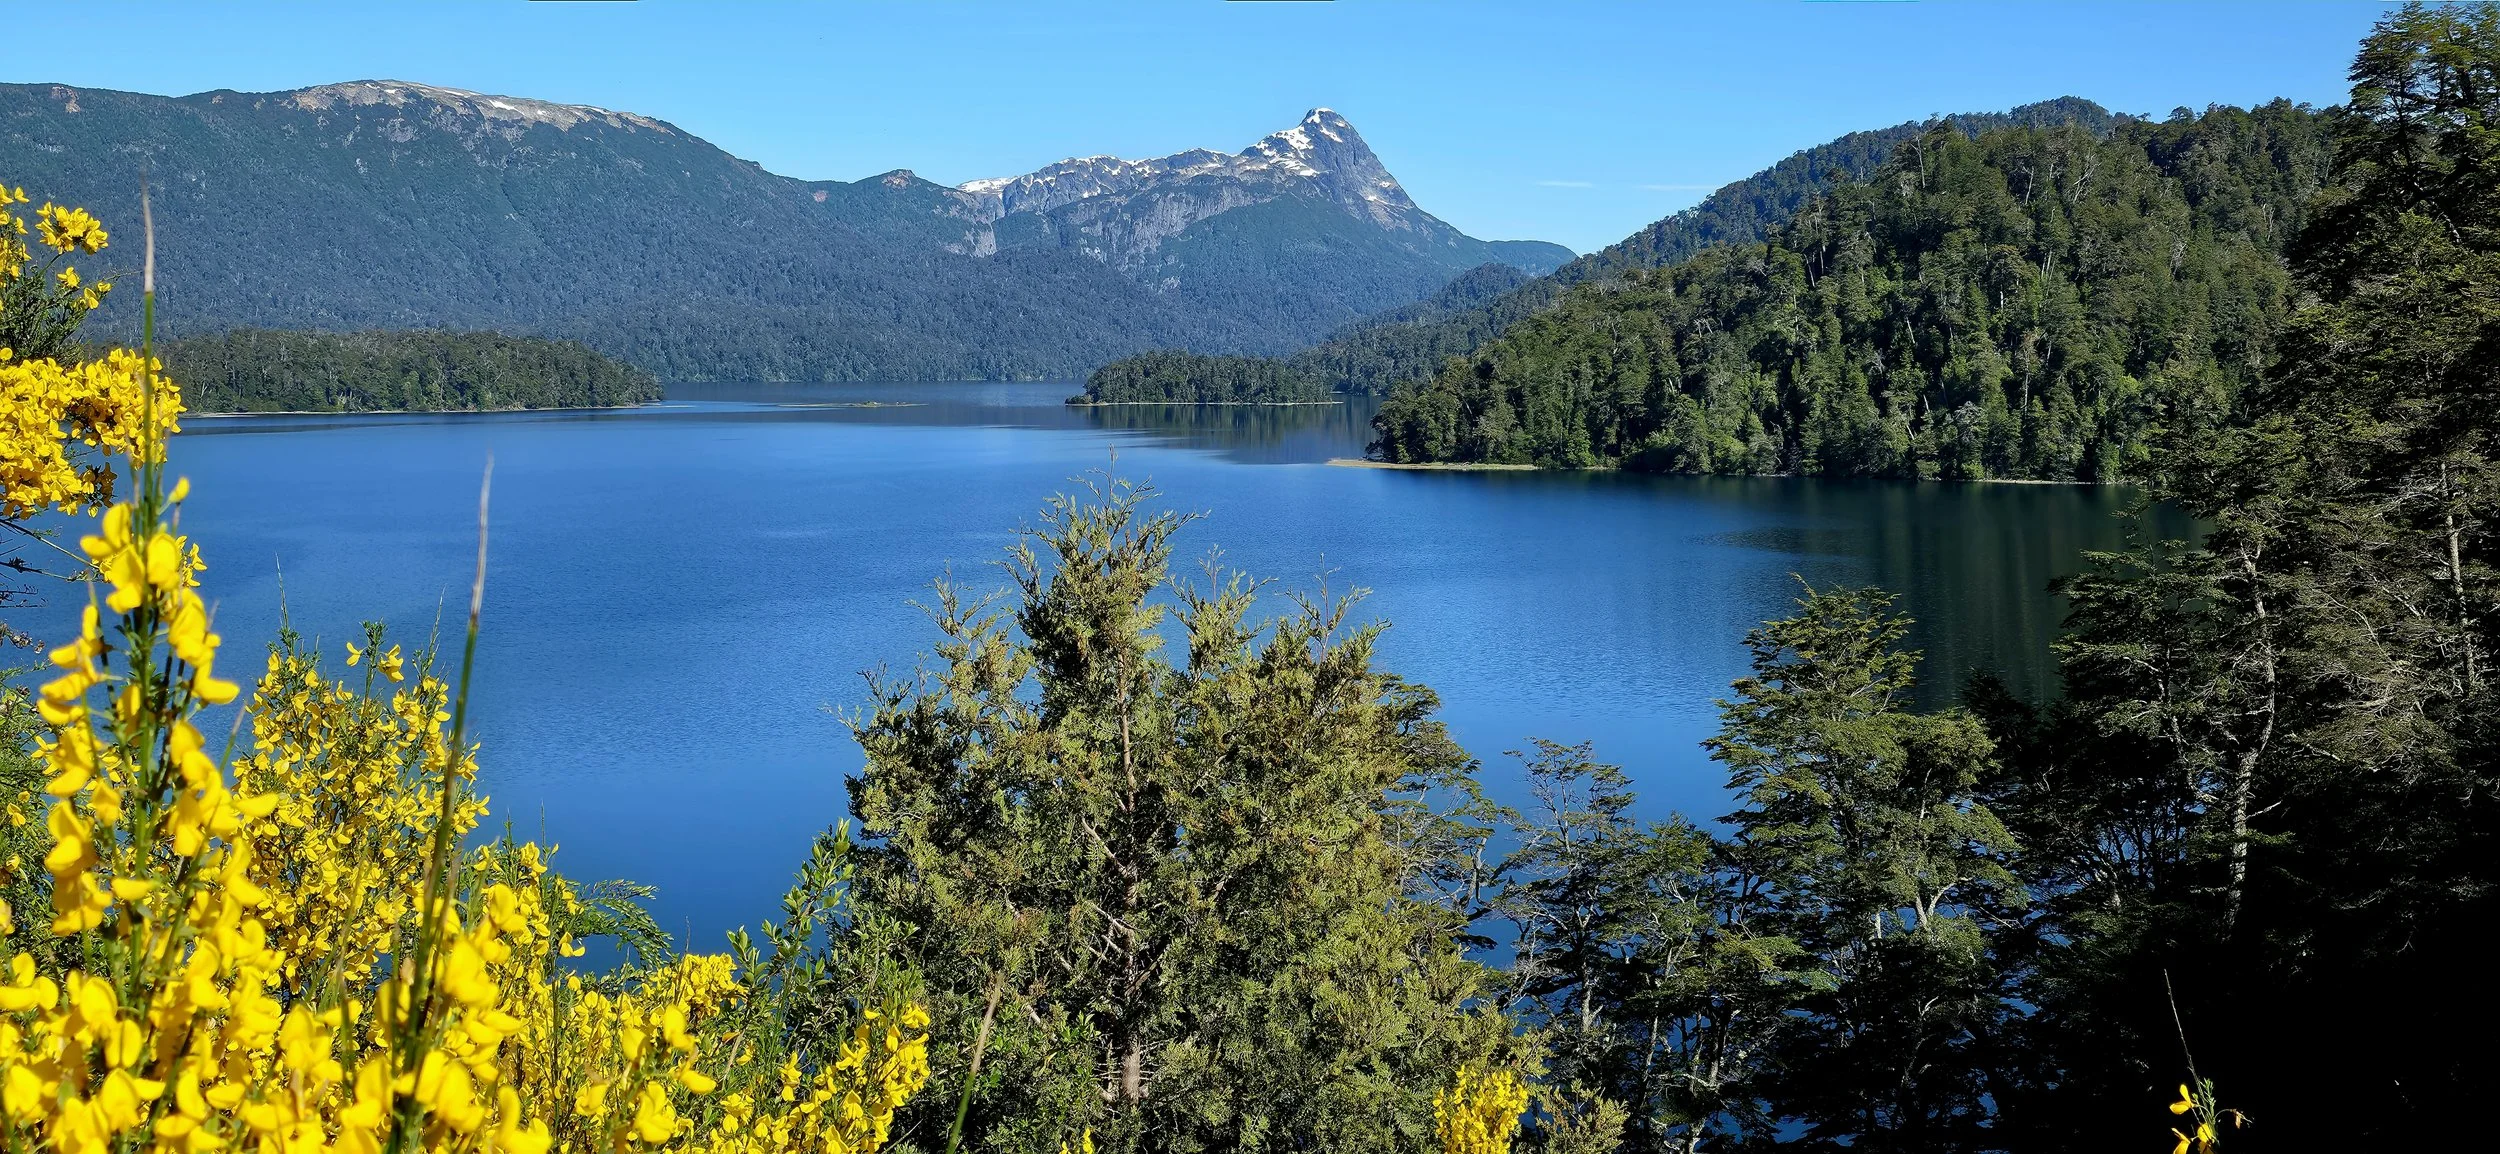
The Seven Lakes is a “must-do” road trip and much prettier in the early morning when there are few cars on the road and while the sun is rising. It was much more crowded watching the oncoming traffic on the path to San Martin while returning to Bariloche. My overall impression of the route was that it didn’t live up to the hype, but that’s also likely because I’m a bit spoiled with all of my travels. The lakes and mountains were very nice but didn’t seem to compare to Bariloche. That said, I still think most people will really enjoy the drive, but I created this blog to provide my honest feedback so there you have it. Lake Espejo, the second of the seven lakes, arrives quickly and is considered the most scenic lake for its’ crystal-clear waters that reflect the surrounding Andes. There are several viewpoints, however I suggest turning off when you see a narrow road running to the beach (left side). As a heads up, you might wonder how it’s the correct road, but that means you’re on the correct road! This photo was taken from the beach just before approaching the water. Beware of the mama birds and their babies because the mamas can be very protective if you get too close!
This next photo above is also Lake Espejo, but taken from the official mirador along the main road. There is a small parking lot off to the right and the lookout point is across the street.
Another highlight along the road trip was the long stretch of road before reaching Lake Escondido, a super cool, serene run through the forests of Nahuel Huapi National Park. These particular photos mysteriously got deleted so my apologies. As a heads up, most of the lakes only require a quick stop which will keep you on a good pace so you can spend more time in San Martin de los Andes.
San Martín de los Andes is the northernmost town and surrounded by mountains, forest and another lake called Lake Lácar.
San Martín is a hub for outdoor adventure, with Lanín National Park offering warmer weather hiking, as well as kayaking and boating options on the lake, and the ski fields of nearby Cerro Chapelco drawing snow sports enthusiasts in the wintertime.
If your time is limited, just know that Villa La Angostura is nicer and has more to offer than San Martin.
The photo above was taken from Mirador el Arbol off the trail that runs along the side of the road, Federico Gesiuff. The walk to the mirador takes ~15 minutes from the trailhead and a moderate incline, but nothing too challenging for most people. Many visitors actually walk much farther to Mirador Bandurrias, but I had already seen my share of miradors, so I chose to skip it.
With that, this concludes the blog and as always, I hope it’s provided more honest and real guidance than many other resources on the web. Feel free to contact me with any questions or concerns and I’ll do my best to respond in a timely manner. Don’t forget to follow me on Instagram and subscribe to the newsletter if you haven’t already. I appreciate any kind of support!